
Twister Block Tutorial – Quilt Pattern is a creative and satisfying quilting technique that transforms simple fabric squares into dynamic pinwheel-style designs with movement and depth. If you have ever looked at a quilt block that seems to spin right off the surface, chances are you were admiring a beautifully constructed Twister Block. This pattern is loved by beginners and experienced quilters alike because it combines precision, creativity, and a touch of quilting magic.
In this comprehensive guide, you will learn everything you need to know about the Twister Block Tutorial – Quilt Pattern, including what makes the design unique, how the cutting method works, which tools you need, and how to assemble your quilt with confidence. Whether you are creating a full-sized quilt, a table runner, or a wall hanging, this technique offers endless possibilities for color play and layout variations.
Throughout this article, we will explore the essential concepts behind the Twister Block, explain key quilting terms, and provide practical tips for achieving clean lines and sharp points. By the end, you will feel prepared and inspired to start your own Twister-inspired project while keeping your quilting process organized and enjoyable.
1. Understanding the Twister Block and Its Unique Construction
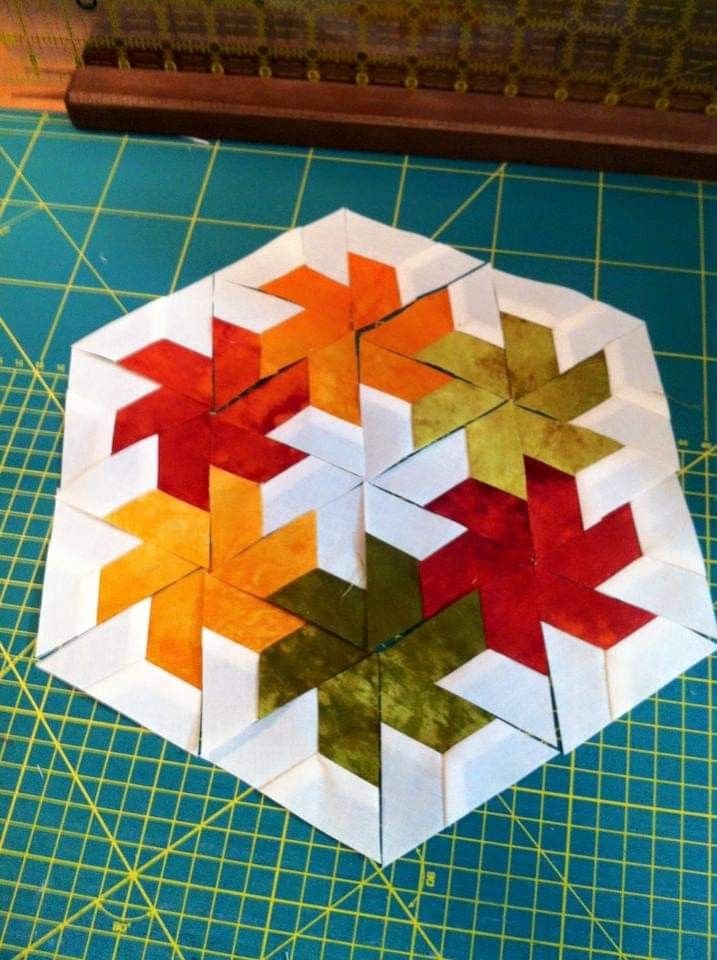
The Twister Block is a quilt block created by first sewing together a grid of squares and then using a specialized ruler to cut new shapes from the intersection points. Unlike traditional quilt blocks that are pieced in their final shape, this method transforms a simple patchwork base into a dynamic spinning design.
At its core, the Twister Block Tutorial – Quilt Pattern relies on careful alignment. After stitching squares together in rows and columns, the quilter places a twister ruler at each seam intersection. This ruler guides the cutting lines, ensuring the resulting shapes form a consistent pinwheel effect.
One of the most fascinating aspects of the Twister Block is how the design emerges after cutting. What begins as a straightforward grid of fabric squares becomes a set of angled segments that, once sewn together again, create the illusion of rotation.
The technique works beautifully with high-contrast fabrics, as the spinning effect becomes more pronounced when light and dark values alternate. However, soft gradients and coordinated color palettes can also produce stunning results with a more subtle movement.
In quilting terminology, this method is sometimes described as a “cut-and-resew” technique. Instead of cutting individual shapes first, you assemble the patchwork base and then recut it into new units. This makes the Twister Block Tutorial – Quilt Pattern both efficient and visually impressive.
Understanding this construction process is the first step toward mastering the design. When you grasp how the seams and intersections guide the cuts, the entire technique feels less intimidating and far more exciting.
2. Essential Tools and Materials for the Twister Block Tutorial – Quilt Pattern
To successfully complete the Twister Block Tutorial – Quilt Pattern, you need a few key quilting tools. The most important item is the twister ruler, which is specifically designed with markings that align perfectly over seam intersections.
A reliable rotary cutter is essential for achieving clean, precise cuts. Sharp blades ensure smooth fabric edges and reduce fraying, which is especially important when working with multiple layers.
You will also need a self-healing cutting mat. This protects your work surface and provides measurement grids that help maintain accuracy. Precision is critical in the Twister Block, as even small misalignments can affect the final layout.
High-quality cotton quilting fabric is highly recommended. Cotton is stable, easy to press, and holds its shape well after cutting and resewing. Prewashing your fabric is optional but can prevent future shrinkage.
Thread choice matters too. A neutral cotton thread often works best because it blends with various fabric colors. Consistent tension on your sewing machine ensures that seams lie flat and intersections remain sharp.
Finally, do not underestimate the importance of a good iron and pressing technique. Pressing seams carefully—rather than simply ironing back and forth—helps maintain accuracy throughout the project. In the Twister Block Tutorial – Quilt Pattern, pressing can make the difference between crisp points and uneven edges.
3. Step-by-Step Process to Create the Twister Block Quilt Pattern
The first step in the Twister Block Tutorial – Quilt Pattern is selecting your fabric squares. Most patterns recommend cutting uniform squares, often 5 inches or larger, depending on your desired finished block size.
Next, sew the squares together into rows using a consistent seam allowance, typically a quarter inch. Accuracy here is essential because the seam intersections will guide your future cuts.
After joining the rows, press the seams carefully. Many quilters prefer pressing seams in alternating directions so that intersections nest together smoothly. This technique improves alignment when resewing the cut pieces.
Now comes the transformative moment. Place the twister ruler over each seam intersection according to the manufacturer’s markings. Carefully cut around the ruler with your rotary cutter. Each cut produces a new angled shape.
Once all intersections are cut, rearrange the new pieces into their spinning configuration. This is when the magic of the Twister Block truly appears. The shapes rotate visually, forming the iconic pinwheel look.
Finally, sew the new pieces together row by row. Press again and admire your work. The Twister Block Tutorial – Quilt Pattern rewards patience and precision with a stunning geometric result that looks far more complex than it actually is.
4. Design Variations, Layout Ideas, and Finishing Tips
One of the joys of the Twister Block Tutorial – Quilt Pattern is its versatility. You can experiment with bold color contrasts to create dramatic movement or use coordinated prints for a softer aesthetic.
Layout variations offer even more creative freedom. Try arranging your Twister Blocks in a single-color background for a modern quilt design, or alternate them with solid squares for a more traditional look.
Borders can enhance the spinning effect. A contrasting border frames the quilt and highlights the motion within the blocks. Sashing between blocks can also add structure and visual breathing space.
When it comes to quilting the finished top, consider simple straight-line quilting to emphasize the geometric design. Alternatively, free-motion quilting can add texture without overpowering the spinning motif.
Binding choice plays a subtle but important role. A darker binding can frame the quilt boldly, while a lighter binding blends seamlessly. In any case, accuracy in trimming and squaring up ensures clean edges.
Above all, take your time during assembly. The Twister Block Tutorial – Quilt Pattern is forgiving, but attention to detail will elevate your final project from good to exceptional.
FAQ About Twister Block Tutorial – Quilt Pattern
What is a Twister Block in quilting?
A Twister Block is a quilt block created by sewing together fabric squares and then cutting them with a specialized ruler to form a spinning pinwheel design.
Is the Twister Block suitable for beginners?
Yes, the Twister Block Tutorial – Quilt Pattern is beginner-friendly if you are comfortable with basic sewing, accurate seam allowances, and rotary cutting techniques.
Do I need a special ruler?
Yes, a twister ruler is essential for achieving the correct angles and proportions. It ensures consistency and accuracy throughout the cutting process.
What fabric works best for this pattern?
High-quality cotton quilting fabric is ideal because it holds its shape well and presses cleanly, making the cutting and resewing stages easier.
Can I make projects other than quilts?
Absolutely. The Twister Block Tutorial – Quilt Pattern can be used for table runners, pillow covers, wall hangings, and even tote bags.
How do I prevent my points from being cut off?
Maintain a consistent seam allowance and align the ruler precisely at seam intersections. Careful pressing and accurate cutting are key to preserving sharp points.
Twister Block Tutorial – Quilt Pattern
The Twister Block Tutorial – Quilt Pattern offers a creative and satisfying way to transform simple squares into a dynamic, spinning quilt design. By understanding the construction method, using the right tools, and practicing precise cutting and pressing, you can achieve professional-looking results with confidence.
Throughout this guide, we explored the structure of the Twister Block, explained essential tools, walked through the step-by-step process, and discussed layout and finishing ideas. With patience and attention to detail, this technique becomes an enjoyable and versatile addition to your quilting skills.
Now that you understand the full process behind the Twister Block Tutorial – Quilt Pattern, you are ready to select your fabrics, prepare your workspace, and begin creating a quilt that truly appears to move. Happy quilting!