
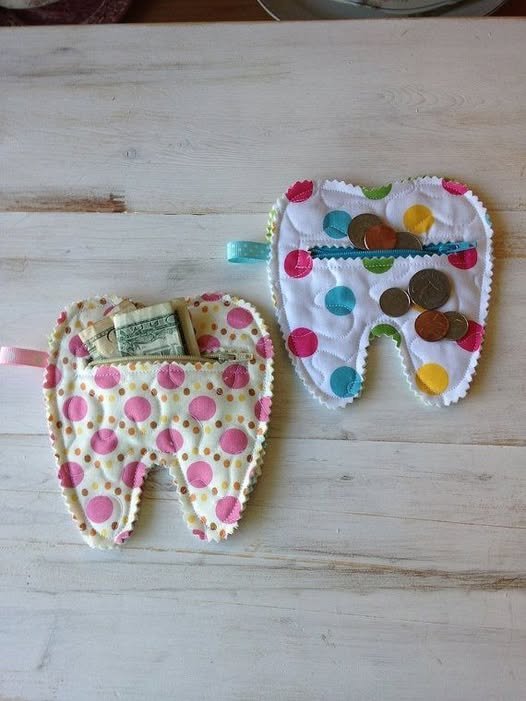
The Tooth Fairy Pocket Pouch – Quilt Pattern is a charming and creative project that brings together functionality, sentiment, and quilting artistry. Imagine your little one placing their tiny tooth into a special handmade pouch and waking up to find a surprise from the tooth fairy. This project combines the joy of quilting with the magical memories of childhood, making it a keepsake that will be treasured for years.
Creating a Tooth Fairy Pocket Pouch – Quilt Pattern is not just about sewing; it’s about crafting something that carries emotional value. Every stitch, fabric choice, and decorative detail tells a story. Whether you’re a beginner quilter or a seasoned sewing enthusiast, this project offers an approachable yet rewarding experience. The best part is that you can fully personalize it — from the colors and fabrics to the embroidered designs — making each pouch unique.
By following this guide, you’ll learn how to design, cut, assemble, and finish your very own Tooth Fairy Pocket Pouch – Quilt Pattern. We’ll cover fabric selection, piecing techniques, and embellishment ideas to help your project shine. Whether you’re making it for your own child, a grandchild, or as a thoughtful handmade gift, this tutorial will inspire you to create something magical.
1. Gathering Materials and Choosing Fabrics
Before you start quilting your Tooth Fairy Pocket Pouch – Quilt Pattern, gather all the necessary materials. You’ll need quilting cotton or a similar sturdy fabric for the base, a soft lining fabric, batting for structure, and some colorful scraps for decorative touches. Selecting high-quality fabric ensures your pouch will last through multiple “tooth fairy” visits.
Consider a theme when choosing fabrics. Pastel shades, whimsical prints, or even glittery accents can make the pouch feel magical. If you’re making it for a boy, think about fun patterns like stars, dinosaurs, or cars. For a girl, floral prints, hearts, or fairy motifs work beautifully. The fabric you choose will set the tone of the final design.
Don’t forget the thread! Matching or contrasting thread can change the entire look of your project. A metallic thread can add a little sparkle, perfect for a fairy-themed item. Additionally, you might want ribbon, buttons, or small appliqué shapes for embellishments.
You’ll also need basic quilting tools: a rotary cutter, quilting ruler, cutting mat, pins or clips, an iron, and your sewing machine. Having the right tools makes your work faster and more precise.
If you prefer a more traditional look, choose fabrics that coordinate in a classic quilting style. Think of tiny floral calicos, patchwork patterns, and soft pastels. Modern quilters may opt for bold solids or geometric prints. The beauty of the Tooth Fairy Pocket Pouch – Quilt Pattern is that it can adapt to any style.
Pre-washing and ironing your fabric before cutting will prevent shrinking and ensure crisp, clean lines when you assemble your pouch. This step is especially important for projects meant to last for years.
2. Cutting and Preparing Your Quilt Pieces
For the Tooth Fairy Pocket Pouch – Quilt Pattern, start by cutting the main body of the pouch. A size of about 6 inches wide by 8 inches tall works well, but you can adjust it to fit your preference. Cut two rectangles of outer fabric, two rectangles of lining, and two pieces of batting.
The pocket portion can be smaller — about 4 inches high — and can feature a decorative quilting block or appliqué. This is your chance to get creative. Perhaps add the child’s initial, a tooth-shaped appliqué, or even a small embroidered fairy wand.
Once your pieces are cut, layer each outer fabric rectangle with a piece of batting. This will give your pouch structure and a soft feel. Use pins or fabric clips to hold them together.
Quilting the outer panels adds both beauty and durability. You can use simple straight-line quilting, free-motion quilting, or even hand-stitching for a personal touch. Keep in mind that the quilting design should complement the small size of the project without overwhelming it.
If you want a truly unique Tooth Fairy Pocket Pouch – Quilt Pattern, mix and match fabrics for the outer panels. A patchwork front and a solid back can give the pouch visual interest. Scraps from other quilting projects are perfect for this.
Finally, prepare the pocket piece by hemming the top edge. A folded hem of about ¼ inch, pressed and stitched, will keep the pocket neat and ready to attach later.
3. Assembling the Tooth Fairy Pocket Pouch
To assemble your Tooth Fairy Pocket Pouch – Quilt Pattern, begin by attaching the pocket to the front outer panel. Align the bottom edges and sides, and baste the pocket in place. You can add decorative stitching along the top of the pocket for both strength and style.
Next, place the two outer panels right sides together and sew along the sides and bottom, leaving the top open. Repeat the same process for the lining pieces, but leave a 2-inch opening along the bottom seam — this is where you’ll turn the pouch right-side out later.
Slide the outer pouch inside the lining, right sides facing each other. Align the raw edges at the top and pin them securely. Stitch all the way around the top edge.
Turn the pouch right-side out by pulling it through the opening in the lining. Push out all the corners gently to keep them crisp. Then sew the opening in the lining closed with a small, neat stitch.
Press the pouch carefully, making sure the top edge is smooth. Topstitching around the upper edge will help the pouch keep its shape and add a professional finish.
At this stage, you can add a ribbon loop or small handle so the pouch can hang on a doorknob or bedpost. This detail not only looks cute but also makes it easy for the tooth fairy to find.
4. Adding Decorative Touches and Personalization
The magic of the Tooth Fairy Pocket Pouch – Quilt Pattern lies in the little details. Personalization makes it special and memorable. Consider adding the child’s name using fabric paint, embroidery, or iron-on letters.
You can also sew on small appliqués like stars, hearts, or a tiny crown to enhance the fairy-tale theme. Metallic threads, sequins, or beads can be used sparingly to add sparkle without making the pouch too heavy.
If you enjoy hand embroidery, a small stitched tooth fairy or wand can make the pouch truly one-of-a-kind. Choose colors that complement your fabrics and give the design a whimsical charm.
Another fun option is to quilt the child’s birth date or the year the pouch was made onto the back. This transforms the pouch into a cherished keepsake that can be passed down or kept as a memory.
Think about how the pouch will be used. If it will hang, make sure decorations don’t get in the way of functionality. If it will be placed under a pillow, keep embellishments soft and flat for comfort.
Finally, don’t forget to give your finished Tooth Fairy Pocket Pouch – Quilt Pattern a gentle press before presenting it. Presentation matters, especially for a magical moment in a child’s life.
FAQ – Tooth Fairy Pocket Pouch – Quilt Pattern
1. What size should the Tooth Fairy Pocket Pouch be?
A common size is about 6 x 8 inches, but you can adjust based on personal preference or available fabric.
2. Can beginners make this quilt pattern?
Yes! The Tooth Fairy Pocket Pouch – Quilt Pattern is beginner-friendly, with simple shapes and easy assembly steps.
3. What fabrics work best for this project?
Quilting cotton is ideal for structure, but you can also use flannel for a softer feel. Mixing prints and solids adds charm.
4. Do I need a sewing machine?
A sewing machine speeds up the process, but this small project can be sewn by hand with patience.
5. How can I personalize the pouch?
Add embroidery, appliqué, or fabric paint to include the child’s name, favorite colors, or themed designs.
6. Is batting necessary?
Yes, batting gives the pouch shape and a quilted feel, but you can use felt or fleece as an alternative.
The Tooth Fairy Pocket Pouch – Quilt Pattern is more than just a sewing project — it’s a way to create magical moments and lasting memories. With the right fabrics, careful stitching, and a touch of personalization, you can make a beautiful keepsake that a child will treasure. Whether you’re making it for your own family or as a thoughtful gift, this project blends creativity with sentiment in the best way. I’d love to hear your thoughts and suggestions on this tutorial, so feel free to share your honest opinion and ideas for future projects.