
Quilt Cup Blocks – Pattern is a charming and creative quilting concept that has captured the hearts of crafters who love combining traditional techniques with a fresh, playful design. This pattern stands out for its versatility, allowing quilters to explore different fabrics, colors, and layouts while creating a cohesive and visually appealing piece. Whether you are a beginner or an experienced quilter, understanding how to work with this pattern can elevate your quilting projects to a whole new level.
One of the most appealing aspects of the Quilt Cup Blocks – Pattern is how it blends simplicity with elegance. The “cup” shape can be interpreted in multiple ways, making it adaptable for seasonal quilts, kitchen-themed projects, or even decorative wall hangings. This flexibility makes it a favorite among quilting enthusiasts who enjoy experimenting with design while still following a structured approach. The pattern encourages creativity without overwhelming the maker.
In addition, the Quilt Cup Blocks – Pattern offers a wonderful opportunity to improve precision and technique. From cutting fabric pieces accurately to aligning seams perfectly, this pattern helps build essential quilting skills. It also promotes mindful crafting, as each block requires attention to detail and thoughtful assembly. By mastering this pattern, you can confidently move on to more complex quilting designs in the future.
Understanding the Basics of Quilt Cup Blocks – Pattern
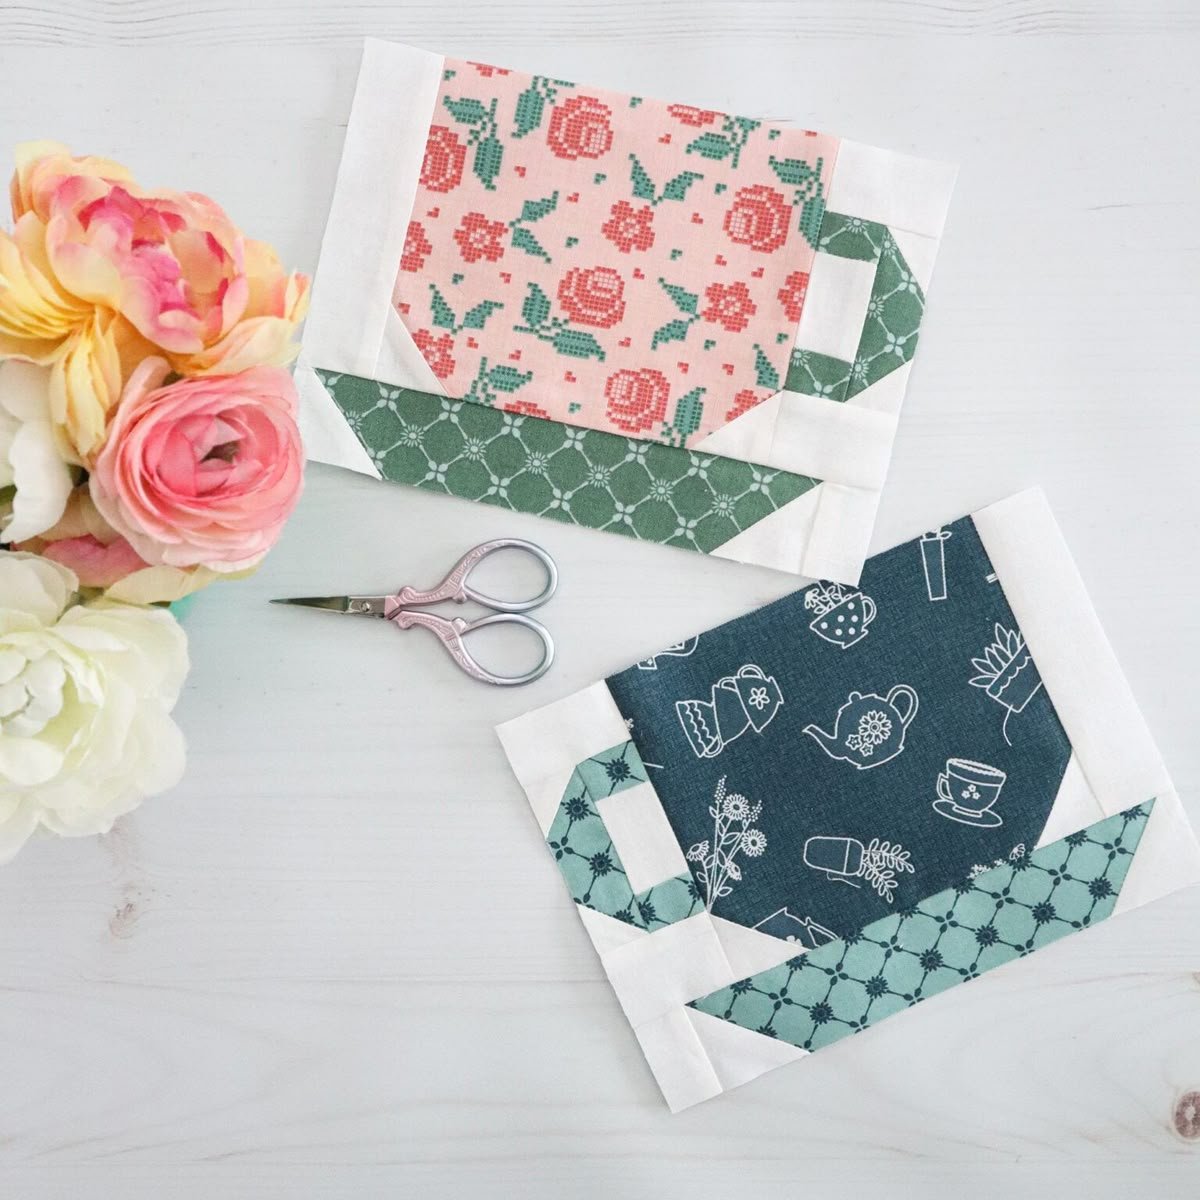
The foundation of the Quilt Cup Blocks – Pattern begins with understanding its structure. Typically, each block is composed of geometric shapes arranged to resemble a cup or container. These shapes can include squares, rectangles, and sometimes curved pieces, depending on the variation of the pattern you choose.
When starting out, it is important to select fabrics that contrast well with each other. This helps highlight the “cup” design within each block. Light and dark combinations work particularly well, as they create depth and make the pattern more visually striking. Choosing the right fabric is a crucial first step toward achieving a polished result.
Another key element is accurate cutting. Precision ensures that all pieces fit together seamlessly, reducing frustration during the assembly process. Using a rotary cutter, quilting ruler, and cutting mat can greatly improve your accuracy and efficiency.
Sewing techniques also play a vital role in this pattern. Consistent seam allowances are essential to maintain uniform block sizes. Even small inconsistencies can affect the overall layout of your quilt, so taking your time during this stage is highly recommended.
Pressing seams properly is another detail that should not be overlooked. Pressing rather than ironing helps prevent fabric distortion and keeps your blocks crisp and flat. This step contributes significantly to the final appearance of your quilt.
Finally, understanding the layout options for the Quilt Cup Blocks – Pattern allows you to customize your project. You can arrange blocks in straight rows, alternate their orientation, or combine them with other patterns for a more dynamic design.
Choosing Fabrics and Colors for Quilt Cup Blocks – Pattern
Selecting the right fabrics is one of the most enjoyable parts of working with the Quilt Cup Blocks – Pattern. The design lends itself well to a variety of styles, from modern minimalism to vintage-inspired looks. Your fabric choices will ultimately define the character of your quilt.
For a cohesive appearance, consider using a consistent color palette throughout your project. This does not mean limiting yourself to just a few colors, but rather ensuring that all chosen fabrics complement each other. Harmonious color combinations create a balanced and pleasing visual effect.
If you prefer a bold and eye-catching quilt, opt for high-contrast fabrics. Pairing bright colors with neutral tones can make each cup block stand out distinctly. This approach works especially well for statement pieces or decorative quilts.
Patterned fabrics can also add depth and interest to your quilt. Floral prints, polka dots, and geometric designs can bring personality to each block. However, it is important to balance patterned fabrics with solids to avoid overwhelming the overall design.
Texture is another factor to consider. Mixing different fabric textures, such as cotton and linen, can enhance the tactile quality of your quilt. This adds an extra layer of sophistication and makes the finished piece more unique.
Lastly, always prewash your fabrics before starting your project. This helps prevent shrinking and color bleeding, ensuring that your Quilt Cup Blocks – Pattern quilt maintains its beauty over time.
Step-by-Step Assembly of Quilt Cup Blocks – Pattern
Creating a quilt using the Quilt Cup Blocks – Pattern involves a series of carefully executed steps. While the process may seem complex at first, breaking it down into manageable stages makes it much more approachable.
Begin by cutting all your fabric pieces according to the pattern specifications. Organizing these pieces beforehand can save time and reduce confusion during assembly. Labeling each piece is especially helpful for beginners.
Next, start piecing together the smaller sections of each block. This often involves sewing individual shapes into rows or segments. Working in stages allows you to focus on accuracy and ensures that each component is properly aligned.
Once the smaller sections are complete, join them to form the full block. Pay close attention to seam alignment, as this will affect the overall look of the design. Taking your time during this step is key to achieving professional results.
After completing all the blocks, arrange them on a flat surface to determine the final layout. This is your opportunity to experiment with different arrangements and find the most visually appealing configuration.
Sew the blocks together row by row, then join the rows to create the quilt top. Maintaining consistent seam allowances throughout this process is crucial for a uniform finish.
Finally, add batting and backing to your quilt, then quilt and bind the edges. This completes your Quilt Cup Blocks – Pattern project and transforms your work into a functional and decorative piece.
Tips for Enhancing Your Quilt Cup Blocks – Pattern Projects
Improving your quilting skills while working on the Quilt Cup Blocks – Pattern can be both rewarding and enjoyable. Small adjustments and thoughtful techniques can make a significant difference in the final outcome.
One effective tip is to chain piece your blocks. This method involves sewing multiple pieces in a continuous sequence without cutting the thread in between. It saves time and increases efficiency, especially for larger projects.
Another helpful practice is to use a design wall. This allows you to visualize your quilt layout and make adjustments before sewing everything together. Seeing the blocks arranged vertically can provide a better perspective.
Experimenting with sashing and borders can also enhance your quilt. Adding strips of fabric between blocks or around the edges can frame your design and give it a more finished look.
Consider incorporating quilting motifs that complement the cup theme. Simple patterns like curves or loops can add texture without overpowering the design. This adds an artistic touch to your quilt.
Keeping your workspace organized is another important factor. A tidy environment helps you stay focused and reduces the likelihood of mistakes. It also makes the quilting process more enjoyable.
Lastly, don’t be afraid to personalize your quilt. Adding unique details, such as embroidery or appliqué, can make your Quilt Cup Blocks – Pattern project truly one of a kind.
Quilt Cup Blocks – Pattern
What is the Quilt Cup Blocks – Pattern best used for?
The Quilt Cup Blocks – Pattern is ideal for decorative quilts, kitchen-themed projects, and gifts. Its versatile design makes it suitable for various applications.
Is the Quilt Cup Blocks – Pattern beginner-friendly?
Yes, many variations of this pattern are suitable for beginners. Starting with simple designs can help build confidence and skills.
What type of fabric works best for this pattern?
Cotton fabric is the most commonly used due to its durability and ease of handling. However, other fabrics can be used for added texture.
How long does it take to complete a quilt using this pattern?
The time required depends on the size of the quilt and your experience level. Smaller projects can be completed in a few days, while larger quilts may take several weeks.
Can I customize the Quilt Cup Blocks – Pattern?
Absolutely. You can experiment with colors, layouts, and additional design elements to create a unique quilt.
Do I need special tools for this pattern?
Basic quilting tools such as a rotary cutter, ruler, and sewing machine are sufficient. Additional tools can enhance precision but are not mandatory.
The Quilt Cup Blocks – Pattern is a delightful and versatile quilting design that offers endless possibilities for creativity and skill development. Throughout this article, you learned about the basics of the pattern, how to choose fabrics and colors, step-by-step assembly techniques, and valuable tips to enhance your projects. By following these guidelines, you can confidently create beautiful quilts that showcase your craftsmanship.
Quilting is not just about making something functional—it’s about expressing creativity and enjoying the process. The Quilt Cup Blocks – Pattern provides the perfect balance of structure and flexibility, making it an excellent choice for quilters of all levels.
Now it’s your turn to bring this pattern to life. Try it out, experiment with your own ideas, and most importantly, have fun along the way. I’d love to hear your honest opinion—did this guide help you? Do you have suggestions or tips to share? Feel free to leave your thoughts and inspire others in the quilting community.