
The Owl Softies – Quilt Pattern is a delightful sewing project that combines the timeless art of quilting with the charm of handcrafted soft toys. These adorable owls are perfect for gifting to children, decorating your home, or even adding a whimsical touch to a nursery. Their soft, quilted texture makes them both cuddly and visually appealing, while the handmade aspect ensures each one is unique. Whether you are an experienced quilter or someone just starting out in the world of fabric crafts, this project offers the perfect balance between creativity and accessibility.
Making the Owl Softies – Quilt Pattern allows you to explore a variety of quilting techniques on a small scale. You can experiment with fabric combinations, textures, and patterns without committing to a large quilt. The process is fun and relaxing, and the end result is always rewarding. One of the greatest advantages of this project is its versatility—you can create owls in different sizes, colors, and styles, each with its own personality. It’s also a fantastic way to use up fabric scraps from previous quilting projects, turning them into something new and adorable.
From a creative standpoint, the Owl Softies – Quilt Pattern is the perfect blend of art and function. Not only are these owls charming as decorative pieces, but they are also soft enough to serve as huggable companions for little ones. In this guide, you’ll learn how to choose the best fabrics, cut and assemble the owl shapes, add quilted details, and finish them with eyes, beaks, and other embellishments. By the end, you’ll be ready to create your own collection of quilted owls that bring joy and coziness to any space.
1. Choosing Fabrics and Materials for Owl Softies
Selecting the right fabrics is the first step to creating your Owl Softies – Quilt Pattern. The fabric choice will determine the softness, durability, and overall appearance of the finished owl. Quilting cotton is a popular choice because it is easy to sew and comes in countless colors and patterns. For a more textured effect, you can mix in flannel, linen, or even minky fabric for the belly section.
When choosing colors, think about the purpose of your owl. Bright, cheerful colors work well for children’s toys, while muted, earthy tones create a more sophisticated, decorative look. You can also experiment with seasonal fabrics—autumn leaves for fall décor, pastel tones for spring, or festive prints for the holiday season.
In addition to fabric, you’ll need batting or fusible fleece to give the owl its quilted texture and soft feel. This layer adds depth to your stitches and ensures the toy feels plush and huggable. High-quality polyester stuffing or natural cotton fill will be used to shape the body.
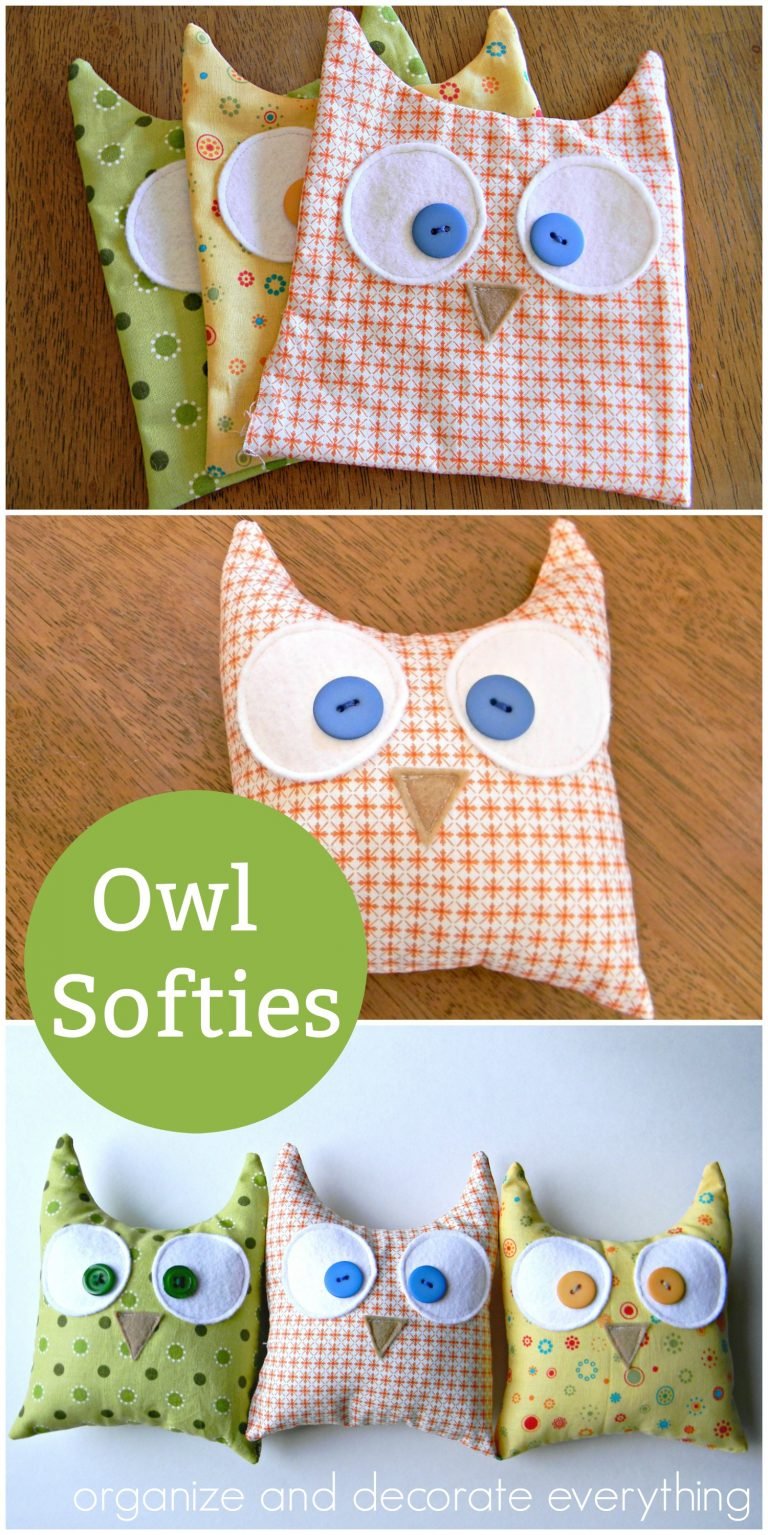
For the facial features, felt is an excellent material for creating the eyes and beak, as it does not fray and is easy to cut into precise shapes. Buttons can also be used for eyes, but they should be sewn securely if the owl is intended for a child to avoid any choking hazards.
Other essential tools include a rotary cutter, quilting ruler, sewing pins, matching thread, and a sewing machine. With all these materials in place, you’ll be ready to start your project on a solid foundation.
2. Cutting and Assembling the Owl Body
The next step in making your Owl Softies – Quilt Pattern is to cut out the pieces for the owl’s body and wings. Start by creating a paper template of the owl shape, which will help ensure both sides are symmetrical. You can design a rounded, cartoon-like owl or a taller, more realistic shape depending on your preference.
Once your templates are ready, cut the front and back pieces from your chosen fabric, remembering to also cut matching batting or fleece pieces for quilting. The wings and belly panel can be cut from contrasting fabrics to add visual interest. This is your chance to get creative with fabric combinations and patterns.
Pin the batting to the wrong side of your outer fabric pieces and baste them together. This will keep the layers from shifting during quilting. For the wings, you can either quilt them separately and attach them later or sew them directly onto the front panel for a more integrated look.
If you plan to add any decorative stitching, such as feather-like quilting lines, this is the stage to do it. These small quilting details not only enhance the look of your owl but also make the fabric layers more secure.
Once your panels are quilted and ready, begin assembling the body. Place the front and back pieces right sides together and sew around the edges, leaving a small opening at the bottom for turning and stuffing. Clip the curves to ensure a smooth shape when turned right side out.
With the body sewn and turned, your owl will start to take shape, and you’ll be ready to move on to the next stage—adding the features that will bring it to life.
3. Adding Eyes, Beak, and Decorative Details
One of the most enjoyable parts of making the Owl Softies – Quilt Pattern is adding the facial features. This is where your owl truly gains its personality and charm. Start with the eyes, which can be made from felt circles, embroidered stitches, or securely sewn buttons. Layering smaller felt circles over larger ones gives the eyes depth and character.
The beak can be cut from yellow, orange, or brown felt and sewn or appliquéd onto the face. You can position it close to the eyes for a cute, cartoonish look or lower on the face for a more realistic appearance.
If you want your owl to have a whimsical style, consider adding embellishments like embroidered eyelashes, patterned fabric patches, or even small bows. For a rustic or folk-art look, use visible hand stitching around the eyes and wings.
This is also the stage where you can quilt additional details onto the body, such as feather textures or decorative lines on the wings. These stitches can be done with contrasting thread for a bold effect or matching thread for subtle elegance.
Remember to secure all small pieces well, especially if the owl will be handled by children. Double-stitching and knotting the threads will ensure the features stay in place for years to come.
With the face and decorative details complete, your owl will already look adorable—but the final step will make it cuddly and ready for use.
4. Stuffing and Finishing Your Owl Softies
The last step in making the Owl Softies – Quilt Pattern is to stuff and close the owl. Use small handfuls of stuffing at a time to ensure even distribution. Start by filling the ears and wings before moving on to the body. This will help maintain the shape and avoid lumps.
If you want your owl to sit upright, you can add a small bag of plastic pellets or rice at the bottom before finishing the stuffing. This weight will keep the owl stable on shelves or beds.
Once you are satisfied with the amount of stuffing, sew the opening closed using a ladder stitch for an invisible finish. This hand-sewing technique hides the stitches, giving your owl a neat, professional appearance.
After closing, give your owl a gentle fluff to evenly spread the stuffing. Check all seams and features to ensure everything is secure. If desired, you can add a hanging loop to the top of the head so the owl can be displayed on a wall or door.
For gifting purposes, wrap the owl in tissue paper or place it in a decorative bag. A handmade quilted softie is a thoughtful, personal present that shows care and creativity.
Once complete, you’ll have a charming quilted owl that is ready to bring joy—whether it’s for you, a child, or a special friend.
FAQ – Owl Softies – Quilt Pattern
1. Is this project beginner-friendly?
Yes, the Owl Softies – Quilt Pattern is suitable for beginners, especially those with basic sewing skills. The small size makes it less intimidating than a full quilt.
2. What type of fabric works best?
Quilting cotton, flannel, and linen are great options. Mixing textures can make the owl more visually interesting.
3. Can I wash the finished owl?
Yes, if all materials are washable. Use gentle cycles and avoid high heat to keep the shape intact.
4. Do I need a sewing machine?
While it is possible to sew by hand, a sewing machine will speed up the process and give cleaner results.
5. How long does it take to make one owl?
Most people can complete one owl in a few hours, depending on the amount of quilting and decorative details.
6. Can I scale the pattern up or down?
Yes, resizing the template is easy, allowing you to create owls of different sizes for various purposes.
The Owl Softies – Quilt Pattern is a charming, versatile sewing project that combines the art of quilting with the fun of creating soft toys. From choosing fabrics to assembling the body, adding features, and finishing with careful stuffing, every step allows for creativity and personalization.
These quilted owls make wonderful gifts, delightful décor items, and cherished keepsakes. I hope this guide inspires you to make your own collection of softies—please share your honest opinions and suggestions so we can continue creating and improving together.