
The Friendship Star Quilt Block Tutorial – Quilt Pattern is one of the most beloved and timeless patchwork designs in the quilting world. With its simple yet symbolic arrangement, this quilt block represents friendship, unity, and the beauty of shared creativity. Whether you are a beginner quilter looking to practice your piecing skills or an experienced quilter searching for a classic design with deep meaning, this pattern is a perfect choice. Its charm lies not only in its straightforward construction but also in the message it carries, making it a wonderful project for both personal use and gifting.
In this guide, we will walk through everything you need to know about creating the Friendship Star Quilt Block Tutorial – Quilt Pattern from start to finish. You will discover the history of this block, learn how to cut and piece your fabric, explore color options, and find tips for sewing with accuracy. Each step is explained clearly so you can enjoy the process without feeling overwhelmed. By the end, you will have a beautiful quilt block that can stand alone as a wall hanging or become part of a larger quilt.
Quilters around the world have turned to this block not only for its beauty but also for its adaptability. The Friendship Star Quilt Block Tutorial – Quilt Pattern can be made in countless variations depending on fabric choice, layout, and color placement. Whether you prefer soft pastels, bold contrasts, or traditional reproductions, this block adapts seamlessly. It also provides an excellent opportunity to experiment with scrap fabric, making it economical and eco-friendly.
1. Understanding the Friendship Star Quilt BlocTHE BEST QUILT PATTERN
The Friendship Star Quilt Block Tutorial – Quilt Pattern has a fascinating history that makes it especially meaningful. Traditionally, this block symbolizes the bond of friendship. The star itself is created through the clever use of half-square triangles combined with simple squares, giving the block its distinct shape. This design was often used in quilts that were gifted to friends or members of the community as a token of love, kindness, and support.
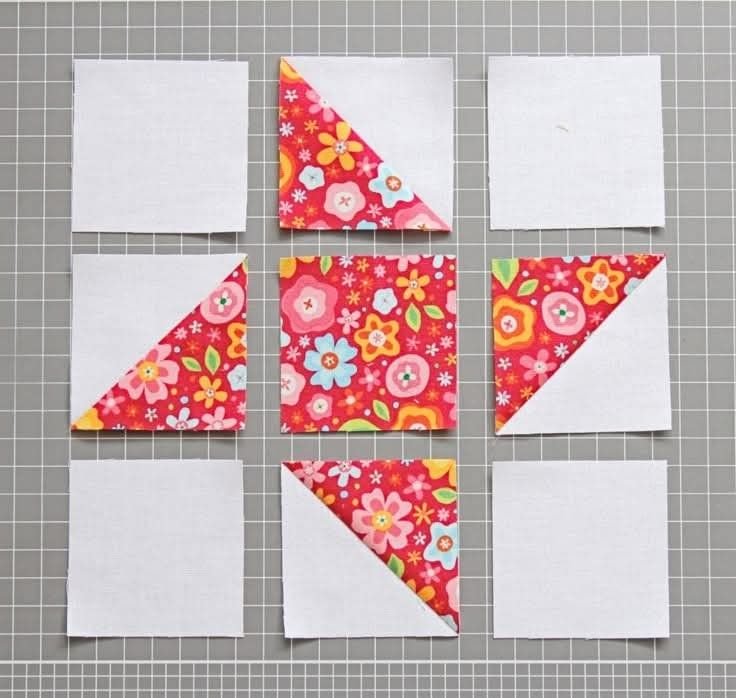
The block is built on a nine-patch structure, which makes it approachable for beginners. Each square within the nine-patch grid contributes to the final star motif, and by carefully selecting contrasting fabrics, you can highlight the star shape beautifully. Many quilters appreciate how this pattern balances simplicity and symbolism in such an elegant way.
Another wonderful feature of the Friendship Star Quilt Block Tutorial – Quilt Pattern is its versatility. While it can be made in the standard nine-inch or twelve-inch size, you can adjust the measurements to create blocks of different dimensions. This flexibility allows you to tailor your project to fit into a sampler quilt, a table runner, or even a full-size quilt.
For those who love tradition, the block is often made in two fabrics: one for the star points and one for the background. However, modern quilters frequently experiment with vibrant color palettes, using multiple fabrics for added visual interest. This adaptability ensures that each quilt has a personal touch.
Beyond aesthetics, this block also serves as excellent practice for improving piecing accuracy. Since it requires half-square triangles, quilters can sharpen their skills in trimming, pressing, and aligning seams. These skills will serve you well in future projects, making this tutorial both practical and rewarding.
Ultimately, the Friendship Star is more than just a block—it’s a symbol of connection. When you create one, you carry on a tradition of using quilts to share stories, emotions, and memories.
2. Materials and Cutting Instructions
Before starting the Friendship Star Quilt Block Tutorial – Quilt Pattern, it’s essential to gather the right materials. At a minimum, you will need fabric for the background, fabric for the star points, and fabric for the center square. Cotton fabric is the most common choice because of its durability and ease of use.
When selecting fabrics, consider choosing colors that contrast well. For example, a light background paired with a dark star creates a striking effect. On the other hand, a softer palette with low contrast produces a more subtle look. This freedom allows you to match your quilt block to your overall project theme or home décor.
For a standard twelve-inch block, you will need the following cuts: one 4.5-inch square for the center, four 4.5-inch background squares, and eight 4.5-inch squares for the half-square triangles (four in star fabric and four in background fabric). Always double-check your measurements to ensure accuracy before cutting.
It’s also helpful to use a rotary cutter, cutting mat, and quilting ruler. These tools will make your cuts precise, which is vital when assembling the half-square triangles. Accuracy at this stage will save you frustration later when you piece the block together.
If you prefer working with pre-cuts, such as charm squares or layer cakes, you can easily adapt them for this block. Charm squares, in particular, are a convenient size for creating half-square triangles with minimal waste.
Once your fabric is cut and ready, label the pieces if necessary. Staying organized during this stage makes the sewing process smoother, especially if you are making multiple blocks at once.
3. Step-by-Step Assembly of the Block
Now that your pieces are prepared, it’s time to assemble the Friendship Star Quilt Block Tutorial – Quilt Pattern. Begin by creating the half-square triangles. Pair one star fabric square with one background square, place them right sides together, and draw a diagonal line across the back. Sew a quarter inch away from each side of the line, then cut along the line to create two half-square triangles. Press the seams open or to the darker fabric.
Trim your half-square triangles to the correct size to ensure they fit perfectly into the nine-patch layout. This trimming step is crucial for keeping your block square and neat. Even a small misalignment can affect the final shape of the star.
Next, lay out your pieces in the nine-patch format. Place the center square in the middle, surround it with background squares, and arrange the half-square triangles to form the star points. This layout is what brings the star to life.
Once you are satisfied with the placement, begin sewing the rows together. Sew three squares at a time to create each row, and then press the seams. Alternate the direction of seam pressing for each row to allow the seams to nest together when you join the rows.
After assembling the rows, sew them together to complete the block. Take your time aligning the seams so that the points of your star are sharp and precise. The more attention you give to pressing and alignment, the more professional your finished block will look.
When finished, give your block a final press. At this stage, you can admire your completed Friendship Star Quilt Block Tutorial – Quilt Pattern and decide how it will be used—whether as part of a larger quilt, a pillow cover, or a wall hanging.
4. Creative Variations and Project Ideas
One of the joys of the Friendship Star Quilt Block Tutorial – Quilt Pattern is its adaptability to different projects and styles. You can keep it traditional or give it a modern twist depending on your preferences.
For a scrappy look, consider using a variety of fabrics for the star points. This approach is not only economical but also creates a lively and cheerful block. Scrappy quilts have a long tradition in quilting history, and the Friendship Star is a perfect candidate for this style.
If you love modern quilting, try playing with negative space. Use a solid background fabric and bold, vibrant colors for the stars. By spacing the blocks out with wide sashing, you can achieve a fresh and contemporary quilt design.
The block also lends itself well to themed projects. For example, you could use patriotic colors for a holiday quilt, or soft pastels for a baby quilt. The symbolism of friendship makes this block especially meaningful as a gift, whether for a close friend, a family member, or a special occasion.
Beyond quilts, this block can be incorporated into smaller items such as tote bags, placemats, or cushion covers. These projects are quick to complete and make wonderful handmade gifts.
For quilters who enjoy experimenting, try enlarging the block for a bold statement piece or shrinking it to create miniature blocks. The possibilities are endless, and each variation brings out a different side of the pattern.
By exploring these creative options, you can keep the Friendship Star Quilt Block Tutorial – Quilt Pattern fresh and exciting, no matter how many times you make it.
FAQ about the Friendship Star Quilt Block Tutorial – Quilt Pattern
What is the Friendship Star quilt block?
It is a traditional quilt block built on a nine-patch grid, featuring a central square and star points made from half-square triangles.
Is the Friendship Star quilt block beginner-friendly?
Yes, it is excellent for beginners because it uses simple shapes like squares and half-square triangles, which help build foundational quilting skills.
What size should I cut my fabric for this block?
For a twelve-inch block, you will need one 4.5-inch center square, four 4.5-inch background squares, and eight 4.5-inch squares for the half-square triangles.
Can I make the Friendship Star block in different sizes?
Absolutely. You can scale the block up or down by adjusting the measurements. Many quilters enjoy making smaller or larger versions for different projects.
What fabrics work best for this quilt block?
Cotton is recommended for its durability and ease of use. Choose contrasting fabrics to highlight the star shape effectively.
What projects can I make with the Friendship Star block?
You can use it in full quilts, table runners, pillows, wall hangings, tote bags, and more. Its versatile design makes it suitable for both large and small projects.
The Friendship Star Quilt Block Tutorial – Quilt Pattern is a timeless and meaningful design that combines simplicity with symbolism. From understanding its history to learning step-by-step assembly and exploring creative variations, this tutorial offers everything you need to create a beautiful and heartfelt quilt block.
Whether you are quilting for yourself or creating a gift for someone special, this pattern carries a message of unity and connection that makes it especially rewarding. Now that you’ve learned the process, I encourage you to give it a try and experience the joy of quilting with purpose.
I would love to hear your honest opinions and suggestions about this guide. Did it inspire you to make your own Friendship Star Quilt Block Tutorial – Quilt Pattern? Share your thoughts and ideas so we can continue learning and growing together as a quilting community.