
The Double padded potholder tutorial. – Quilt Pattern is a delightful and practical project that combines the art of quilting with the functionality of kitchen accessories. Whether you’re an experienced quilter or a beginner eager to explore, this project offers a perfect balance between creativity and usefulness. Potholders are a must-have in every kitchen, and making them double padded ensures extra protection from heat, making them as safe as they are beautiful. This tutorial not only teaches you the techniques but also inspires you to customize your creations.
One of the best parts about the Double padded potholder tutorial. – Quilt Pattern is its adaptability. You can use different fabrics to match your kitchen’s color scheme, choose seasonal prints for festive cooking, or create unique designs as handmade gifts for friends and family. The double padding provides extra thickness, making them more durable and heat-resistant. This is particularly useful for handling hot pots, baking trays, or cast-iron cookware without worry.
In this article, we will cover every step needed to create your own Double padded potholder tutorial. – Quilt Pattern. You’ll learn about choosing fabrics and materials, cutting and quilting, assembling the layers, and adding finishing touches. Each stage will be explained clearly, with helpful tips to achieve professional results, so you can confidently create beautiful and functional potholders for your home.
1. Choosing Fabrics and Materials for Your Double Padded Potholder
When starting your Double padded potholder tutorial. – Quilt Pattern, fabric selection is a key step. Quilting cotton is the most common choice because it is easy to sew, comfortable to handle, and available in endless colors and patterns. You can also choose to mix prints for a vibrant, patchwork style.
The lining and inner layers are equally important. For heat protection, you’ll need a heat-resistant batting such as insulated batting or a combination of regular cotton batting with an extra heat barrier layer. This is what makes your potholder truly double padded and safe for kitchen use.
Coordinating thread is another essential element. High-quality cotton or polyester thread works well for quilting and ensures strong seams that can withstand repeated use and washing. You might even choose a contrasting thread color to add a decorative element.
Zigzag scissors or a rotary cutter will help you cut the fabric neatly. You’ll also need quilting rulers and a self-healing cutting mat to maintain accuracy in measurements. Precise cutting ensures that all layers align perfectly during assembly.
If you want to make your potholder even more functional, consider adding a small hanging loop. This makes it easy to store your potholder on a hook, keeping it within reach when cooking.
By preparing the right materials, you set the foundation for a beautiful and practical project that will serve you well in the kitchen.
2. Cutting and Quilting the Layers
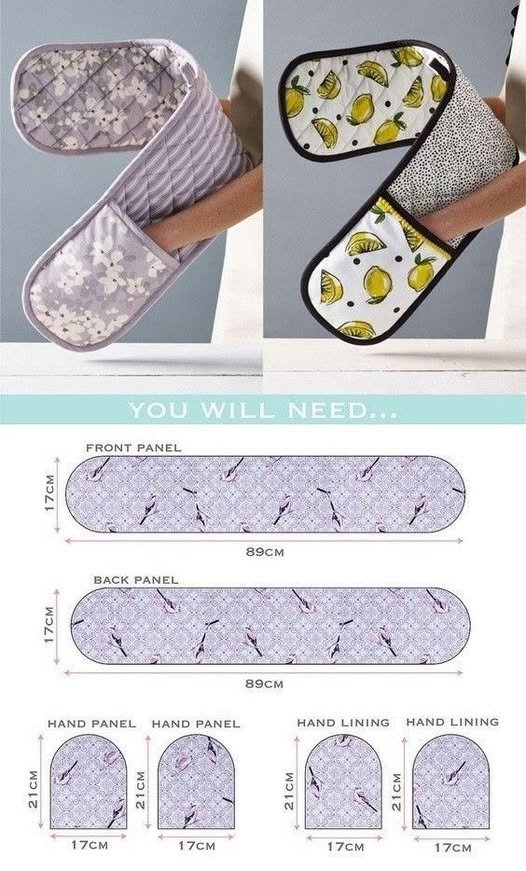
The Double padded potholder tutorial. – Quilt Pattern begins with accurate cutting. Your potholder typically consists of three main layers: the quilted top, the heat-resistant inner padding, and the backing. Because this is a double padded design, you’ll be using two layers of batting or a combination of batting and insulated lining.
Start by cutting the outer fabric slightly larger than your desired finished size to allow for trimming after quilting. Do the same with the batting layers and the backing fabric. This extra margin gives you flexibility if the layers shift slightly during sewing.
Layer your pieces in the correct order: outer fabric face up, batting layers underneath, then the backing fabric. Pin or baste them together to prevent movement while quilting.
When it comes to quilting patterns, you can choose simple straight lines, diagonal crosshatch designs, or even free-motion quilting if you want a decorative look. Quilting not only adds style but also secures the layers, preventing bunching over time.
After quilting, trim the layers to your final size, keeping the edges perfectly aligned. This will make the binding process much smoother later on.
Taking the time to cut and quilt your layers neatly will ensure your finished potholder looks polished and lasts for years.
3. Assembling and Binding the Potholder
Once the quilted panels for your Double padded potholder tutorial. – Quilt Pattern are ready, it’s time to assemble them into the final shape. If you have made two quilted panels for extra padding, place them with the right sides facing out, batting in the middle.
Secure the layers together with clips or pins before attaching the binding. Bias binding is ideal for potholders because it stretches slightly around curves and corners, giving a smooth finish. You can make your own binding from matching fabric or use pre-made binding for convenience.
Sew the binding to one side of the potholder, folding it over the raw edge to the other side and stitching it down. This encloses all raw edges, protecting the fabric from fraying and adding a decorative border.
If you want to include a hanging loop, fold a small strip of fabric or binding into a loop and sew it into one corner as you attach the binding. This little detail adds functionality and style.
Make sure your stitches are secure and even. Double-stitching around the edges can provide extra durability, especially since potholders are often washed and used frequently.
A well-bound potholder not only looks professional but also stands up to heavy kitchen use.
4. Adding Personal Touches and Care Tips
The beauty of the Double padded potholder tutorial. – Quilt Pattern is that it leaves plenty of room for creativity. You can personalize each potholder with fabric appliqués, embroidery, or even fabric paint to create a unique look. This makes them excellent handmade gifts for special occasions.
Mixing fabric patterns is another fun way to customize your design. For example, use a bold floral print for the front and a coordinating solid or stripe for the back. The binding can also be a contrasting color to make the edges pop.
If you want your potholder to match other kitchen textiles, use leftover fabric from aprons, table runners, or placemats. This creates a cohesive, designer-inspired kitchen set.
When it comes to care, machine wash your potholders in cold or warm water and air dry or tumble dry on low. Avoid bleach, as it can weaken fibers and fade colors.
Over time, the double padding will maintain its protective qualities, but if you notice thinning or wear, it’s easy to make a fresh set. Handmade potholders tend to last longer than store-bought ones due to their quality construction.
By adding your own style and following proper care tips, you can ensure your potholders are both functional and a joy to use.
FAQ – Double Padded Potholder Tutorial. – Quilt Pattern
1. Is this project beginner-friendly?
Yes, this Double padded potholder tutorial. – Quilt Pattern is great for beginners who want to practice quilting techniques while making something useful.
2. What size should I make my potholder?
A common size is around 8×8 inches, but you can adjust to suit your preferences or kitchen needs.
3. What batting is best for heat protection?
Insulated batting designed for hot pads is ideal. Combining it with cotton batting provides double padding for extra safety.
4. Can I quilt by hand instead of using a machine?
Yes, hand quilting works well for this project and adds a charming, homemade touch.
5. How can I make the potholder thicker?
Simply add more layers of batting or use a dense, heat-resistant fabric in the middle.
6. Can I wash the potholder in the machine?
Absolutely. Use gentle cycles and avoid high heat in the dryer to preserve the fabrics and batting.
Creating your own Double padded potholder tutorial. – Quilt Pattern is a rewarding sewing project that combines practicality with artistic expression. From selecting fabrics and quilting the layers to binding the edges and adding personal touches, each step allows you to build your sewing skills while making something you’ll use daily.
With double padding, your potholder will be durable, heat-resistant, and beautiful. I hope this guide has inspired you to create your own version. Please share your honest opinions and suggestions so we can continue to bring more creative and functional quilting projects to life.