
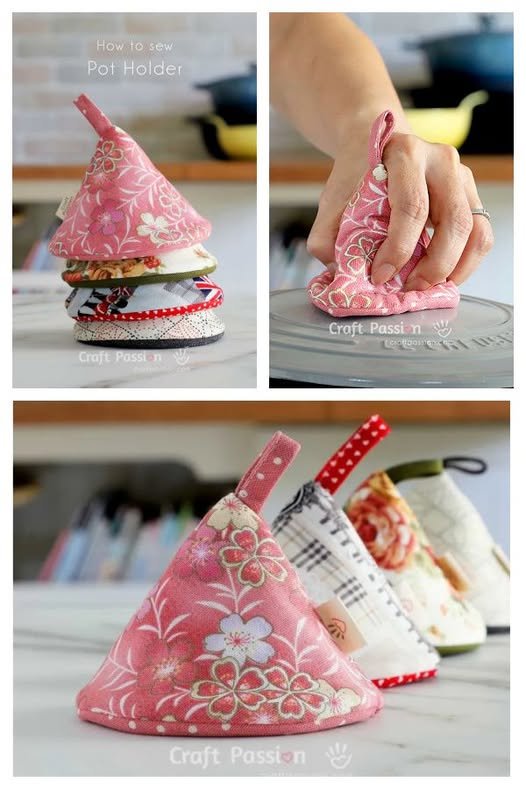
If you love sewing, quilting, and adding a charming handmade touch to your kitchen, a Cone Potholder Sewing Pattern – Quilt Pattern might just be your next favorite project. This delightful and practical accessory not only protects your hands from hot dishes but also adds a cozy, personalized flair to your home. Whether you are a beginner looking for a simple yet rewarding project or an experienced quilter wanting to experiment with new designs, this guide will walk you through everything you need to know. Using a Cone Potholder Sewing Pattern gives you the flexibility to play with colors, textures, and patterns to match your kitchen décor while enjoying the satisfaction of making something with your own two hands.
The Quilt Pattern approach to making a cone potholder offers endless possibilities for customization. You can create a traditional patchwork look with scrap fabrics, use bright and bold prints for a playful kitchen statement, or keep it simple and minimalistic with neutral tones. The cone shape is particularly handy because it slips easily onto your hand, providing both comfort and protection when handling hot cookware. By following a Cone Potholder Sewing Pattern – Quilt Pattern, you can achieve a functional and stylish kitchen accessory in just a few hours.
Before diving into the actual sewing process, it’s important to understand the structure of this project. This pattern is perfect for using up fabric scraps, experimenting with different quilting techniques, and practicing your precision sewing skills. Plus, it makes an excellent gift idea for friends, family, or even as part of a handmade kitchen set. Throughout this article, we will explore fabric choices, essential tools, cutting techniques, assembly steps, and finishing touches to make your Cone Potholder Sewing Pattern – Quilt Pattern a true standout piece.
1. Choosing Fabrics and Materials for Your Cone Potholder Sewing Pattern – Quilt Pattern
When starting any quilting project, fabric selection is key. For a Cone Potholder Sewing Pattern – Quilt Pattern, you’ll want fabrics that are both heat-resistant and visually appealing. Cotton fabrics are a popular choice because they are easy to work with, durable, and come in a wide variety of prints. You might also consider using quilting cotton, which has the right weight and texture for this type of project.
To ensure your potholder is safe for handling hot cookware, you will need to use insulating batting. A popular choice is heat-resistant batting designed specifically for kitchen accessories. This helps prevent heat from transferring through the fabric to your hands. It’s best to combine one layer of heat-resistant batting with a layer of regular cotton batting for added comfort and structure.
The beauty of a Quilt Pattern is that you can mix and match fabrics to create interesting designs. For example, you can use different prints for each panel of the cone to achieve a patchwork effect. Alternatively, you might opt for a cohesive look by choosing fabrics within the same color palette. Either way, the goal is to create something that reflects your personal style.
Don’t forget to pre-wash your fabrics before cutting. Pre-washing prevents shrinkage and ensures that colors won’t bleed when the potholder is washed later. It’s a small step that can make a big difference in the final quality of your project.
In addition to fabric, gather essential tools such as a rotary cutter, self-healing cutting mat, quilting ruler, sewing pins or clips, and a sewing machine. Having everything organized and ready before you start will make the process smoother and more enjoyable.
Lastly, keep in mind that the quality of your materials will directly affect the longevity of your Cone Potholder Sewing Pattern – Quilt Pattern. Investing in good-quality fabric, thread, and batting ensures your finished product will withstand regular use and washing.
2. Cutting and Preparing Your Pieces
Once you have your fabrics ready, the next step is cutting the pieces according to your Cone Potholder Sewing Pattern – Quilt Pattern. Accurate cutting is essential in quilting because it ensures all your pieces fit together perfectly. Using a quilting ruler and rotary cutter will give you clean, precise edges.
Begin by cutting the main cone shape. Many patterns provide a template, which you can trace onto your fabric using fabric chalk or a disappearing ink pen. Cut two identical pieces from your outer fabric and two from the lining fabric. You will also need to cut matching pieces of batting to add insulation.
If your Quilt Pattern includes patchwork panels, cut your smaller fabric pieces first, sew them together, and then cut the cone shape from the completed patchwork. This adds a beautiful quilted look to your potholder while keeping the structure intact.
Be mindful of fabric grain direction when cutting. Keeping pieces aligned with the grain helps maintain shape and prevents stretching during sewing. It’s also important to cut your batting slightly smaller than your fabric to reduce bulk in the seams.
Label each piece if you’re working with multiple fabrics to avoid confusion later. A simple sticky note or fabric marker can help you keep track of which piece goes where. This is especially helpful if you’re creating a detailed Quilt Pattern layout.
Once all pieces are cut, layer the outer fabric, batting, and lining together. This is a good time to pin or clip them in place to prevent shifting. Preparing everything before sewing allows you to focus on stitching without interruptions.
Double-check your measurements before moving to the next stage. Even small cutting errors can affect the final fit of your Cone Potholder Sewing Pattern – Quilt Pattern, so precision is your best friend here.
3. Sewing and Quilting the Potholder
With your pieces cut and prepared, it’s time to start sewing your Cone Potholder Sewing Pattern – Quilt Pattern. Begin by quilting the outer fabric and batting together. You can follow simple straight-line quilting, diagonal lines, or more decorative patterns depending on your style. Quilting not only enhances the design but also secures the batting in place, ensuring durability.
When quilting, start from the center and work outward to prevent fabric puckering. Use a walking foot if available, as it helps feed the layers evenly through the sewing machine. Choose a thread color that complements your fabric for a seamless look or a contrasting color for a bold effect.
After quilting the main panels, sew the outer fabric pieces together along the side edges, leaving the bottom open. Repeat the process for the lining pieces. If your pattern includes a hanging loop, sew it in place between the layers before closing the seams.
Next, insert the lining into the outer shell, wrong sides together. Align the seams carefully to keep everything neat. Sew around the bottom edge, then turn the potholder right side out.
Topstitching along the edges adds a professional finish and helps the potholder keep its shape. It also strengthens the seams, which is important for an item that will see frequent use in the kitchen.
Finally, give your Cone Potholder Sewing Pattern – Quilt Pattern a good press with an iron to set the seams and smooth out any wrinkles. This step makes your finished piece look crisp and polished.
4. Finishing Touches and Creative Variations
Now that your Cone Potholder Sewing Pattern – Quilt Pattern is assembled, it’s time to add finishing touches. A fabric loop for hanging is both practical and decorative. You can make it from matching fabric or use a contrasting strip for extra flair.
Consider adding decorative stitching around the edges. A zigzag or scallop stitch can give your potholder a unique character while reinforcing the seams. If you enjoy embroidery, you could even personalize it with initials, small motifs, or kitchen-themed designs.
One of the joys of working with a Quilt Pattern is experimenting with different layouts. Try mixing fabrics with solids, florals, stripes, and novelty prints for an eclectic look. You can also play with the quilting pattern itself—swirls, waves, or geometric designs can all change the final vibe.
If you want to make your potholder extra functional, consider adding a pocket inside the cone to slip your hand into. This adds more heat protection and a comfortable grip when handling hot dishes.
For seasonal or themed designs, select fabrics that reflect the occasion. Holiday prints, pastel spring colors, or rich autumn tones can make your cone potholder a festive kitchen accessory. This is also a great way to use up small fabric scraps from other quilting projects.
Finally, don’t be afraid to make a matching set. Creating multiple potholders in different colors or sizes can elevate your kitchen décor and provide you with handy tools for all cooking situations.
FAQ – Cone Potholder Sewing Pattern – Quilt Pattern
1. What is a Cone Potholder Sewing Pattern – Quilt Pattern?
It’s a sewing and quilting design used to create a cone-shaped potholder, offering both heat protection and a decorative element for your kitchen.
2. Can beginners make a cone potholder?
Yes! This project is beginner-friendly, especially if you follow step-by-step instructions and take your time with each stage.
3. What fabrics work best for this pattern?
Quilting cotton is ideal because it’s durable, easy to sew, and available in countless prints. Always pair it with heat-resistant batting for safety.
4. How do I make my potholder heatproof?
Use a layer of heat-resistant batting along with regular cotton batting, and always choose 100% cotton fabrics.
5. Can I wash my quilted cone potholder?
Yes, but wash in cold water and air dry to maintain its shape and fabric quality.
6. How can I customize my cone potholder?
You can change fabrics, quilting patterns, and even add embroidery or appliqué for a personalized touch.
7. Is this a good project for fabric scraps?
Absolutely! The patchwork nature of quilting makes this a perfect scrap-busting project.
8. How long does it take to make one?
Depending on your sewing experience, it can take anywhere from one to three hours.
9. Do I need special quilting tools?
While a rotary cutter and quilting ruler help with precision, you can still make this with basic sewing tools.
10. Can I sell cone potholders I make from this pattern?
Yes, as long as the pattern you use allows for commercial use. Always check pattern licensing terms.
Making a Cone Potholder Sewing Pattern – Quilt Pattern is a fun and satisfying project that blends functionality with creativity. From choosing fabrics to adding finishing touches, every step allows you to infuse your personal style into a practical kitchen accessory. With a little time and imagination, you can create a potholder that is both useful and beautiful. I hope this guide has inspired you to try making your own. Please share your honest opinion and suggestions—I’d love to hear how your project turns out!