
The Cat quilt pattern – Quilt Pattern is a delightful project that combines the charm of feline-inspired designs with the timeless craft of quilting. Whether you are a cat lover, a quilting enthusiast, or someone searching for a unique handmade gift idea, this project is perfect for you. The design allows you to create a quilt that is both cozy and decorative, with adorable cat motifs that can be customized in countless ways. From realistic depictions to whimsical cartoon-style cats, the creative possibilities are endless.
Working on a Cat quilt pattern – Quilt Pattern also offers a great opportunity to improve your quilting skills. You’ll be practicing accurate cutting, piecing, appliqué, and possibly even free-motion quilting to bring your chosen cat designs to life. This project is suitable for quilters of all levels because it can be simplified for beginners or made more intricate for advanced sewists. You can make a small wall hanging, a baby quilt, or a full-size bed cover—the choice is entirely yours.
In this guide, we’ll explore how to choose fabrics, prepare and assemble the quilt blocks, apply your cat-themed designs, and add finishing touches that make your quilt truly special. With the right techniques and a touch of creativity, your Cat quilt pattern – Quilt Pattern will be a piece you treasure for years to come and a guaranteed conversation starter in any home.
1. Choosing Fabrics and Colors for a Cat Quilt Pattern
When starting your Cat quilt pattern – Quilt Pattern, selecting fabrics is one of the most exciting parts of the process. The colors and textures you choose will determine the overall feel of your quilt. You can opt for fabrics in natural cat colors like black, white, gray, and tan for a realistic look, or use bright, playful fabrics for a more whimsical style.
Cotton quilting fabric is the most popular choice because it is easy to sew and comes in endless prints and solids. If you want extra softness, you might add flannel for certain blocks or the backing. It’s also fun to incorporate fabric prints that feature paw prints, fish bones, or tiny cat illustrations for added detail.
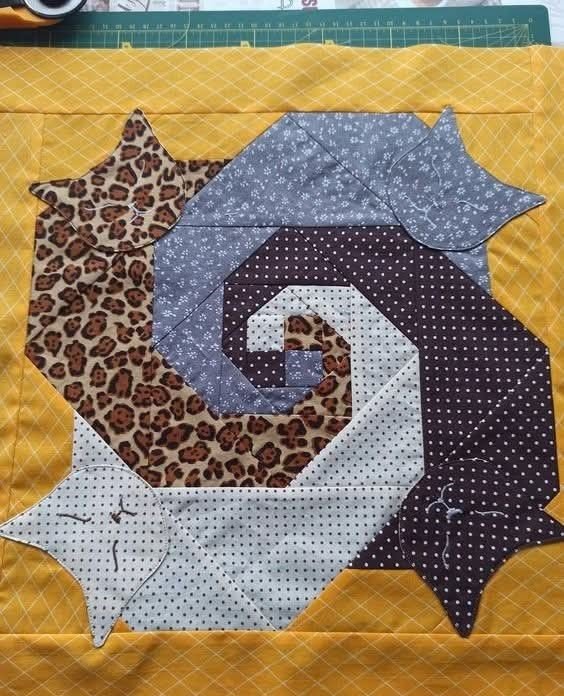
To make your quilt visually dynamic, consider using a mix of solid fabrics and patterned ones. For example, a cat’s body could be made from a polka-dot print while the background uses a calming solid color to make the design pop. This contrast is key for creating eye-catching quilt blocks.
Another important consideration is fabric durability. Since quilts are often washed and used regularly, it’s essential to select high-quality fabrics that will withstand time and laundering. Pre-washing fabrics before cutting can help prevent shrinking later.
If you’re making a quilt as a gift, think about the recipient’s favorite colors or home décor style. Customizing your Cat quilt pattern – Quilt Pattern in this way makes the finished piece even more meaningful.
Once your fabrics are chosen, it’s time to gather the other necessary materials like batting, backing fabric, thread, and quilting tools to start your project.
2. Preparing and Assembling the Quilt Blocks
The heart of a Cat quilt pattern – Quilt Pattern is in its quilt blocks. These are the individual units that come together to form the finished quilt. Depending on the pattern you’re following, your cat designs might be pieced traditionally, created through appliqué, or even assembled using foundation paper piecing for precise shapes.
Begin by cutting all your fabric pieces according to your chosen pattern’s measurements. Precision here is critical to ensure that your blocks fit together perfectly later on. A rotary cutter, quilting ruler, and self-healing cutting mat are essential tools for this step.
If your design uses appliqué, you’ll trace the cat shapes onto fusible web, iron them onto your chosen fabric, and then cut them out carefully. These appliqué pieces are then positioned onto the background fabric and stitched down with either a satin stitch, blanket stitch, or raw-edge finish, depending on the look you want.
For pieced blocks, sew smaller fabric shapes together with a ¼-inch seam allowance, pressing seams open or to one side as directed. Work methodically to keep your pieces aligned and your blocks square.
Once you’ve completed all your blocks, arrange them on a design wall or flat surface to determine the best layout. Play with the arrangement until the colors and shapes flow pleasingly across the quilt top.
When you’re happy with the layout, begin sewing the blocks together row by row, pressing seams carefully to keep everything flat. This step brings your Cat quilt pattern – Quilt Pattern to life as the individual blocks transform into a cohesive quilt top.
3. Quilting Your Cat Design
Quilting is the stage where your Cat quilt pattern – Quilt Pattern truly starts to shine. Not only does quilting hold the layers together, but it also adds texture and enhances your design. You can choose a quilting style that complements your cat motifs—subtle stitching that lets the design stand out, or more decorative quilting that adds extra personality.
Straight-line quilting is a great choice for beginners and creates a clean, modern look. Simply stitch evenly spaced lines across the quilt, either horizontally, vertically, or in a grid. For something more dynamic, try diagonal quilting or cross-hatching.
If you want to highlight specific parts of your cats, free-motion quilting allows you to outline shapes and add playful swirls, whiskers, or paw prints in the stitching. This technique takes practice, but the results can be stunning.
Choose a thread color that works well with your fabric choices. Neutral tones blend in for a subtle effect, while contrasting colors make the quilting more visible and artistic.
Before quilting, always baste your layers (quilt top, batting, and backing) together using safety pins, basting spray, or large hand stitches. This step prevents shifting during quilting and ensures a smooth finish.
Take your time with this stage, as careful quilting elevates the entire look of your project. Once finished, trim any excess batting and backing to prepare for the binding process.
4. Adding the Finishing Touches
The final step in creating your Cat quilt pattern – Quilt Pattern is adding the binding and any decorative details. Binding neatly finishes the quilt’s edges, making it durable and giving it a polished appearance. You can make binding from matching fabric for a cohesive look or choose a contrasting color for extra visual interest.
To bind your quilt, cut strips of fabric, join them end-to-end, press in half lengthwise, and sew them around the quilt edges. Fold the binding over to the back and stitch it down by hand or machine.
If you want to make your quilt extra special, consider adding small embellishments like embroidery for facial details, buttons for eyes (only if the quilt won’t be used by small children), or hand quilting in select areas for added charm.
You can also sew a personalized fabric label on the back with your name, the date, and a short message. This turns your quilt into a keepsake that future generations will treasure.
After finishing, give the quilt a gentle wash to soften it and remove any remaining markings. This also allows the batting to fluff slightly, adding that classic quilted texture.
When completed, your Cat quilt pattern – Quilt Pattern will be a one-of-a-kind piece that blends warmth, creativity, and love for cats in every stitch.
FAQ – Cat Quilt Pattern – Quilt Pattern
1. Is the Cat quilt pattern suitable for beginners?
Yes, beginners can make a Cat quilt pattern – Quilt Pattern by choosing a simple design and following clear instructions.
2. What size should my quilt be?
You can make it any size, from a small wall hanging to a full bed quilt, depending on your needs and available time.
3. Can I use fabrics other than cotton?
Yes, but cotton quilting fabric is recommended for ease of sewing and durability. Flannel can also be used for added softness.
4. How can I make my quilt look more realistic?
Use fabric colors and prints that mimic real cats, and add details through quilting or embroidery.
5. How do I care for my finished quilt?
Wash it gently in cold water with mild detergent, and air dry or tumble dry on low to preserve its quality.
6. How long does it take to make a Cat quilt pattern?
It depends on the size and complexity, but most projects take anywhere from a few days to a few weeks.
Creating a Cat quilt pattern – Quilt Pattern is a fun and fulfilling sewing project that allows you to combine your love of quilting with adorable feline designs. From selecting fabrics and preparing blocks to quilting and adding final touches, every step is a chance to express your creativity. Whether for yourself or as a thoughtful handmade gift, this quilt will be a cherished piece.
I hope this guide has inspired you to make your own version—please share your honest opinions and suggestions so we can continue to grow and inspire fellow quilting enthusiasts.