
If you’re looking to bring a touch of nature into your quilting projects, this Cardinal Quilt Block Tutorial – Quilt Pattern is the perfect place to start. Known for its vibrant red plumage and symbolic meaning of hope and renewal, the cardinal bird makes a stunning motif for any quilt. This quilt pattern not only adds color and character to your creation but also provides a fulfilling and meditative quilting experience.
In this comprehensive guide, you’ll learn how to create your very own Cardinal Quilt Block step by step. Whether you’re a beginner looking to practice basic techniques or an experienced quilter seeking a creative block to add to your collection, this Cardinal Quilt Block Tutorial – Quilt Pattern is designed to suit all skill levels. The instructions are clear, the method is rewarding, and the result is something you’ll be proud to show off.
Throughout this article, you’ll find easy-to-follow guidance, helpful tips, and SEO-friendly structure based on Google’s best practices. Each section is optimized to help you navigate the quilting process from start to finish, making this Cardinal Quilt Block Tutorial – Quilt Pattern both user-friendly and enjoyable.
1. Preparing Your Materials and Tools
Before you begin your Cardinal Quilt Block Tutorial – Quilt Pattern, it’s important to gather all necessary tools and fabrics to ensure a smooth quilting experience. The cardinal design involves several red and contrasting fabrics, and accurate cutting will be essential for crisp, clean lines.
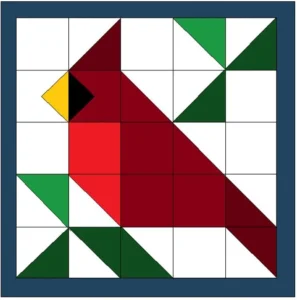
Choose high-quality cotton fabric in shades of red for the bird’s body, black for the face and details, and white or light gray for the background. Solid colors or subtle prints work well to bring out the beauty of the quilt pattern without overwhelming it. Precision is key in this design.
You’ll need a rotary cutter, self-healing cutting mat, quilting ruler, and a reliable sewing machine. Don’t forget thread that matches your fabrics, plus a few pins or clips to hold pieces in place. A pressing iron is also essential to ensure flat seams throughout the project.
Start by pre-washing and ironing your fabrics to prevent shrinkage later. Then, cut your pieces according to the block size you’re aiming for. Common sizes for a Cardinal Quilt Block include 8″, 10″, or 12″ squares, depending on your final quilt layout.
If you’re using a printed template, carefully transfer the shapes to your fabric using a washable marker or chalk. Label each piece to keep track of which part of the bird you’re constructing. Organizing your pieces beforehand will make assembly much easier.
This early stage is all about setting yourself up for success. Having all your tools and materials ready means you can focus on the creative aspects of the Cardinal Quilt Block Tutorial – Quilt Pattern without interruption.
2. Constructing the Cardinal Body
Now it’s time to sew the pieces together to form the body of the cardinal. This part of the Cardinal Quilt Block Tutorial – Quilt Pattern brings your fabric to life as the vibrant red bird begins to take shape. Start by assembling the head, body, and wing components.
Begin with the head section. Sew together the triangular red pieces with the black fabric used for the face and beak area. Pay attention to the angles here; accurate seams ensure the cardinal’s face looks sharp and expressive.
Next, move on to the body. This section usually consists of larger red fabric blocks that will connect the head to the tail and wings. Double-check your seam allowances to keep everything symmetrical. The wing might include a slightly darker or patterned red to distinguish it from the body.
Sew the pieces in small sections before combining them into the full bird shape. Press each seam after sewing to reduce bulk and ensure clean lines. Ironing is especially crucial when dealing with multiple angles and color transitions.
Once you’ve completed the bird’s body, lay it out over the background fabric to check for alignment. The cardinal should be centered or placed in a visually pleasing position, depending on your quilt layout design.
This step is where the magic begins. You’ll see the Cardinal Quilt Block emerge from simple shapes into a recognizable, eye-catching bird. Keep your work clean and steady, and enjoy watching your quilt pattern evolve.
3. Adding the Background and Final Block Assembly
With the cardinal assembled, it’s time to incorporate it into the block by adding the background fabric and framing. This step in the Cardinal Quilt Block Tutorial – Quilt Pattern is essential to give your design space and balance.
Begin by attaching the side and corner background pieces. These are often white, cream, or light gray and help the cardinal stand out. Make sure to measure and align these pieces precisely so the final block remains square.
Work from the center outward, sewing one piece at a time. This prevents distortion and ensures a well-proportioned block. Pinning your sections before sewing can help maintain accuracy, especially if the cardinal has detailed features near the block edges.
Once the background pieces are attached, it’s time to trim the block. Use a quilting ruler to square up all sides, making sure the cardinal is well-centered and upright. A square, even block makes it easier to assemble into a larger quilt later.
At this stage, consider adding optional details like a small eye, beak embroidery, or extra shading with thread painting. These little touches can enhance the realism and charm of your Cardinal Quilt Block.
Press the final block carefully, pressing seams away from the red fabric to avoid color bleed. Let your block cool completely before storing it or stitching it into a full quilt top.
Now your Cardinal Quilt Block Tutorial – Quilt Pattern has come full circle, from individual pieces to a beautifully complete block ready to be admired or joined with others in a larger project.
4. Creative Ideas for Using Your Cardinal Quilt Block
The fun doesn’t stop with one block. Now that you’ve completed the Cardinal Quilt Block Tutorial – Quilt Pattern, you can explore various creative ways to incorporate it into your quilting projects. From wall hangings to table runners, the possibilities are endless.
One popular idea is to create a full winter or woodland-themed quilt. Use the cardinal block alongside pine trees, snowflakes, and forest animal motifs. This seasonal design is perfect for holiday décor or a cozy winter throw.
Another approach is to feature the cardinal block as a centerpiece in a mini quilt or pillow cover. Add decorative borders or sashing to highlight the vibrant bird and make it pop even more. It also makes a great handmade gift.
Consider creating a series of bird-themed quilt blocks. Pair your Cardinal Quilt Block with other birds like blue jays, robins, or hummingbirds to make a nature-inspired sampler quilt that celebrates birdwatching and the great outdoors.
For a modern touch, repeat the cardinal block in different color palettes – such as golds or blues – to create a stylized quilt with abstract charm. You can also alternate cardinal blocks with plain or geometric blocks for a clean and balanced layout.
If you’re passionate about storytelling through fabric, build a quilt that tells a seasonal journey: include cardinals in the winter section, blooming flowers in spring, and so on. The cardinal’s symbolism of hope and memory fits beautifully in such narrative designs.
Your Cardinal Quilt Block Tutorial – Quilt Pattern is more than just a lesson—it’s a gateway to creative freedom. Let your imagination take flight and explore all the beautiful ways this design can enhance your quilting journey.
Frequently Asked Questions (FAQ)
What size is the standard Cardinal Quilt Block?
Most commonly, Cardinal Quilt Blocks are made in sizes like 8”, 10”, or 12” square. You can scale the pattern up or down depending on your quilt layout or desired effect.
Is this Cardinal Quilt Block suitable for beginners?
Yes! This Cardinal Quilt Block Tutorial – Quilt Pattern is beginner-friendly, especially when broken down into small, manageable sections. Straight seams and basic piecing techniques make it accessible.
Can I use patterned fabric for the cardinal?
Absolutely. While solid reds help define the cardinal shape clearly, small-scale prints or textured fabrics can add depth and personality to the bird. Just avoid patterns that compete too much with the bird’s features.
How can I prevent my red fabric from bleeding?
Pre-wash your red fabrics in cold water with a color catcher. Use gentle detergent and avoid over-drying. Press the fabric after washing to prepare it for cutting.
Can I hand-sew the block instead of using a machine?
Yes, you can hand-piece the Cardinal Quilt Block using traditional techniques. It will take longer but can be a relaxing and satisfying process.
What kind of quilt projects can include the Cardinal Quilt Block?
This block works well in full quilts, mini quilts, wall hangings, pillows, table runners, or as part of a seasonal display. Its versatility is one of its biggest advantages.
This Cardinal Quilt Block Tutorial – Quilt Pattern has taken you through every step of crafting a beautiful and meaningful quilt block featuring one of nature’s most beloved birds. From material preparation to final touches and creative applications, you now have the knowledge and inspiration to bring your cardinal to life in fabric form.
Whether you’re using it as a statement piece or part of a larger quilt, the Cardinal Quilt Block adds color, emotion, and natural beauty to any project. Don’t forget to enjoy the process and let your creativity shine with each stitch.
If you followed this tutorial, I’d love to hear from you! Please leave a sincere opinion below, share your experiences, and let me know how your Cardinal Quilt Block turned out. Your feedback and suggestions help inspire future tutorials and fellow quilters around the world.