
The Tulip Top Tutorial – Crochet Pattern is a wonderful project for crochet enthusiasts who want to create a stylish and feminine garment that’s both comfortable and versatile. Inspired by the delicate beauty of tulip flowers, this crochet top brings a fresh, floral touch to your wardrobe. Whether you are making it for yourself, a loved one, or as a custom piece for sale, this project allows you to explore different stitches, yarns, and colors while producing a unique, handcrafted clothing item that’s perfect for spring, summer, or even layered in cooler months.
One of the best things about the Tulip Top Tutorial – Crochet Pattern is that it can be adapted for different body types and personal preferences. By simply adjusting the number of stitches, the type of yarn, or the length of the top, you can make a piece that’s truly one-of-a-kind. The tulip motif gives the design a playful yet elegant appearance, and the breathable fabric makes it ideal for warm weather. For crocheters who enjoy combining style with comfort, this project offers the best of both worlds.
This crochet top is also a fantastic opportunity to practice shaping and garment construction in crochet. While the pattern is suitable for confident beginners, it still provides enough challenge to keep more experienced crocheters engaged. By following the Tulip Top Tutorial – Crochet Pattern, you’ll learn how to create tulip-inspired stitches, assemble panels, and finish your piece with a professional touch. With patience and creativity, the final result will be a wearable work of art.
1. Materials and Preparation for the Tulip Top Tutorial – Crochet Pattern
Before starting your Tulip Top Tutorial – Crochet Pattern, it’s important to gather all the materials you need. The right tools and yarn will ensure your project turns out beautifully and fits comfortably.
For yarn, lightweight cotton or cotton blends are highly recommended. Cotton yarn is breathable, durable, and perfect for warm-weather garments. It also showcases the tulip stitch details beautifully. You may also consider bamboo or linen blends for an even softer drape.
Choose a crochet hook size that matches your yarn’s recommended gauge. Commonly, hooks between 3.5mm and 4.5mm work well for lightweight tops, but checking your gauge swatch is essential to ensure proper sizing.
Other essential tools include a yarn needle for weaving in ends, stitch markers to keep track of pattern repeats, and sharp scissors for neat finishing. Having a measuring tape on hand is also important for checking garment dimensions.
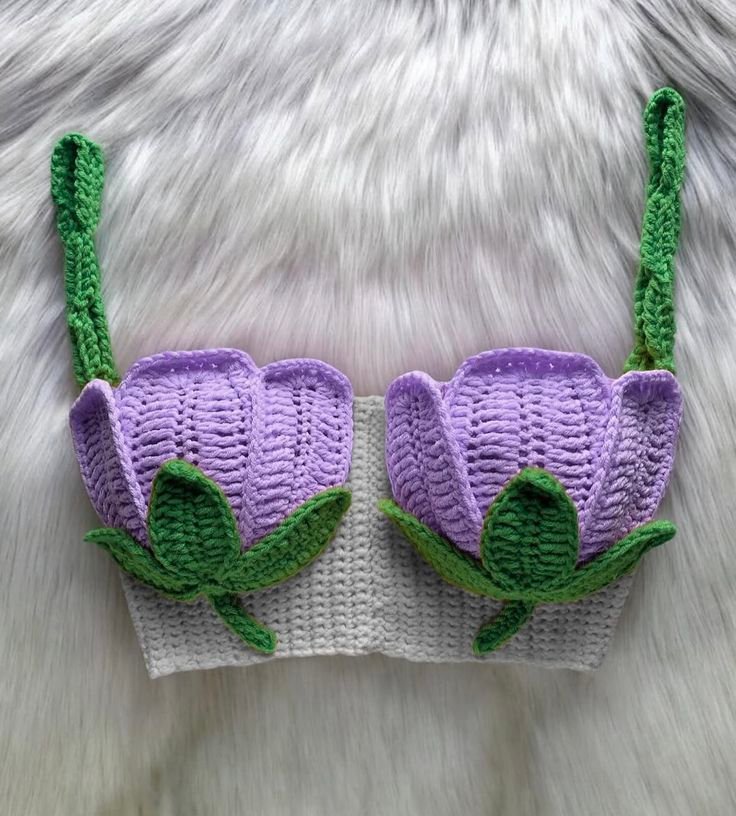
Pick your color palette carefully. Tulip motifs look stunning when made with contrasting colors — for example, a green stem and leaves paired with vibrant flower shades like pink, purple, yellow, or red. The background can be neutral or complementary to make the tulips pop.
Lastly, prepare a comfortable workspace with good lighting. Working on clothing items requires focus, and being able to clearly see your stitches will make the process smoother and more enjoyable.
2. Step-by-Step Instructions for the Tulip Top Tutorial – Crochet Pattern
Creating the Tulip Top Tutorial – Crochet Pattern involves working in panels or rounds, depending on the style you prefer. The tulip stitch motif is the central element of the design, and mastering it will ensure your top has the desired floral appearance.
Start by making a foundation chain that matches the width of your top’s front panel. You can measure against your body or a garment you like for reference. Make sure your stitch count is compatible with the tulip stitch pattern repeat.
Work the tulip stitches by alternating colors for the stem, leaves, and flower. Typically, the stem and leaves are made in green yarn, while the tulip bloom is worked in a vibrant shade. This stitch pattern creates small, charming tulip shapes that stand out beautifully on the fabric.
Continue crocheting the panel until it reaches your desired length. Repeat the process for the back panel if you’re working in two pieces. For a sleeveless top, you can add straps by chaining and attaching them to the upper edges of the garment.
If you want sleeves, work them separately using the same stitch pattern or a simpler stitch for contrast. Joining sleeves to the body is straightforward if you leave enough armhole space when seaming the sides.
Once your panels are complete, seam them together using a whip stitch or mattress stitch for a neat finish. Add any additional edging or decorative borders to enhance the look of your Tulip Top Tutorial – Crochet Pattern.
3. Tips for Success with the Tulip Top Tutorial – Crochet Pattern
To ensure your Tulip Top Tutorial – Crochet Pattern turns out exactly as you envision, there are some helpful tips you can follow during the process.
First, take the time to make a gauge swatch. This step prevents sizing issues and ensures your top will fit comfortably. Many crocheters skip this step and end up with a garment that’s too small or too large.
Second, use high-quality yarn to ensure your top retains its shape and softness after washing. Cheaper yarn may stretch out or fade quickly, especially if exposed to sunlight.
Third, consider adding shaping elements such as slight increases or decreases at the waist to create a more flattering silhouette. Even small adjustments can make the garment fit better.
Fourth, block your finished top before wearing it. Blocking helps even out stitches, opens up the tulip motifs, and gives the garment a polished look.
Fifth, if you are a beginner with color changes, practice them before starting your main piece. Clean color changes make your tulip motifs sharper and more vibrant.
Lastly, don’t be afraid to experiment. You can modify the length, neckline style, or strap thickness to create a custom design that perfectly matches your personal style.
4. Styling and Customizing the Tulip Top Tutorial – Crochet Pattern
One of the most exciting parts of completing your Tulip Top Tutorial – Crochet Pattern is deciding how to style and personalize it. This crochet top can be worn in many different ways, making it a versatile piece in your wardrobe.
For a casual summer look, pair your tulip top with denim shorts or a light skirt. The floral details will add a fresh, cheerful touch to your outfit.
To dress it up, wear it with tailored trousers or a flowy maxi skirt. Layering with a cardigan or blazer can make it suitable for cooler evenings or more formal occasions.
Customizing your tulip top can be as simple as changing the color scheme. Bright, bold tulips are perfect for a playful vibe, while muted tones create a more elegant and sophisticated appearance.
You can also experiment with the neckline shape. A scoop neck, V-neck, or halter style can completely change the overall look of the top.
Adding embellishments like crochet lace borders, buttons, or beads can enhance the uniqueness of your Tulip Top Tutorial – Crochet Pattern.
Finally, consider making matching accessories, such as a headband or a small bag, using the same tulip stitch motif. This creates a coordinated, handmade ensemble that showcases your creativity.
FAQ – Tulip Top Tutorial – Crochet Pattern
Q: Is the Tulip Top Tutorial – Crochet Pattern suitable for beginners?
A: Yes, confident beginners can make it, especially if they have experience with basic stitches and simple color changes.
Q: How long does it take to crochet the Tulip Top?
A: It depends on your skill level and available time. On average, it may take 2–5 days for a beginner and less for experienced crocheters.
Q: What is the best yarn for this pattern?
A: Lightweight cotton or cotton blends are ideal, but bamboo and linen blends also work well for a breathable, comfortable top.
Q: Can I make the Tulip Top in a larger or smaller size?
A: Absolutely. Adjusting the number of stitches in your foundation chain and working more or fewer rows will change the size.
Q: Do I need to block my Tulip Top?
A: Yes, blocking helps even out stitches, defines the tulip motifs, and gives the garment a professional finish.
Q: Can I turn the Tulip Top into a dress?
A: Yes, by extending the length and shaping it appropriately, you can create a tulip dress using the same stitch pattern.
The Tulip Top Tutorial – Crochet Pattern is a charming and versatile project that combines the art of crochet with wearable fashion. From selecting materials to mastering the tulip stitch, this pattern offers an engaging and rewarding experience for all skill levels. With customization options for color, fit, and style, you can create a truly unique garment that reflects your personality.
I’d love to hear your honest feedback and any creative ideas you have for making this project even more special — share your thoughts and inspire other crochet enthusiasts!