
How to Crochet a Aviator Hat – Pattern is a delightful project for crochet lovers who enjoy creating practical, cozy, and stylish accessories. This type of hat combines vintage charm with modern comfort, making it a favorite among crafters who appreciate handmade fashion. Whether you are crocheting for yourself, a child, or as a thoughtful gift, learning this pattern opens the door to a versatile and rewarding project.
The beauty of crochet lies in its ability to transform simple yarn into something warm, functional, and unique. When working on a How to Crochet a Aviator Hat – Pattern, you are not just following instructions—you are creating a piece that reflects creativity and care. Aviator hats are particularly loved for their ear flaps and snug fit, which help protect against cold weather while adding a playful and classic look.
Another wonderful aspect of mastering How to Crochet a Aviator Hat – Pattern is the opportunity to customize the design. You can choose different yarn textures, colors, and finishing touches like buttons, braids, or pom-poms. This flexibility allows each crocheter to produce a hat that feels personal and special while still following a reliable and easy-to-learn pattern.
1. Understanding the Basics of How to Crochet a Aviator Hat – Pattern
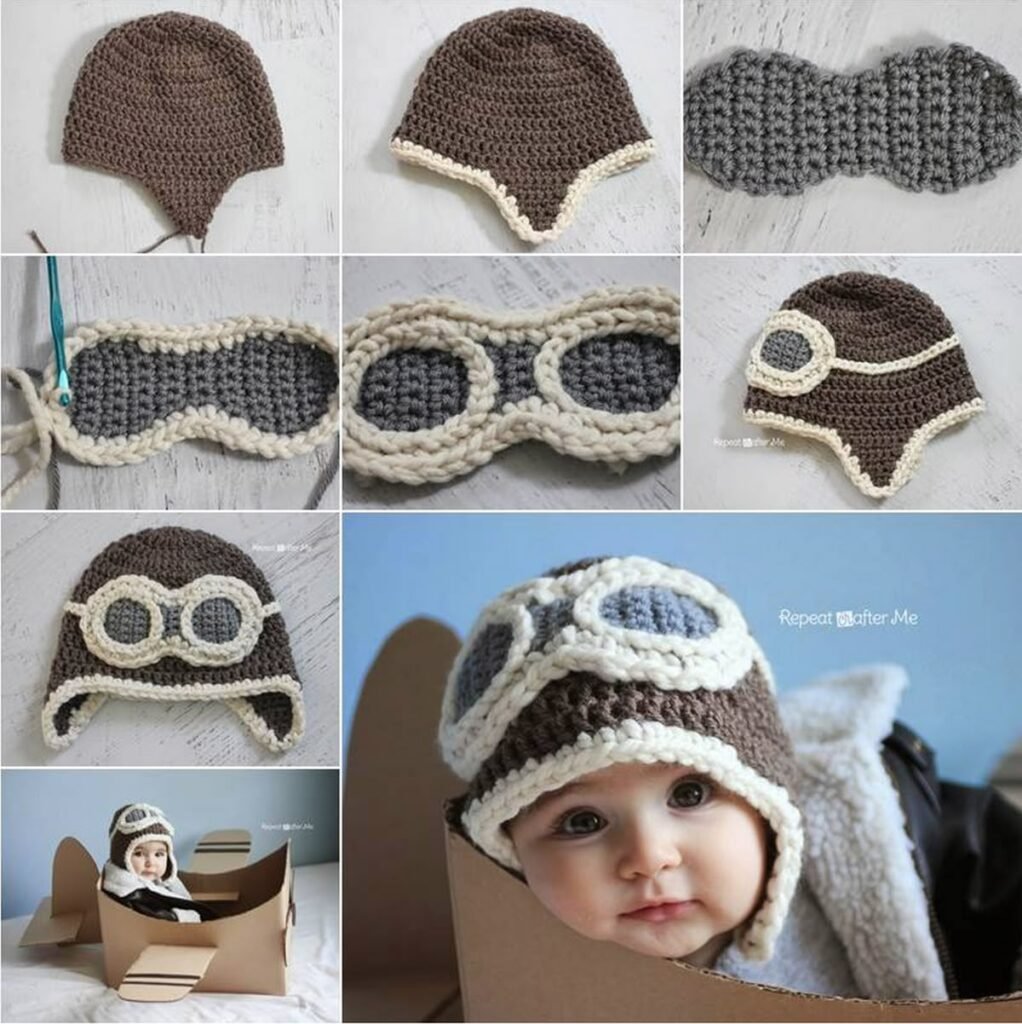
Before starting How to Crochet a Aviator Hat – Pattern, it is helpful to understand the structure of the hat. Aviator hats usually consist of a rounded crown, ear flaps, and optional straps or decorative elements. These components come together to create a hat that is both functional and visually appealing.
The crown of the hat is typically crocheted in the round. This technique allows the fabric to expand gradually until it reaches the desired circumference. When working on How to Crochet a Aviator Hat – Pattern, maintaining consistent stitch tension is essential to ensure the hat fits comfortably.
Next come the ear flaps, which are one of the most recognizable features of an aviator hat. These flaps are crocheted separately or directly onto the hat and extend downward to cover the ears. They provide warmth and add character to the finished design.
Many crocheters enjoy the creative freedom that comes with shaping the ear flaps. In a How to Crochet a Aviator Hat – Pattern, you can adjust the size and shape depending on whether the hat is intended for a baby, child, or adult.
Another key element is the edging or border around the hat. This finishing step helps reinforce the shape and provides a polished appearance. Simple stitches like single crochet or slip stitches often work beautifully.
Finally, understanding the basic stitches used in How to Crochet a Aviator Hat – Pattern will make the project much easier. Most patterns rely on beginner-friendly stitches such as single crochet, half double crochet, and basic increases or decreases.
2. Materials and Preparation for How to Crochet a Aviator Hat – Pattern
Gathering the right materials is an important step when preparing to work on How to Crochet a Aviator Hat – Pattern. The most essential item is yarn that is soft, warm, and comfortable against the skin. Acrylic blends and wool blends are commonly used because they provide warmth without being too heavy.
A crochet hook that matches the recommended yarn weight will help you achieve the correct gauge. Following the hook size suggested in a How to Crochet a Aviator Hat – Pattern ensures the stitches are neither too tight nor too loose.
You will also need basic tools such as scissors, a yarn needle, and stitch markers. These tools make the process smoother and help maintain the shape of your hat as you work.
Another helpful preparation step is making a gauge swatch. Even though it might seem small, this step can save time and frustration later. A proper gauge ensures that your How to Crochet a Aviator Hat – Pattern will fit the intended wearer correctly.
Choosing colors is also part of the fun. Some crocheters prefer classic aviator shades like brown, cream, or gray, while others enjoy experimenting with vibrant colors. The pattern remains the same, but the visual result can be completely unique.
Lastly, preparing a comfortable workspace can enhance your crochet experience. Good lighting, organized materials, and a quiet environment allow you to focus fully on completing your How to Crochet a Aviator Hat – Pattern.
3. Step-by-Step Process for How to Crochet a Aviator Hat – Pattern
The first step in How to Crochet a Aviator Hat – Pattern is creating the crown. This usually begins with a magic ring or a small chain circle. Stitches are then worked in rounds, gradually increasing until the crown reaches the correct diameter.
After finishing the crown, the body of the hat is crocheted without increases. This section forms the sides and helps the hat fit snugly around the head. Maintaining even stitches during this stage is essential for a smooth appearance.
Once the main hat body is complete, you will begin shaping the ear flaps. In a typical How to Crochet a Aviator Hat – Pattern, the ear flaps are positioned symmetrically on both sides of the hat.
The ear flaps are worked in rows rather than rounds. This technique allows them to extend downward while keeping their structure firm. Many patterns use decreases at the ends of rows to create a slightly tapered shape.
After finishing the ear flaps, crocheters often add ties or braids to the ends. These details not only enhance the design but also help secure the hat in windy weather.
To complete the How to Crochet a Aviator Hat – Pattern, a border is usually crocheted around the entire edge. This finishing touch unifies the crown, ear flaps, and sides into a cohesive design.
4. Tips for Customizing and Perfecting Your Aviator Hat
One of the most exciting aspects of How to Crochet a Aviator Hat – Pattern is the ability to personalize the final result. Small adjustments can transform a simple hat into a unique and meaningful piece.
For example, adding textured stitches can create visual interest. Ribbed edges, puff stitches, or even simple color changes can elevate the design without making it overly complicated.
Size adjustments are also important. When following How to Crochet a Aviator Hat – Pattern, you can easily modify the number of rounds in the crown or the length of the ear flaps to better fit the wearer.
Another creative idea is incorporating faux-fur yarn or fluffy edging around the ear flaps. This adds warmth and gives the hat a classic aviator appearance reminiscent of vintage pilot gear.
Crocheters who enjoy embellishments may add buttons, small appliqués, or pom-poms. These decorations can make the hat more playful, especially for children.
Finally, practicing patience and consistency will always improve your results. With time and experience, each How to Crochet a Aviator Hat – Pattern becomes easier and more enjoyable to create.
FAQ About How to Crochet a Aviator Hat – Pattern
1. Is the How to Crochet a Aviator Hat – Pattern suitable for beginners?
Yes, many versions of How to Crochet a Aviator Hat – Pattern are beginner-friendly. They usually involve simple stitches and basic shaping techniques that new crocheters can learn quickly.
2. What type of yarn works best for this pattern?
Soft and warm yarns such as acrylic blends, wool blends, or cotton blends work well for How to Crochet a Aviator Hat – Pattern. The key is choosing a yarn that feels comfortable against the skin.
3. How long does it take to crochet an aviator hat?
The time required depends on your experience level. Many crocheters can complete a How to Crochet a Aviator Hat – Pattern within a few hours or over a relaxing weekend.
4. Can this pattern be adjusted for different sizes?
Absolutely. A How to Crochet a Aviator Hat – Pattern can easily be adapted for babies, children, or adults by adjusting the number of crown increases and the length of the hat body.
5. Do I need advanced crochet skills to make this hat?
Not necessarily. Most How to Crochet a Aviator Hat – Pattern instructions rely on simple stitches and straightforward construction techniques.
6. How can I make the hat warmer?
Using thicker yarn, adding a lining, or crocheting tighter stitches can make your How to Crochet a Aviator Hat – Pattern warmer and more suitable for colder climates.
Learning How to Crochet a Aviator Hat – Pattern is a rewarding and creative experience that allows crocheters to produce a warm, stylish, and practical accessory. Throughout this guide, we explored the structure of the hat, the materials needed, the step-by-step creation process, and several ways to customize the final design.
By understanding the basic techniques and applying a bit of creativity, anyone can successfully complete a How to Crochet a Aviator Hat – Pattern. This project not only improves crochet skills but also results in a handmade item that can be cherished or gifted to someone special.
If you enjoyed learning about How to Crochet a Aviator Hat – Pattern, feel free to share your thoughts. Your honest opinion, experiences, and suggestions are always welcome and can help inspire other crochet enthusiasts to start their own projects.