
Crochet Easter Bunny Ornaments – Pattern is one of the most delightful and heartwarming ways to celebrate the spring season with handmade charm. Whether you are decorating your home, preparing thoughtful handmade gifts, or adding a festive touch to your Easter table, these adorable crochet pieces bring warmth, creativity, and personality to any space. Handmade decorations have a unique emotional value, especially when crafted with care and intention.
Creating Crochet Easter Bunny Ornaments – Pattern designs allows crafters to combine tradition with creativity. Easter is often associated with renewal, hope, and joyful gatherings, and crochet ornaments reflect these sentiments beautifully. The soft texture of yarn, the gentle shaping of bunny ears, and the tiny embroidered faces transform simple materials into meaningful keepsakes that can be treasured year after year.
For both beginners and experienced crocheters, working on a Crochet Easter Bunny Ornaments – Pattern project is a relaxing and rewarding experience. These ornaments are usually small in size, making them perfect for quick projects that use minimal yarn. At the same time, they offer endless opportunities for personalization through color choices, embellishments, and finishing details. Now, let’s explore how to create, customize, and optimize your crochet bunny ornaments for Easter.
1. Understanding the Basics of Crochet Easter Bunny Ornaments – Pattern
The foundation of a successful Crochet Easter Bunny Ornaments – Pattern begins with understanding basic crochet stitches. Most bunny ornament patterns use simple stitches such as single crochet, slip stitch, and chain stitch. These stitches create a firm yet soft texture that holds the shape of the bunny while maintaining a delicate decorative appearance.
When starting your Crochet Easter Bunny Ornaments – Pattern, choosing the right yarn is essential. Cotton yarn is often preferred because it holds structure well and provides a clean stitch definition. However, soft acrylic yarn can also work beautifully if you prefer a fluffier look. Light pastel shades such as pink, baby blue, lavender, and cream are especially popular for Easter-themed projects.
Hook size also plays a significant role in shaping your ornament. A slightly smaller hook than recommended for your yarn can create tighter stitches, which help maintain the bunny’s form. This is particularly important for small ornaments, where stuffing and shaping need to be secure and neat.
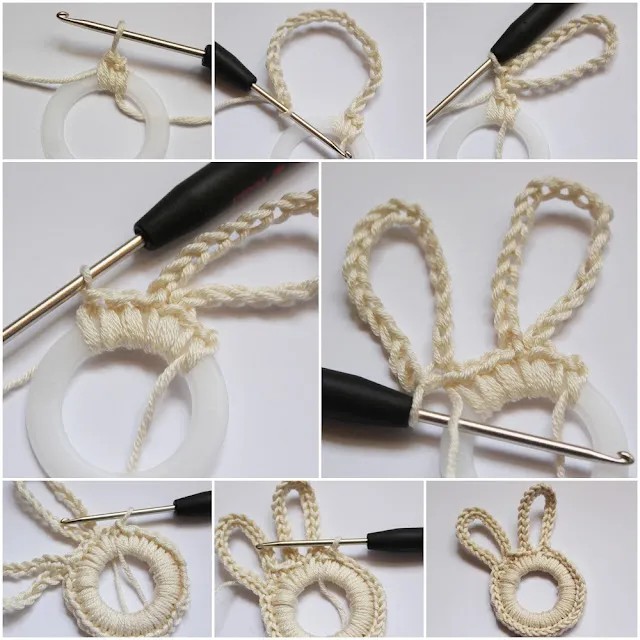
Most Crochet Easter Bunny Ornaments – Pattern designs are worked in the round, especially when creating the bunny’s head and body. Working in continuous rounds helps eliminate visible seams and produces a smooth finish. Using stitch markers can make it easier to track your rounds, especially for beginners.
Adding dimension to your crochet bunny is often achieved through simple increases and decreases. These shaping techniques allow you to form rounded heads, tiny cheeks, and even small tails. Mastering these basic shaping methods will give your ornament a polished and professional appearance.
Finally, finishing techniques complete your Crochet Easter Bunny Ornaments – Pattern beautifully. Securely fastening off yarn, weaving in ends, and gently shaping the piece before attaching embellishments ensures durability. Since ornaments are often stored and reused, strong finishing is essential for longevity.
2. Materials and Tools for Crochet Easter Bunny Ornaments – Pattern
To create stunning Crochet Easter Bunny Ornaments – Pattern pieces, you need a carefully selected set of materials. High-quality yarn, a suitable crochet hook, stuffing material, a yarn needle, scissors, and optional embellishments are the core essentials. Keeping your tools organized helps streamline the crafting process.
Stuffing is an important component if your ornament is three-dimensional. Polyester fiberfill is lightweight and easy to shape, making it ideal for small bunny ornaments. Avoid overstuffing, as it can distort the stitches and make the ornament look stretched.
Safety eyes or embroidered eyes can be used to bring your bunny to life. If the ornaments are purely decorative, small plastic safety eyes work well. However, if the ornaments may be handled frequently, embroidered eyes offer extra security and a softer aesthetic.
For hanging your Crochet Easter Bunny Ornaments – Pattern, you will need ribbon, twine, or crocheted chains. Soft satin ribbons create a delicate look, while rustic twine gives a farmhouse-style charm. Choosing the right hanging material can enhance your overall Easter décor theme.
Optional embellishments like tiny bows, miniature flowers, or embroidered details can add personality. These small touches transform a simple bunny shape into a charming decorative piece that stands out. However, moderation is key to keeping the design elegant and balanced.
Organizing your materials before starting your Crochet Easter Bunny Ornaments – Pattern saves time and prevents frustration. Preparing yarn colors, pre-cutting ribbon lengths, and having all tools within reach makes the creative process more enjoyable and efficient.
3. Step-by-Step Design Approach for Crochet Easter Bunny Ornaments – Pattern
When approaching a Crochet Easter Bunny Ornaments – Pattern, it helps to break the design into manageable sections. Typically, the project involves crocheting the body, shaping the ears, adding facial features, and attaching a hanging loop. Working methodically ensures consistent results.
Begin by crocheting a small circular base for the bunny’s head or body. Using gradual increases creates a rounded shape. Once the desired size is achieved, you can begin decreasing to close the shape if you are making a stuffed ornament.
The ears are a defining feature of any Crochet Easter Bunny Ornaments – Pattern. They can be crocheted separately and sewn on, or incorporated directly into the main body. Long, narrow shapes with subtle shaping at the tip give the bunny a realistic yet playful appearance.
Facial details bring personality to your ornament. Simple embroidered whiskers, a tiny triangle nose, and small stitched eyes create a sweet expression. Keeping the face minimal often results in a more timeless and elegant design.
Attaching a loop for hanging is a crucial final step. A small crocheted chain secured firmly at the top of the head works well. Make sure it is tightly attached so the ornament hangs straight and securely on branches, hooks, or decorative displays.
Before finishing your Crochet Easter Bunny Ornaments – Pattern, inspect your work carefully. Check that all seams are secure, stuffing is evenly distributed, and embellishments are firmly attached. A final gentle shaping with your hands ensures the ornament looks symmetrical and polished.
4. Creative Ideas and Customization for Crochet Easter Bunny Ornaments – Pattern
One of the joys of working with a Crochet Easter Bunny Ornaments – Pattern is the ability to customize each piece. You can experiment with different yarn textures, such as fuzzy yarn for a plush effect or metallic thread accents for subtle sparkle.
Color combinations allow you to adapt your ornament to various décor styles. Soft neutrals create a minimalist aesthetic, while bright pastel tones reflect traditional Easter vibrancy. Mixing and matching ear linings with body colors adds depth and contrast.
You can also create themed variations of your Crochet Easter Bunny Ornaments – Pattern. For example, adding a tiny carrot accessory or a miniature flower crown transforms the basic bunny into a character. These variations make the ornaments even more charming.
Personalization makes these ornaments meaningful gifts. Adding embroidered initials or small tags with names can turn your crochet bunny into a keepsake for children, friends, or family members. Handmade gifts often carry emotional value that store-bought decorations cannot match.
Another creative approach is to use your Crochet Easter Bunny Ornaments – Pattern in different settings. They can decorate Easter baskets, hang on spring branches, adorn gift wrapping, or be displayed as part of a seasonal centerpiece. Their versatility enhances their appeal.
Finally, consider making a coordinated set of Crochet Easter Bunny Ornaments – Pattern pieces in various sizes. A collection of small, medium, and slightly larger bunnies displayed together creates visual interest and elevates your seasonal décor.
FAQ About Crochet Easter Bunny Ornaments – Pattern
What skill level is required for Crochet Easter Bunny Ornaments – Pattern?
Most Crochet Easter Bunny Ornaments – Pattern designs are beginner-friendly. Basic stitches like single crochet and simple increases and decreases are usually enough to complete the project successfully.
How long does it take to complete one ornament?
Depending on your experience level, a single Crochet Easter Bunny Ornaments – Pattern ornament can take between one to three hours. Smaller, flat designs are typically quicker than fully stuffed versions.
What type of yarn is best for Crochet Easter Bunny Ornaments – Pattern?
Cotton yarn is often recommended because it holds its shape well and provides crisp stitch definition. However, acrylic yarn can also work beautifully for softer and fluffier ornaments.
Can I wash Crochet Easter Bunny Ornaments – Pattern decorations?
Yes, but it depends on the yarn used. Always check the yarn label for washing instructions. Hand washing and air drying are generally the safest methods to preserve shape and details.
How can I make my Crochet Easter Bunny Ornaments – Pattern look more professional?
Focus on even tension, tight stitching, and careful finishing. Securely weaving in ends and attaching embellishments neatly makes a significant difference in the final result.
Are Crochet Easter Bunny Ornaments – Pattern projects suitable for gifts?
Absolutely. Handmade ornaments are thoughtful, unique, and meaningful gifts. They can be customized with colors, initials, or decorative accents to suit the recipient’s preferences.
Throughout this article, we explored the beauty and versatility of Crochet Easter Bunny Ornaments – Pattern projects. From understanding essential stitches and selecting materials to shaping, finishing, and customizing your ornaments, each step contributes to creating charming handmade Easter decorations. These small crochet pieces not only enhance seasonal décor but also offer a relaxing and fulfilling creative experience.
By mastering the techniques discussed here, you can confidently create your own Crochet Easter Bunny Ornaments – Pattern designs and adapt them to your personal style. Whether you are crafting for your home, preparing heartfelt gifts, or simply enjoying a peaceful crochet session, these ornaments are a delightful way to celebrate spring.
I would truly love to hear your honest opinion about this guide. Have you tried making your own Crochet Easter Bunny Ornaments – Pattern? Do you have suggestions, creative ideas, or personal tips to share? Leave your sincere feedback and let’s continue inspiring each other with handmade creativity.