
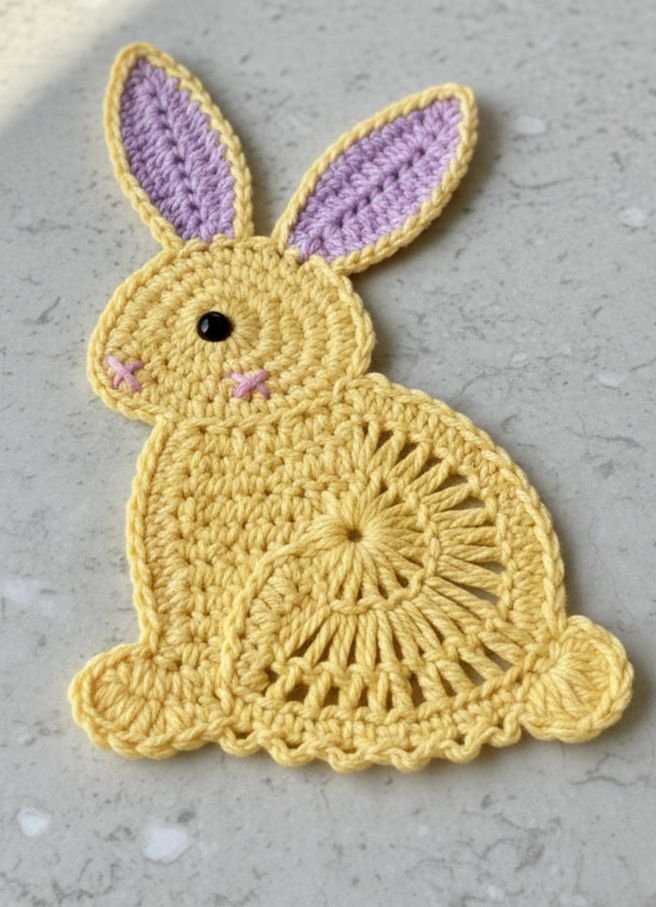
Crochet Bunny Tutorial is the perfect starting point for anyone who wants to create a charming handmade piece filled with personality and warmth. Whether you are a beginner exploring the world of crochet or an experienced crafter looking for a delightful new project, this guide will walk you through every essential detail. In this comprehensive article, you will learn techniques, tips, and creative ideas to help you master your very own Crochet Bunny Tutorial from start to finish.
Crochet has long been cherished as a relaxing and rewarding craft. The simple rhythm of stitches combined with the joy of seeing a project come to life makes it deeply satisfying. When it comes to handmade toys, few projects are as beloved as a crochet bunny. They are adorable, versatile, and perfect as gifts, decorations, or keepsakes. This Crochet Bunny Tutorial will guide you in a structured yet approachable way, ensuring that each step feels manageable and enjoyable.
Creating a bunny through crochet is more than just following instructions. It is about understanding the stitches, shaping techniques, and finishing touches that bring character to your piece. Throughout this article, the term Crochet Bunny Tutorial will not only represent a pattern but also a learning journey. By the end, you will feel confident in adjusting sizes, experimenting with yarns, and even personalizing your bunny with unique details.
1. Understanding the Basics of the Crochet Bunny Tutorial
Before diving into the stitches, it is important to understand what makes a Crochet Bunny Tutorial beginner-friendly and successful. At its core, this project relies on basic crochet techniques such as chain stitches, single crochet, increases, and decreases. These foundational stitches form the structure of the bunny’s body and head.
Most crochet bunnies are created using the amigurumi technique, which involves working in continuous rounds. In a typical Crochet Bunny Tutorial, you will start with a magic ring, allowing you to create a tightly closed center. This method prevents gaps and ensures your stuffing stays securely inside the toy.
Choosing the right yarn is another essential step in your Crochet Bunny Tutorial. Soft cotton or acrylic yarns are ideal because they provide structure while remaining gentle to the touch. Medium-weight yarn is often recommended for beginners, as it makes stitches easier to see and manage.
The hook size should complement your yarn choice. Usually, a slightly smaller hook than recommended on the yarn label is used for amigurumi projects. This creates tighter stitches, which are important in any Crochet Bunny Tutorial to prevent stuffing from showing through.
Stitch markers are extremely helpful when working in continuous rounds. Since you do not join at the end of each round, marking the beginning helps you keep track of your progress. This small habit can make your Crochet Bunny Tutorial much smoother and more organized.
Finally, understanding the pattern structure is key. Many crochet bunny patterns are divided into sections such as head, body, ears, arms, and legs. Breaking the project into parts makes the Crochet Bunny Tutorial feel less overwhelming and more achievable, even for beginners.
2. Step-by-Step Structure of a Crochet Bunny Tutorial
A well-organized Crochet Bunny Tutorial typically begins with the head and body. In many patterns, these are crocheted as one continuous piece to reduce sewing later. Starting from the top of the head, you will increase stitches gradually to form a round shape.
As you move down in your Crochet Bunny Tutorial, you will maintain consistent rounds before decreasing slightly to shape the neck. This transition is subtle but important for giving your bunny a natural look. Even tension throughout this step ensures symmetry.
After completing the body, stuffing becomes essential. Use small amounts of fiberfill at a time and press it gently into place. Proper stuffing during your Crochet Bunny Tutorial prevents lumps and helps maintain the bunny’s shape over time.
The ears are often crocheted separately. In many Crochet Bunny Tutorial designs, the ears are made by chaining a foundation and working rows back and forth, or by creating elongated rounds. Longer ears can give your bunny a floppy and playful personality.
Arms and legs are usually small cylindrical shapes. In a detailed Crochet Bunny Tutorial, these parts are either sewn on later or crocheted directly into the body for added durability. Sewing securely is crucial if the bunny will be handled frequently.
Finishing touches complete your Crochet Bunny Tutorial. Adding safety eyes or embroidering facial features brings your bunny to life. A small embroidered nose and a gentle smile can transform a simple project into a heartwarming handmade treasure.
3. Personalizing Your Crochet Bunny Tutorial
One of the most enjoyable aspects of any Crochet Bunny Tutorial is personalization. Once you understand the basic construction, you can experiment with colors, textures, and accessories. Soft pastel tones are popular for spring-themed bunnies, while neutral shades create a timeless look.
You can adjust the size of your bunny by changing yarn weight and hook size. A thinner yarn will create a smaller bunny, while bulky yarn produces a larger, cuddly version. This flexibility makes the Crochet Bunny Tutorial adaptable to many creative goals.
Clothing and accessories add personality. Consider crocheting a tiny scarf, dress, or hat to complement your bunny. Incorporating simple embellishments enhances your Crochet Bunny Tutorial and allows you to showcase your creativity.
Embroidery details can also elevate your design. Adding blush to the cheeks, shaping the eyes with thread, or creating textured fur effects are subtle ways to refine your Crochet Bunny Tutorial. These details require patience but make a noticeable difference.
If you are making the bunny as a gift, personalization can include initials or themed colors. For example, pastel pink and white are often associated with Easter decorations, making your Crochet Bunny Tutorial perfect for seasonal displays.
Finally, experimenting with different stitch patterns can change the overall texture. While most bunnies use single crochet, incorporating small textured stitches in specific areas can add depth. Your Crochet Bunny Tutorial becomes more than a pattern; it becomes a creative expression.
4. Tips for Success in Your Crochet Bunny Tutorial
Consistency is one of the most important factors in a successful Crochet Bunny Tutorial. Maintaining even tension ensures that your bunny’s shape remains symmetrical. Practice makes perfect, so do not worry if your first attempt is not flawless.
Take your time reading the pattern carefully. Many mistakes happen when steps are rushed or misunderstood. A thoughtful approach to your Crochet Bunny Tutorial will help you avoid unnecessary unraveling and frustration.
Keep your workspace organized. Having scissors, yarn needles, stitch markers, and stuffing ready before starting your Crochet Bunny Tutorial makes the process smoother. Preparation saves time and reduces interruptions.
Blocking is not always necessary for amigurumi, but gently shaping your bunny after stuffing can improve its final look. Adjusting the stuffing and smoothing out the fabric enhances the quality of your Crochet Bunny Tutorial.
Do not be afraid to redo a section if needed. Learning through corrections is part of mastering any Crochet Bunny Tutorial. Each project helps you improve your technique and confidence.
Most importantly, enjoy the creative process. A Crochet Bunny Tutorial is not just about the final product. It is about the relaxing experience of crafting something by hand and celebrating your progress along the way.
FAQ About Crochet Bunny Tutorial
What skill level is required for a Crochet Bunny Tutorial?
Most Crochet Bunny Tutorial patterns are suitable for beginners who understand basic stitches such as chain and single crochet. With patience and practice, even newcomers can complete this project successfully.
How long does it take to finish a Crochet Bunny Tutorial?
The time required depends on your experience level and the size of the bunny. On average, a small bunny can take several hours spread over a few days.
What type of yarn works best for a Crochet Bunny Tutorial?
Cotton and acrylic yarns are commonly recommended. They provide structure and softness, making them ideal for amigurumi projects like this Crochet Bunny Tutorial.
Can I wash a crochet bunny?
Yes, but always check the yarn label for washing instructions. Many acrylic yarns are machine washable, while cotton may require gentle care.
How do I prevent gaps in my Crochet Bunny Tutorial?
Using a smaller hook and maintaining tight tension helps minimize gaps. This technique ensures that stuffing remains hidden inside your bunny.
Is it safe to use safety eyes?
Safety eyes are commonly used, but for very young children, embroidered eyes are a safer alternative. This makes your Crochet Bunny Tutorial both beautiful and secure.
In this complete Crochet Bunny Tutorial, we explored everything from foundational stitches and structure to personalization and finishing techniques. You learned how to select the right materials, shape each part of the bunny, and add thoughtful details that bring character and charm to your handmade creation. By understanding the process step by step, you can confidently approach your next crochet project with creativity and skill.
Now it is your turn to pick up your hook and start crafting. I hope this Crochet Bunny Tutorial has inspired and guided you clearly. Please leave your honest opinion and share your suggestions. Your feedback helps improve future tutorials and supports a growing community of crochet enthusiasts.