
The Bitty Kitty Bag – crochet pattern is a charming and fun project that combines creativity with functionality. This adorable bag is perfect for cat lovers, crochet enthusiasts, or anyone who enjoys making personalized handmade accessories. With its playful feline design, the Bitty Kitty Bag quickly becomes a favorite project for beginners and experienced crocheters alike. Not only is it a wonderful gift idea, but it also makes a stylish and whimsical accessory to use every day.
Crafting a Bitty Kitty Bag – crochet pattern allows you to explore textures, colors, and different yarn weights. It’s a versatile design that can be customized according to your preferences, whether you want a neutral and classic look or a bold and colorful statement piece. The bag’s simple yet delightful structure makes it an excellent introduction to shaping techniques in crochet, while still offering room for creative flair.
Before diving into the step-by-step tutorial, it’s important to highlight how this Bitty Kitty Bag – crochet pattern is not only about creating a practical item but also about embracing the joy of handmade artistry. It embodies the warmth of crafting, the joy of personalization, and the satisfaction of producing something useful and beautiful with your own hands.
1. Materials and Tools for the Bitty Kitty Bag – Crochet Pattern
To bring the Bitty Kitty Bag – crochet pattern to life, you’ll need a handful of simple materials. Start by selecting yarn in your preferred color. Cotton yarn is highly recommended because it provides durability and structure to the bag, ensuring it holds its shape while still being soft to the touch.
The size of the crochet hook will depend on the yarn weight you choose. For most cotton yarns, a 4 mm to 5 mm hook works perfectly, but always check the yarn label for recommendations. Having a good quality hook will also help keep your stitches even and consistent.
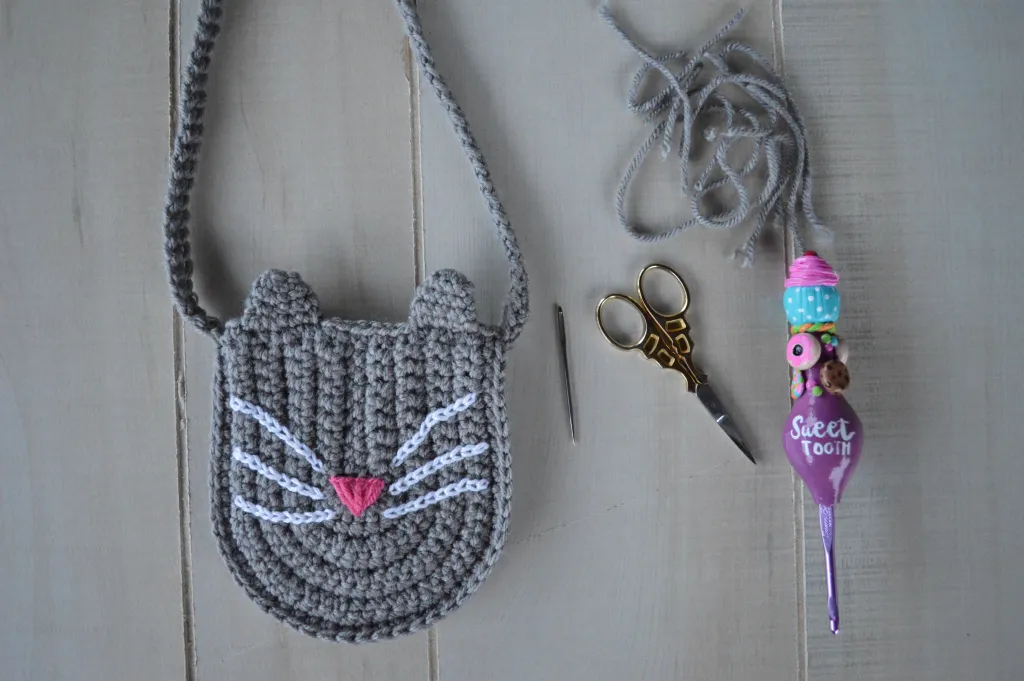
Aside from yarn and hooks, you’ll need basic accessories such as a yarn needle for weaving in ends, stitch markers to keep track of your rounds, and a pair of scissors. Optional but highly useful items include a bag lining fabric and small handles if you want to give your Bitty Kitty Bag a more polished and professional finish.
Safety eyes or embroidered eyes can bring the kitty’s face to life. If you are gifting the bag to a child, embroidered eyes are a safer alternative. You can also use buttons or felt pieces to create adorable facial details.
Another optional addition is a magnetic snap closure, which adds functionality to your bag. It ensures that your belongings stay secure inside without compromising the bag’s cute design.
By preparing your tools and materials ahead of time, you’ll ensure a smooth and enjoyable crocheting experience. Gathering everything before starting the Bitty Kitty Bag – crochet pattern prevents unnecessary interruptions during your creative flow.
2. Step-by-Step Instructions for the Bitty Kitty Bag – Crochet Pattern
Begin your Bitty Kitty Bag – crochet pattern by creating a foundation chain that determines the bag’s width. Most versions of this bag start with around 25 to 30 chains, but you can adjust according to the desired size. Once your base is ready, crochet in rows or rounds to form the body of the bag.
The body is usually constructed using simple stitches such as single crochet or half double crochet. These stitches provide a sturdy structure while maintaining flexibility. Crocheting in continuous rounds is a great way to avoid visible seams, which helps keep the design clean and polished.
Once the body reaches your preferred height, you can move on to shaping the kitty’s ears. These are usually small triangular extensions made at the top corners of the bag. Ears add that unmistakable feline charm, instantly transforming a simple tote into the whimsical Bitty Kitty Bag.
Next, it’s time to craft the bag’s face. Embroider whiskers, add safety eyes, and create a small nose using yarn or felt. This step allows for endless personalization—you can make your kitty look playful, sleepy, or even mischievous depending on your design choices.
The straps are another important element. You can crochet long straps for a crossbody style or short handles for a handbag. Strong stitches like slip stitches or reinforced rows ensure the straps remain durable enough to carry daily essentials.
Finally, add any finishing touches such as a lining, decorative buttons, or extra embellishments. These small details elevate your Bitty Kitty Bag – crochet pattern and make it uniquely yours.
3. Creative Variations of the Bitty Kitty Bag – Crochet Pattern
One of the most exciting aspects of working with the Bitty Kitty Bag – crochet pattern is the opportunity for creative customization. You can experiment with yarn colors to match your personality or create seasonal versions of the bag. A pastel palette makes for a sweet springtime look, while darker tones add sophistication for fall and winter.
You can also modify the size of the bag. By adjusting the number of foundation chains and rows, you can create a mini coin purse version or a larger tote-style bag. The versatility of the pattern makes it ideal for different purposes, whether it’s a small accessory or a functional everyday bag.
Texture is another way to add uniqueness. Try incorporating different stitch patterns like bobbles, shells, or ridges into the body of the bag. These stitch variations give depth and personality to your project.
For cat lovers who enjoy a playful touch, you can crochet small paw prints or a tail and attach them to the bag. These details make the bag even more delightful, especially for kids or as a themed gift.
Adding accessories like keychains, tassels, or pom-poms enhances the bag’s design. For example, a pom-pom in the shape of a kitty tail adds whimsy while maintaining the feline theme.
Remember, the beauty of the Bitty Kitty Bag – crochet pattern lies in its adaptability. Every crafter can take the basic design and infuse it with their unique style and creativity.
4. Tips for Success with the Bitty Kitty Bag – Crochet Pattern
When working on the Bitty Kitty Bag – crochet pattern, maintaining consistent tension is key. Uneven tension can affect the shape and sturdiness of the bag. Practicing your stitches before starting helps ensure smooth results.
Blocking is another useful step. Once your bag is completed, lightly steam or dampen the project and shape it properly. This technique evens out stitches and helps the bag maintain its structure.
If you are a beginner, don’t be afraid to take it slow. Break the pattern into manageable steps and celebrate small achievements, such as completing the bag’s base or finishing the ears. Crochet is as much about the process as it is about the final result.
Always check your stitch count regularly, especially when working in rounds. Miscounts can cause uneven edges or distort the bag’s shape. Stitch markers are invaluable for keeping your place and ensuring accuracy.
Experiment with different yarns to see how they affect the bag’s outcome. For instance, cotton yarn provides structure, while acrylic might result in a softer, more flexible bag. Testing small swatches helps you choose the best material for your needs.
Finally, don’t forget to enjoy the journey. The Bitty Kitty Bag – crochet pattern is meant to be fun, creative, and rewarding. Each stitch brings you closer to a charming handmade piece that reflects your love of crochet and creativity.
FAQ about the Bitty Kitty Bag – Crochet Pattern
What skill level is required for the Bitty Kitty Bag – crochet pattern?
This pattern is beginner-friendly, but even advanced crocheters enjoy making it due to its customizable design.
How long does it take to complete the bag?
Depending on your skill level and the size of the bag, it can take anywhere from a few hours to a couple of days.
Can I use different yarn types for the Bitty Kitty Bag – crochet pattern?
Yes, cotton yarn is recommended for structure, but you can also experiment with acrylic or blends for different textures.
Is the Bitty Kitty Bag suitable for children?
Absolutely, but if gifting to kids, it’s safer to embroider or crochet the eyes instead of using safety eyes or buttons.
Do I need to line the bag?
Lining is optional, but it adds durability and prevents small items from slipping through stitches.
Can I resize the Bitty Kitty Bag?
Yes, by adjusting the foundation chain and number of rows, you can make smaller or larger versions.
The Bitty Kitty Bag – crochet pattern is more than just a crafting project; it’s a blend of creativity, functionality, and joy. With simple stitches, customizable details, and endless possibilities for personalization, this bag is an excellent choice for anyone who loves handmade items. Whether you’re making it for yourself, a loved one, or as a thoughtful gift, the process is just as rewarding as the finished piece.
Now that you’ve explored this tutorial, I’d love to hear your thoughts! Share your sincere opinion and suggestions on the Bitty Kitty Bag – crochet pattern—your feedback helps inspire new ideas and keeps the joy of crochet alive in our creative community.