
Puff Ripple Stitch – Crochet Pattern is one of the most charming and textured techniques you can add to your handmade collection. From the very first row, this stitch combination creates a beautiful wave effect enhanced by soft, raised puff stitches that give dimension and personality to any crochet project. If you love patterns that look intricate but are surprisingly approachable, this design will quickly become one of your favorites.
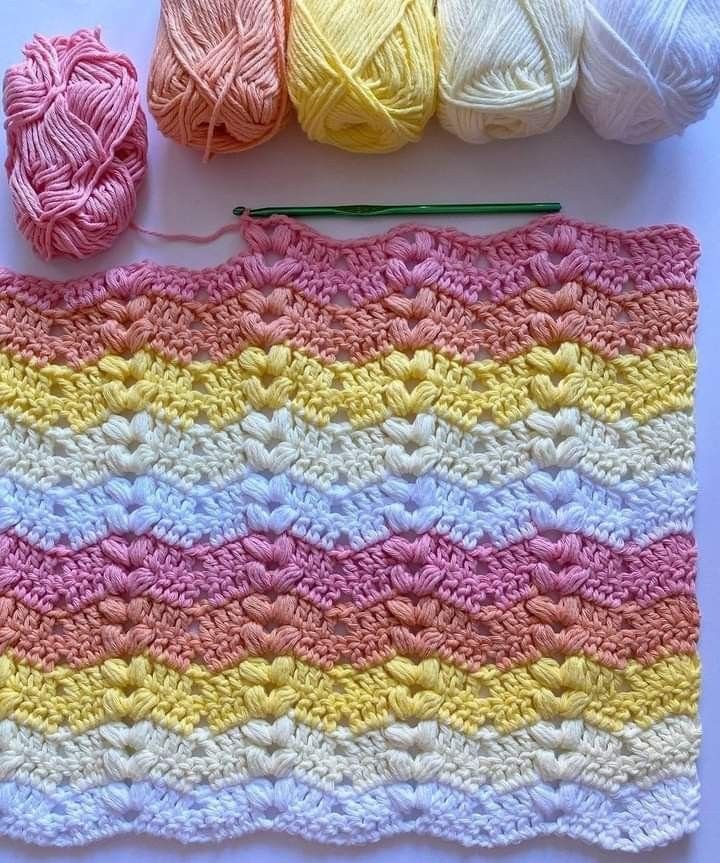
The beauty of the Puff Ripple Stitch – Crochet Pattern lies in its balance between structure and softness. The ripple creates movement, while the puff stitches add a delightful 3D texture that catches the light and highlights the yarn’s color transitions. Whether you are crafting a cozy blanket, a stylish scarf, or a decorative pillow cover, this stitch brings elegance without overwhelming complexity.
In this complete guide, you will discover everything you need to know about the Puff Ripple Stitch – Crochet Pattern, from understanding how the stitch works to tips for mastering tension and texture. This article is designed to be beginner-friendly yet detailed enough for experienced crocheters who want to refine their skills. Let’s explore this stunning stitch step by step and uncover why it has become so popular in the crochet community.
1. What Is the Puff Ripple Stitch – Crochet Pattern?
The Puff Ripple Stitch – Crochet Pattern combines two beloved crochet elements: the ripple (also known as chevron) pattern and the puff stitch. The ripple pattern creates a flowing wave design through strategic increases and decreases, while the puff stitch adds raised clusters that bring softness and texture to the surface.
A ripple pattern is formed by repeating peaks and valleys across the row. These are achieved by working multiple stitches into one space for peaks and crocheting stitches together for valleys. When combined correctly, this sequence produces a continuous wave that feels rhythmic and visually appealing.
The puff stitch, on the other hand, is created by yarn over multiple times and pulling up loops in the same stitch before closing them together. This produces a rounded, plush texture. In the Puff Ripple Stitch – Crochet Pattern, puff stitches are often placed along the peaks or strategically within the waves to highlight the design.
One of the reasons crocheters love this pattern is its versatility. It works beautifully with solid yarns for a sophisticated look, but it truly shines when used with gradient or self-striping yarn. The ripples enhance color transitions, while the puff stitches emphasize depth.
This pattern is suitable for many skill levels. Beginners who are comfortable with basic stitches like double crochet can learn it with patience, while intermediate crocheters will enjoy the relaxing repetition once the pattern rhythm is established.
Most importantly, the Puff Ripple Stitch – Crochet Pattern allows for creative customization. You can adjust the height of the ripples, change the spacing of puff stitches, or experiment with different yarn weights to achieve unique results.
2. Materials and Preparation for Puff Ripple Stitch – Crochet Pattern
Before starting the Puff Ripple Stitch – Crochet Pattern, it is essential to choose the right materials. While the pattern works with almost any yarn type, medium-weight yarn (worsted weight) is often recommended for beginners because it clearly shows stitch definition.
Selecting a hook size that matches your yarn label recommendation is a good starting point. However, if you prefer softer, more pronounced puff stitches, you may consider going up half a size to create a looser fabric that enhances texture.
Tension plays a crucial role in achieving a consistent ripple effect. If your tension is too tight, the waves may curl excessively. If it is too loose, the structure may look uneven. Practicing a small swatch of the Puff Ripple Stitch – Crochet Pattern before starting a large project helps ensure balanced results.
Counting stitches carefully is another key preparation step. Since ripple patterns rely on precise increases and decreases, losing track can disrupt the wave alignment. Using stitch markers at peak and valley points can simplify this process.
Color planning also adds personality to your project. Some crocheters prefer alternating rows of different colors to emphasize the ripple structure, while others stick with a single shade to highlight the puff texture.
Finally, create a comfortable workspace with good lighting. Because puff stitches involve multiple loops on the hook, clear visibility helps maintain consistent stitch height and tension throughout your Puff Ripple Stitch – Crochet Pattern project.
3. How to Crochet the Puff Ripple Stitch – Crochet Pattern Step by Step
To begin the Puff Ripple Stitch – Crochet Pattern, start with a foundation chain that is a multiple of your chosen ripple repeat. Many ripple designs use multiples of 14 or 16 plus additional turning chains, but always calculate based on your specific variation.
The first row typically establishes the ripple structure using double crochet stitches. You will create peaks by placing multiple stitches in one space and valleys by crocheting stitches together. This foundational row sets the wave pattern for the entire project.
In the next row, puff stitches are introduced. To create a puff stitch, yarn over, insert the hook into the stitch, pull up a loop, and repeat several times before pulling through all loops on the hook. This forms a rounded cluster that stands out beautifully.
Placement of puff stitches can vary. Some versions of the Puff Ripple Stitch – Crochet Pattern place puffs only at the peaks for a dramatic effect, while others incorporate them throughout the row for a more textured fabric.
Maintaining consistency in puff height is essential. Try to pull up loops to the same height each time. Uneven loop lengths can cause the fabric to look irregular. With practice, your hands will naturally develop a steady rhythm.
As you continue repeating the established pattern rows, the waves become more defined. After a few repeats, you will notice how the ripples flow seamlessly across the fabric, creating a visually satisfying and textured crochet piece.
4. Creative Project Ideas Using Puff Ripple Stitch – Crochet Pattern
The Puff Ripple Stitch – Crochet Pattern is ideal for blankets. The combination of waves and plush puffs makes it perfect for baby blankets, throw blankets, or even larger bedspreads. The texture adds warmth without excessive weight.
Scarves and shawls also benefit from this stitch. The ripple effect gives movement, while the puff stitches add softness around the neck. Choosing lightweight yarn creates an elegant accessory suitable for multiple seasons.
For home décor, consider cushion covers made with the Puff Ripple Stitch – Crochet Pattern. The raised texture adds a sophisticated touch to sofas and chairs, making handmade décor feel modern and inviting.
Crocheted table runners are another creative option. When worked in cotton yarn, the stitch provides both structure and decorative flair. The ripple pattern naturally guides the eye across the table, enhancing presentation.
You can also use this stitch for bags or totes. The puff texture strengthens the fabric slightly and adds visual interest. Lining the bag ensures durability while maintaining the beauty of the crochet exterior.
Finally, consider experimenting with seasonal color palettes. Soft pastels work beautifully for spring projects, while deep jewel tones create a cozy autumn feel. The Puff Ripple Stitch – Crochet Pattern adapts effortlessly to any aesthetic vision.
FAQ About Puff Ripple Stitch – Crochet Pattern
What skill level is required for the Puff Ripple Stitch – Crochet Pattern?
This pattern is suitable for advanced beginners and intermediate crocheters. If you are comfortable with double crochet and basic stitch counting, you can learn this stitch with practice.
Why does my ripple look uneven?
Uneven ripples are usually caused by incorrect stitch counts or inconsistent tension. Double-check your increases and decreases in each row to maintain proper wave formation.
How can I make my puff stitches more defined?
To create more defined puff stitches, ensure you pull up loops to equal height and consider using a slightly larger hook size for softer texture.
Is the Puff Ripple Stitch – Crochet Pattern good for beginners?
Yes, with patience and careful counting, beginners can successfully complete this pattern. Starting with a small swatch helps build confidence.
What type of yarn works best?
Medium-weight yarn is recommended for clarity and texture definition, but the pattern works well with various yarn types depending on your project goals.
Can I adjust the size of my project easily?
Yes, simply modify the foundation chain using the appropriate multiple for your ripple repeat. This makes the Puff Ripple Stitch – Crochet Pattern highly adaptable.
The Puff Ripple Stitch – Crochet Pattern is a beautiful fusion of texture and movement that brings life to any crochet project. Throughout this article, we explored what makes this stitch unique, the materials needed, how to crochet it step by step, and creative ways to use it in blankets, scarves, décor, and more. By mastering tension, counting carefully, and practicing puff consistency, you can create stunning handmade pieces filled with personality and charm.
If you enjoyed learning about the Puff Ripple Stitch – Crochet Pattern, I would love to hear your honest opinion. Have you tried this stitch before? Do you have tips or creative ideas to share? Leave your sincere feedback and suggestions—they may inspire other crocheters to start their next project with confidence and creativity.