
Video Game Controller – Crochet Pattern is more than just a fun craft idea—it’s a creative way to blend modern pop culture with the timeless art of crochet. In recent years, handmade décor inspired by gaming has gained popularity among crafters of all ages. Whether you are making a gift for a gamer, decorating a themed room, or simply looking for a playful project, this pattern brings personality and charm to your handmade collection. By using the Video Game Controller – Crochet Pattern, you can transform yarn into something both nostalgic and meaningful.
Crochet is an accessible craft that allows makers to personalize almost any design. With the Video Game Controller – Crochet Pattern, you can experiment with colors, textures, and details that reflect different gaming styles. From classic black and gray controllers to vibrant, colorful versions, this project offers flexibility. It is suitable for beginners willing to practice basic stitches and also satisfying for experienced crocheters who enjoy refining intricate details. The pattern can be adapted into pillows, appliqués, toys, or decorative pieces.
Creating handmade items inspired by everyday objects helps bring warmth into modern spaces. The Video Game Controller – Crochet Pattern stands out because it connects generations. Adults who grew up playing video games appreciate the nostalgic element, while younger audiences love the playful design. This pattern is not just about crafting; it is about storytelling through yarn. As you follow along, you will learn how to structure your project, select the right materials, and optimize your final result for durability and style.
1. Understanding the Video Game Controller – Crochet Pattern
The Video Game Controller – Crochet Pattern typically starts with a flat or slightly padded base that mimics the silhouette of a standard controller. This shape can be achieved by increasing and decreasing stitches evenly. The symmetry of the controller is important, so counting stitches carefully ensures balance on both sides.
Most patterns rely on basic crochet techniques such as single crochet, half double crochet, and slip stitches. Beginners will find this reassuring, as the project does not require advanced lacework or complex shaping. The key to mastering the Video Game Controller – Crochet Pattern lies in consistent tension and clear stitch markers.
Shaping the handles of the controller is often done by working gradual increases at the edges. This gives the rounded ergonomic appearance associated with gaming controllers. Using stitch markers to outline curves can help maintain precision.
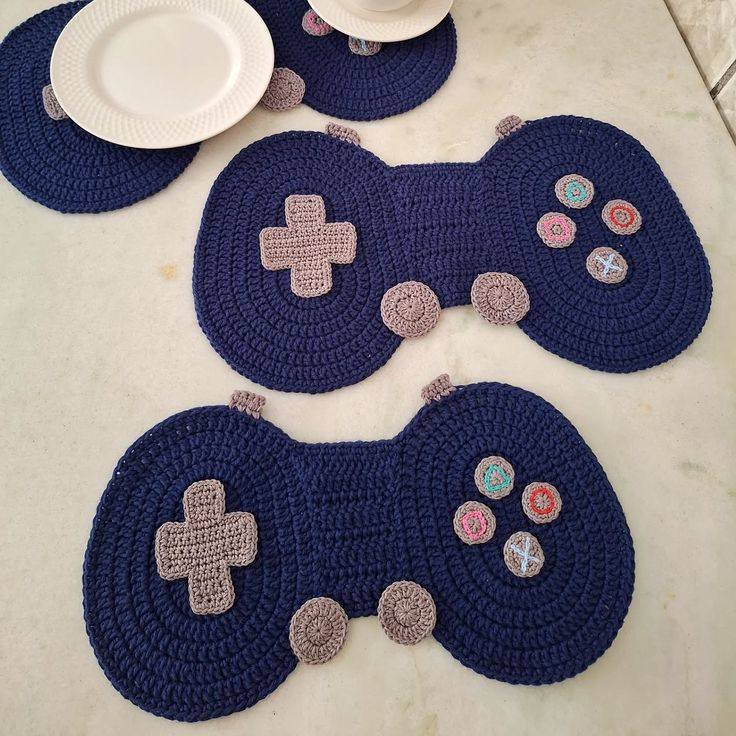
Details such as buttons, directional pads, and analog sticks bring the project to life. These elements are usually crocheted separately and sewn onto the base. Adding slight padding underneath these details enhances the three-dimensional effect.
Color placement plays a significant role in authenticity. While classic controllers are often black or gray, you can personalize your Video Game Controller – Crochet Pattern with bold blues, reds, or pastel shades for a softer aesthetic.
Understanding the structure before beginning helps prevent mistakes. Reading through the entire Video Game Controller – Crochet Pattern prior to starting ensures you know when increases, decreases, and assembly steps occur.
2. Materials and Tools for a Perfect Finish
Choosing the right yarn is essential when working on a Video Game Controller – Crochet Pattern. Medium-weight cotton or acrylic yarn works well because it provides structure without becoming too stiff. Cotton is especially suitable if the final piece will be decorative and long-lasting.
A crochet hook that matches your yarn weight ensures smooth stitching. Typically, a 3.5mm to 4.5mm hook works well for medium yarn. The correct hook size prevents gaps between stitches, keeping the stuffing hidden if you choose to create a plush version.
Stuffing material is optional but recommended if you want a soft toy or pillow. Polyester fiberfill is lightweight and maintains shape over time. Evenly distributing the stuffing prevents lumps and ensures the controller looks realistic.
Small embroidery scissors help trim yarn ends neatly. A yarn needle is essential for sewing together components such as buttons and joysticks. Taking time with assembly improves the overall appearance of the Video Game Controller – Crochet Pattern.
Safety eyes are not necessary for this project, but embroidery thread is useful for adding subtle outlines or decorative accents. Carefully stitched button outlines can enhance realism without overwhelming the design.
Finally, stitch markers and a measuring tape contribute to accuracy. Consistency in measurements ensures that both sides of the controller remain symmetrical. With the right materials, your Video Game Controller – Crochet Pattern will look polished and professional.
3. Step-by-Step Creative Process
Starting the base of the Video Game Controller – Crochet Pattern usually involves chaining a foundation row that matches the controller’s width. From there, rows of single crochet build the body. Gradual increases at specific points shape the rounded handles.
Maintaining even tension throughout the project is important. Uneven stitches can distort the symmetrical look. Checking your work every few rows helps catch small mistakes early.
After completing the front panel, some patterns recommend creating a second identical piece for the back. These pieces are then joined together with single crochet or slip stitches. This step creates a clean, finished edge.
The buttons and analog sticks are often crocheted as small circles. Magic ring techniques are commonly used to create tight, neat rounds. These details are sewn onto the base with careful placement.
Assembly requires patience. Positioning the buttons symmetrically enhances the realism of the Video Game Controller – Crochet Pattern. Measuring equal distances from the center ensures balance.
Once assembled, lightly steam-blocking the piece (if using appropriate yarn) can smooth edges and refine its shape. Blocking is optional but helpful for achieving a professional finish.
4. Customization and Creative Variations
One of the most exciting aspects of the Video Game Controller – Crochet Pattern is customization. You can adapt the size to create keychains, wall décor, or even oversized cushions. Adjusting the yarn thickness changes the scale naturally.
Color variations make each project unique. A pastel palette creates a softer decorative piece, while bold neon shades give a modern twist. Personalizing colors allows you to match room décor or gift preferences.
Adding initials or embroidered names transforms the controller into a personalized keepsake. This makes the Video Game Controller – Crochet Pattern an ideal handmade gift for birthdays or holidays.
You can also experiment with textured stitches for added depth. While the base may remain simple, subtle ribbing or surface crochet can simulate grip patterns.
For children’s rooms, consider using soft hypoallergenic yarn. Ensuring materials are safe and washable makes the finished product both decorative and functional.
Finally, consider turning the pattern into part of a themed collection. Pairing the controller with crocheted headphones or gaming-inspired shapes creates a cohesive handmade décor set centered around the Video Game Controller – Crochet Pattern.
Frequently Asked Questions (FAQ)
What skill level is required for the Video Game Controller – Crochet Pattern?
The Video Game Controller – Crochet Pattern is generally beginner-friendly. Basic knowledge of single crochet, increases, and decreases is sufficient. With patience and attention to stitch count, even new crocheters can complete it successfully.
How long does it take to complete the pattern?
Completion time depends on experience and size. A small appliqué version may take a few hours, while a larger stuffed pillow could take one to two days of relaxed crafting.
Can I sell items made from the Video Game Controller – Crochet Pattern?
In most cases, handmade items created from original patterns can be sold, provided you respect intellectual property guidelines. Always ensure that your design is your own interpretation and does not replicate trademarked branding elements.
What type of yarn works best?
Medium-weight cotton or acrylic yarn is ideal. Cotton provides structure and durability, while acrylic offers softness and affordability.
How can I make the controller look more realistic?
Careful button placement, symmetrical shaping, and subtle embroidery details enhance realism. Consistent tension and neat assembly also improve the final look.
Is this pattern safe for children?
Yes, if made with securely attached parts and safe materials. Avoid small detachable pieces for very young children and ensure all components are firmly sewn.In this detailed guide to the Video Game Controller – Crochet Pattern, you learned how to understand the structure, choose the right materials, follow a step-by-step creative process, and explore customization options. This pattern combines nostalgia, creativity, and functionality in a project that appeals to a wide audience.
By mastering shaping techniques and thoughtful assembly, you can produce a polished and charming handmade piece. If you enjoyed this tutorial, please share your honest opinion and suggestions. Your feedback helps improve future patterns and inspires more creative crochet ideas.