
Learning how to sew Dresden Plates – Quilt Pattern is a delightful and creative experience for every quilting enthusiast. The Dresden Plate is a classic block that has been loved by quilters for generations because of its stunning, circular design made up of wedge-shaped fabric pieces. Whether you are a beginner exploring patchwork or an experienced quilter looking for a new project, this pattern offers endless design possibilities. In this article, we will dive deep into the step-by-step process, techniques, and helpful tips so you can confidently create your own Dresden Plate quilt.
When it comes to quilting, the Dresden Plate stands out because of its versatility. You can sew it in bright, modern fabrics for a fresh look, or choose vintage florals to create a timeless traditional piece. Understanding the process of how to sew Dresden Plates – Quilt Pattern gives you the freedom to express creativity through fabric selection, cutting accuracy, and precise sewing techniques. The finished quilt block looks intricate, but the method is surprisingly straightforward once broken into steps.
This tutorial will guide you through preparing your fabric wedges, assembling the plate, attaching it to a background, and finishing the quilt. Along the way, you will discover important tips that make the process easier and ensure a polished result. Let’s now explore the details so you can start creating your beautiful Dresden Plate quilt today.
1. Understanding the Dresden Plate Quilt Pattern
The first step in learning how to sew Dresden Plates – Quilt Pattern is understanding what this design represents. The Dresden Plate is made of fabric wedges, often shaped like petals, that are sewn together in a circle. Once assembled, the result resembles a flower or a decorative plate, which is how it got its name.
This quilt block became popular in the 1920s and 1930s, during the era when quilting thrived as a creative outlet for women. It remains a beloved design because of its charm and adaptability. You can make Dresden Plates with as few as 12 wedges or as many as 20 or more, depending on the look you want.
The pattern also allows flexibility with the tips of the wedges. They can be pointed, rounded, or even flat, which creates different styles within the same block. This versatility is why quilters continue to return to the Dresden Plate generation after generation.
Fabric choice is another exciting part of this design. Whether you select bold modern prints, soft pastels, or reproduction fabrics, your Dresden Plate will reflect your personality. Each wedge showcases your fabric beautifully, making this block a great choice for scrap quilting.
In addition, the Dresden Plate can be used in various quilting projects. It works well in pillows, wall hangings, table runners, or full-size quilts. Once you master the basics, you can adapt the block into different creative projects.
By fully understanding the history and flexibility of this block, you gain appreciation for why quilters continue to explore how to sew Dresden Plates – Quilt Pattern and why it is a must-learn technique.
2. Preparing the Fabric and Cutting the Wedges
Now that we know what makes this pattern special, the next step in how to sew Dresden Plates – Quilt Pattern is preparing your fabric. Proper preparation ensures your wedges come together neatly and evenly.
First, gather your chosen fabrics. You can use a single fabric line for a cohesive look or mix various prints and solids for a scrappy, vibrant style. Balance light, medium, and dark tones to add depth to the finished block.
Next, you’ll need a Dresden Plate ruler or template. These rulers are designed to cut precise wedge shapes. If you don’t have one, you can make your own template from cardboard or plastic using a printable guide.
Cut your fabric into strips that match the width of your wedge ruler. Then, place the ruler on top of the strip and cut out wedge shapes with a rotary cutter. Repeat until you have the number of wedges needed for your plate.
Be sure to cut accurately. Small mistakes in cutting can cause the wedges not to line up properly. Taking your time with this step saves frustration later in the sewing process.
Press your fabric pieces before cutting if needed, as wrinkles can distort the shapes. Organized preparation sets the foundation for a well-constructed quilt block.
By focusing on fabric preparation and accurate cutting, you are already on the path to mastering how to sew Dresden Plates – Quilt Pattern with professional-looking results.
3. Sewing the Wedges Together
The exciting part of how to sew Dresden Plates – Quilt Pattern begins when you start stitching the wedges together. This is where your block comes to life.
Take two wedges and place them right sides together. Sew along one side using a ¼-inch seam allowance. Accuracy here is key because even small inconsistencies can affect the overall circle.
Press the seam to one side before adding the next wedge. Continue sewing wedges together in pairs, then join pairs into larger sections until you have a full circle.
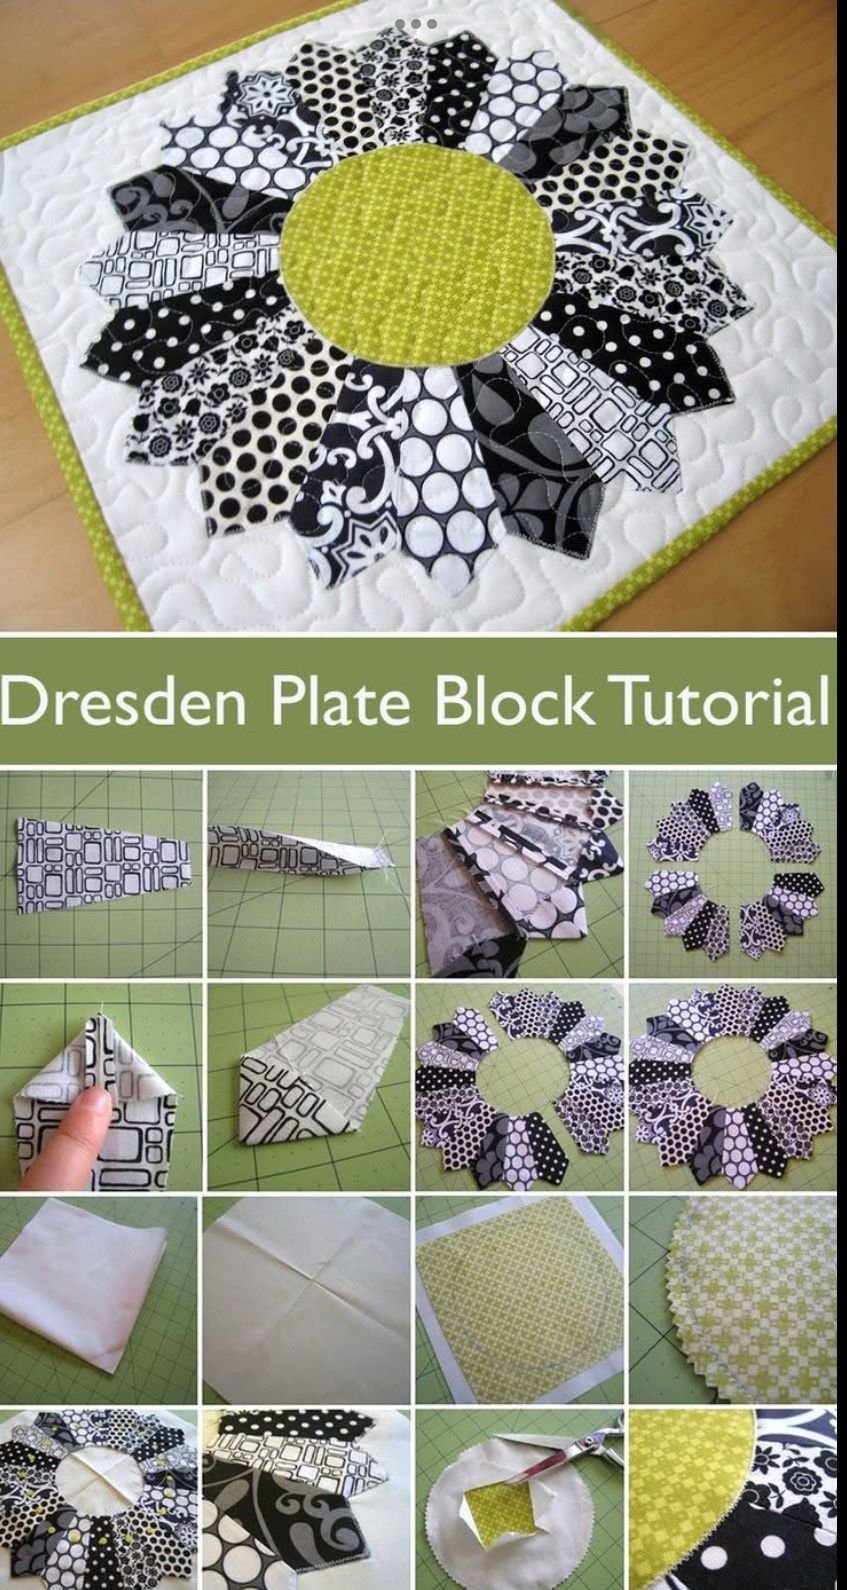
If your wedges have pointed or rounded tops, sew the tips before assembling the full circle. This detail gives the Dresden Plate its distinctive flower-like look. For pointed wedges, fold the top edge in half and stitch, then turn right side out and press.
When all wedges are joined, you might notice the circle not lying perfectly flat. Don’t worry—slight adjustments can be made during pressing or when attaching the plate to the background fabric.
Take your time during this step. The more careful you are with your seam allowances and pressing, the more symmetrical and polished your Dresden Plate will look.
At this stage, you’ll clearly see the beauty of your design and understand why quilters love exploring how to sew Dresden Plates – Quilt Pattern for both traditional and modern projects.
4. Appliquéing the Dresden Plate onto Background Fabric
The final step in how to sew Dresden Plates – Quilt Pattern is attaching the assembled plate to a background block. This step gives structure to the block and prepares it for quilting.
Choose a background fabric that complements your plate. Solid colors or subtle prints work best, as they allow the Dresden Plate design to stand out. Cut a square background piece slightly larger than the plate.
Center the plate on the background. Pin or use fabric glue to hold it in place. Then, appliqué around the edges by hand or machine. For a clean look, turn under the raw edges slightly before stitching.
If your Dresden Plate has an open center, cover it with a fabric circle. This circle can be hand-appliquéd or machine-sewn. It not only adds beauty but also hides the seam points of the wedges.
Take your time to ensure the plate lies flat without puckering. Press the block gently after finishing the appliqué.
Once the Dresden Plate is securely attached, you can assemble it into larger quilt projects. The block can be bordered, sashed, or combined with other designs to create a quilt top.
This step completes the process and allows you to showcase your work proudly. Mastering this stage means you have successfully learned how to sew Dresden Plates – Quilt Pattern from start to finish.
How to sew Dresden Plates – Quilt Pattern
1. What size should I cut my wedges for a Dresden Plate?
The size depends on your ruler or template. Most Dresden Plate rulers provide multiple size options, allowing you to cut wedges for blocks ranging from 6 to 20 inches in diameter.
2. How many wedges are needed to make one Dresden Plate?
It usually takes 12 to 20 wedges, depending on the width of each piece. Always test a circle with a few wedges before cutting all of your fabric to ensure the math works correctly.
3. Can I sew Dresden Plates without a special ruler?
Yes, you can create your own wedge template using cardboard or template plastic. Just make sure the angles are precise so the circle comes together evenly.
4. What is the best way to finish the center of a Dresden Plate?
The center is typically covered with a fabric circle. This can be appliquéd by hand or machine. You can use contrasting or matching fabric to add a unique touch.
5. Can beginners make Dresden Plates?
Absolutely! While it may look complex, the process is beginner-friendly as long as you focus on accurate cutting, seam allowances, and pressing.
6. What projects can I make with Dresden Plates?
You can use them in quilts, pillows, table runners, or wall hangings. The block adapts beautifully to many types of projects.
Now you know the full process of how to sew Dresden Plates – Quilt Pattern from preparing fabric, cutting wedges, sewing them together, and finally appliquéing the plate onto a background. This timeless block offers creativity, flexibility, and beauty for quilters of all levels.
I hope this detailed guide inspires you to try your own Dresden Plate project. Have you ever made one before, or are you planning to start soon? Please share your honest opinion and suggestions in the comments—I’d love to hear about your quilting journey and experiences!