
If you are passionate about quilting, learning How to Make an Entwined Star – Quilt Pattern is a beautiful and rewarding project that will add elegance to your sewing journey. The Entwined Star quilt is a striking design that combines precision, geometry, and creativity into one harmonious block. Quilters of all skill levels can enjoy this project, whether you are a beginner eager to try your first star block or an experienced maker looking to refine your cutting and piecing skills.
This pattern is especially admired for its balanced, woven appearance, where each fabric strip looks like it is looping over and under another, forming a mesmerizing star. When completed, the Entwined Star quilt pattern can be used for a full quilt, a table topper, a wall hanging, or even as part of a sampler quilt. The versatility makes it one of the most beloved star patterns in modern quilting.
In this article, you will not only learn how to make an Entwined Star quilt pattern step by step, but also gain practical tips on fabric selection, piecing accuracy, and finishing techniques. By the end, you’ll be ready to bring this timeless star to life in your own quilting projects.
1. Understanding the Entwined Star Quilt Pattern
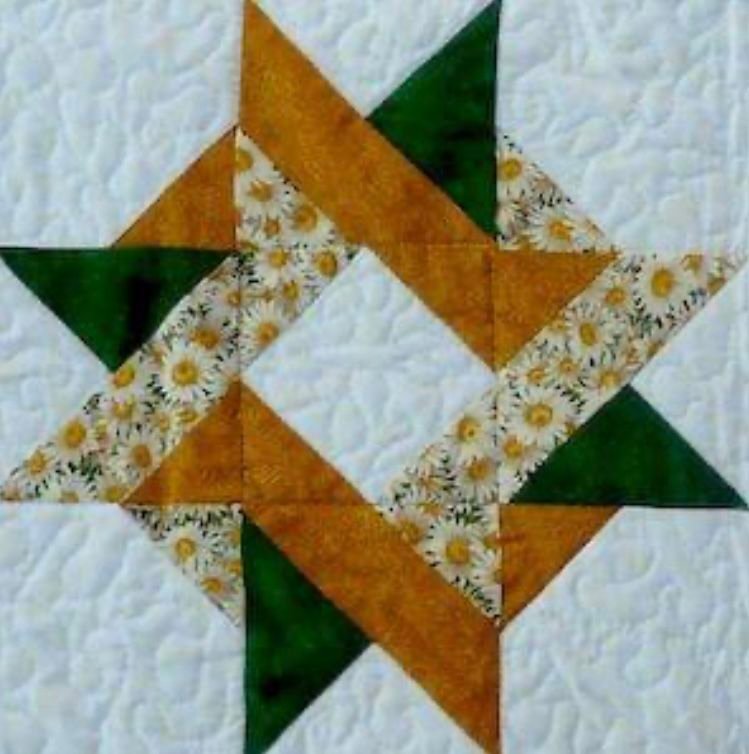
The first step in mastering How to Make an Entwined Star – Quilt Pattern is to understand its structure. The design is made up of interlocking diamond shapes that give the illusion of weaving. This layered appearance is what makes the block stand out in comparison to simpler star blocks like the Sawtooth Star or Lone Star.
The block is typically made using squares, half-square triangles, and carefully arranged strips that interlock at precise angles. Accuracy in cutting and sewing is essential, as even small misalignments can disrupt the visual balance of the entwined effect. However, with patience and practice, the result is a stunning centerpiece for any quilt project.
When selecting fabrics, quilters often choose high-contrast color combinations. Light and dark fabrics highlight the weaving illusion, while a bold background color helps the star shine. Alternatively, a monochromatic approach with shades of the same color creates a more subtle yet elegant design.
Another important consideration is the size of your finished block. Beginners may find it easier to start with a larger block, such as 12 inches, before attempting smaller, more intricate versions. Larger pieces are more forgiving and allow for easier handling at the sewing machine.
Understanding how the pieces fit together is essential. Many quilters sketch the design or use digital quilt design software to plan their layout before cutting fabric. This ensures that each strip and triangle is in the correct place and reduces mistakes during assembly.
By studying the layout, color placement, and block structure before sewing, you set yourself up for success in making your own Entwined Star quilt pattern.
2. Step-by-Step Guide: How to Make an Entwined Star
To begin How to Make an Entwined Star – Quilt Pattern, you will need the right materials: quilting cotton in your chosen colors, a rotary cutter, cutting mat, ruler, sewing machine, and basic quilting tools such as pins and an iron. With everything ready, you can move through the steps with confidence.
Start by cutting fabric strips and squares according to your chosen block size. Precision is key, so measure carefully and double-check your cuts before proceeding. Clean, sharp edges will make piecing much smoother.
Next, sew your strips and squares together to form the first components of the star. Chain piecing can save time if you are making multiple blocks for a larger quilt. Press each seam as you go, alternating seam directions to reduce bulk.
Once the smaller sections are complete, arrange them on your workspace to preview the star design. This step is exciting, as you will see the entwined effect come to life. Adjust fabrics if necessary to balance colors and contrast before sewing the larger sections together.
Carefully assemble the block, joining rows or quadrants while keeping your points sharp. Using a quarter-inch seam allowance is crucial for accuracy, as even small deviations can distort the block’s symmetry.
Finally, press the completed block thoroughly and square it up if needed. Now you have a beautiful Entwined Star quilt block that can be joined with others or used as a standalone project.
By following these steps, you will master how to make an Entwined Star quilt pattern with precision and creativity.
3. Creative Variations of the Entwined Star
One of the joys of learning How to Make an Entwined Star – Quilt Pattern is discovering the many creative variations you can try. Each version allows you to express your personal style while maintaining the beauty of the original design.
A scrappy Entwined Star is a wonderful way to use leftover fabric. By mixing prints and colors, you create a vibrant star that tells a story of past projects. This approach works especially well when combined with a neutral background fabric.
For a modern twist, try using solid fabrics in bold colors. The clean lines of the star stand out beautifully against minimalist backgrounds, making it perfect for contemporary home décor.
You can also experiment with secondary patterns. When multiple Entwined Star blocks are joined together, new designs emerge at the intersections, creating an intricate quilt top with depth and texture.
Seasonal variations are another exciting idea. Soft pastels can make a spring-inspired quilt, while warm reds and greens create a festive holiday piece. The pattern’s adaptability means it can suit any occasion or theme.
Whether you prefer traditional or modern quilting, the Entwined Star quilt pattern is versatile enough to match your creative vision.
4. Finishing and Displaying Your Entwined Star Quilt
After you have completed your blocks, the final step in How to Make an Entwined Star – Quilt Pattern is finishing your quilt. This stage transforms your blocks into a polished piece ready to use or display.
First, decide on the quilt layout. Will you make a single large star as a centerpiece, or combine several blocks into a full quilt? Planning the arrangement ensures a balanced and cohesive design.
Next, add borders if desired. Borders can frame your star beautifully and give the quilt more presence. Choose fabrics that complement the star without overwhelming it.
Layer your quilt with batting and backing fabric, then baste the layers together. Quilting stitches can enhance the entwined effect by following the star’s lines or adding creative patterns in the background.
Binding is the final touch. Carefully sew your binding strips around the quilt’s edges, creating a clean finish that frames your design. Hand or machine binding can be used depending on your preference.
Once finished, your Entwined Star quilt can be displayed proudly. Hang it on a wall, drape it over a couch, or gift it to a loved one. Its timeless design ensures it will be cherished for years.
Finishing your quilt brings a sense of accomplishment, and each step teaches you more about the art of quilting.
How to Make an Entwined Star – Quilt Pattern
1. Is the Entwined Star quilt pattern beginner-friendly?
Yes, beginners can make this pattern, but it requires attention to accuracy. Starting with larger block sizes makes the process easier.
2. What fabrics work best for the Entwined Star?
High-contrast fabrics are ideal, but scrappy or monochrome versions can also look stunning depending on your creative vision.
3. Can I make a full quilt using only Entwined Star blocks?
Absolutely. Multiple blocks joined together create a striking overall design with secondary patterns.
4. How do I keep my points sharp when sewing?
Use a consistent quarter-inch seam allowance, press carefully, and pin intersections before sewing.
5. What size should I start with?
A 12-inch block is recommended for beginners. More advanced quilters may enjoy working with smaller pieces for greater detail.
6. How can I add a personal touch to my Entwined Star quilt?
Experiment with color schemes, fabric textures, and creative quilting stitches to make the design uniquely yours.
Learning How to Make an Entwined Star – Quilt Pattern is a rewarding experience that combines precision, artistry, and creativity. From understanding the block’s structure to experimenting with variations and finishing techniques, this project offers endless opportunities for expression. Whether you make a single star or an entire quilt, the result will be a beautiful piece of handmade art.
I would love to hear your opinion! Share your thoughts, experiences, and suggestions about quilting this pattern. Your feedback not only inspires me but also helps other quilters on their creative journey.