
The Kitten Ears Pet Bed – Crochet Pattern is a delightful and creative project that combines the love of crochet with the joy of making something special for your furry friend. This pattern allows crafters to design a cozy, playful, and whimsical resting place for their cats or small pets. With its charming ear-shaped details and snug structure, it quickly becomes not only a favorite nap spot but also an adorable decorative piece for any pet lover’s home. Whether you’re a beginner or an experienced crocheter, this tutorial offers the chance to create something both practical and heartwarming.
Many pet owners want their pets to have a dedicated space that feels comfortable and safe. By making your own Kitten Ears Pet Bed – Crochet Pattern, you are giving your pet a unique handmade gift that carries love in every stitch. The bed is soft, washable, and durable, making it perfect for everyday use. Plus, it can be customized with colors and yarn textures to match your home décor or your pet’s personality. This adds a personal touch that store-bought pet beds simply can’t replicate.
Crochet projects like this one also provide an excellent opportunity to practice stitches, shaping, and assembly techniques. You’ll learn how to create structured sides, a cushioned base, and of course, the iconic kitten ears that make this pattern stand out. By following this guide, you’ll end up with a project that blends both function and style. Now, let’s go step by step to explore how to create and enjoy this pattern in detail.
1. Understanding the Kitten Ears Pet Bed – Crochet Pattern
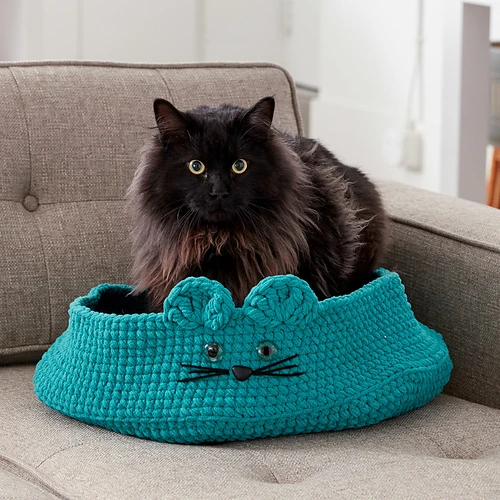
When you first look at the Kitten Ears Pet Bed – Crochet Pattern, you might notice its playful yet functional design. It’s structured like a bowl-shaped cushion with two decorative ears stitched onto the rim. The ears add charm and make it look like a cozy cat-inspired space. The bed is perfect for cats, kittens, or even small dogs and rabbits who love curling up in snug places.
One of the greatest advantages of making this project is that you can customize the size. Whether your pet is a tiny kitten or a larger cat, you can adjust the number of stitches and rounds to suit their needs. The flexibility of crochet makes it easy to scale up or down without losing the design’s essence.
The yarn choice also plays a huge role in the final result. Thicker yarns create a sturdier structure, while softer yarns make a more cushioned feel. Many crafters prefer using cotton blends or chunky acrylic yarn for durability and easy cleaning. Always keep in mind that your pet’s comfort should be the top priority.
The base of the bed typically uses basic stitches such as single crochet or half double crochet, worked in the round to form a firm foundation. Reinforcing the sides is essential to ensure the bed doesn’t collapse under your pet’s weight. This is why choosing the right hook size and tension is crucial.
Another key aspect is the filling for the cushion. Some crocheters prefer stuffing it with fiberfill, while others create a removable pillow insert that can be washed separately. Both methods work well, depending on your preference.
Lastly, the kitten ears are what give the pattern its unique personality. They are crocheted separately and then stitched firmly onto the top edge of the bed. This detail transforms a simple crochet pet bed into a whimsical and adorable piece.
2. Materials and Tools You Will Need
To make the Kitten Ears Pet Bed – Crochet Pattern, it’s important to gather all your supplies before starting. Having everything on hand will ensure a smoother crafting experience and reduce interruptions.
The most important material is yarn. As mentioned before, a chunky or bulky-weight yarn is ideal because it provides both sturdiness and softness. Cotton yarns are especially popular since they are breathable and easy to clean, while acrylic blends often provide more affordability and color options. Choose a yarn that is safe for pets, without loose fibers that could be swallowed.
You will also need a crochet hook that matches the yarn weight. Most chunky yarns recommend hook sizes between 6.5 mm to 9 mm, but you may adjust according to your own tension and preference. A slightly smaller hook will create tighter stitches and a firmer structure.
Additional materials include stitch markers, which are helpful for keeping track of rounds, especially when working in continuous spirals. Scissors, a yarn needle for sewing parts together, and stuffing for the cushion are also required. If you decide to make a removable pillow insert, you may also need fabric and basic sewing tools.
Many crocheters also like to use a non-slip fabric on the bottom of the bed. This prevents the bed from sliding around when pets jump in and out. It can be sewn or glued to the crochet base for added stability.
Safety is an essential consideration when making pet beds. Avoid any embellishments such as buttons, beads, or small parts that a cat or dog could chew on and swallow. Stick with strong stitches and secure seams.
Finally, make sure you set aside a comfortable space to work on your project. Since this bed can be a bit larger than other crochet projects, having a roomy surface will make it easier to keep your work organized.
3. Step-by-Step Guide to Making the Kitten Ears Pet Bed
Creating the Kitten Ears Pet Bed – Crochet Pattern involves a few main sections: the base, the sides, the cushion, and the ears. By breaking it down, the process becomes easier to follow.
Start by making a magic ring and working single crochet stitches in the round to form the base. You will continue increasing evenly until the circle reaches the desired size for your pet. Remember, this foundation will determine how roomy the bed feels.
Once the base is complete, move on to building the sides. Instead of continuing to increase, you will now crochet upward in straight rounds to form walls. This step requires maintaining consistent tension to keep the structure firm and upright. Depending on how tall you want the walls, you may work anywhere between 10 to 20 rounds.
The cushion can be created in two ways: crocheted directly as part of the bed or made separately as a removable pillow. For the removable option, simply crochet another flat circle the same size as the base, then stuff it with fiberfill or fabric scraps before sewing it shut. This allows easy washing.
Now, let’s focus on the signature kitten ears. To make them, crochet two triangular pieces separately. They are typically worked by starting with a few stitches at the base and gradually decreasing rows to form a pointed tip. After finishing, stitch them securely onto the rim of the bed.
Once all pieces are assembled, weave in the ends carefully, making sure there are no loose strands that a pet could pull. The final result should look structured, cozy, and irresistibly cute with its little ears peeking up.
This process may sound detailed, but it’s very achievable even for beginners. The most important aspect is patience and careful attention to shaping. The more effort you put into it, the longer-lasting and more comfortable the bed will be.
4. Tips for Customizing Your Kitten Ears Pet Bed
One of the best things about the Kitten Ears Pet Bed – Crochet Pattern is the ability to personalize it. Every pet is unique, and their resting spot can reflect that individuality.
You can experiment with different yarn colors to match your home interior or highlight your pet’s personality. For example, neutral shades blend seamlessly into modern living rooms, while bright colors create a cheerful accent.
Adding stripes or color changes can also enhance the design. Many crocheters like to use variegated yarns, which naturally produce beautiful patterns without extra effort.
The size of the ears can also be adjusted. Larger ears give the bed a playful cartoonish look, while smaller ones add a subtle touch. Some crafters even crochet additional details, such as a small bow, though care should be taken to ensure pets can’t chew them off.
Another great customization is making the cushion extra thick for pets who love plush comfort. You could even make seasonal covers for the pillow insert, switching them out for winter and summer.
For multi-pet households, creating more than one bed in matching or coordinating colors can prevent territorial disputes and keep your pets happy.
Lastly, don’t forget to label your creation with a small handmade tag. Many crochet enthusiasts take pride in marking their projects, making it clear that the item is crafted with love.
FAQ about the Kitten Ears Pet Bed – Crochet Pattern
Q: Is the Kitten Ears Pet Bed – Crochet Pattern suitable for beginners?
A: Yes, the pattern uses basic stitches and simple shaping techniques. With patience, even beginners can complete it successfully.
Q: What size should I make the bed for my cat?
A: The size depends on your pet. Measure your cat when curled up, then add a few extra inches for comfort. Adjust the stitch count accordingly.
Q: Can I wash the crochet pet bed?
A: Yes, most yarns used for this pattern are machine washable. If you create a removable pillow insert, it makes cleaning even easier.
Q: What yarn is best for this project?
A: Chunky cotton or acrylic yarns are most popular. They are durable, safe for pets, and easy to clean. Avoid fuzzy yarns that shed.
Q: How long does it take to finish the Kitten Ears Pet Bed – Crochet Pattern?
A: The time varies depending on your skill level and speed. Most crocheters can complete it within a few days of casual work.
Q: Can I make this bed for small dogs or rabbits too?
A: Absolutely! The pattern can be customized in size, making it suitable for various small pets who love cozy spaces.
The Kitten Ears Pet Bed – Crochet Pattern is a fun, creative, and rewarding project for any crochet enthusiast who also loves pets. It offers the perfect combination of practicality and charm, ensuring that your furry friend has a cozy resting place while adding a cute handmade touch to your home décor. By following the steps, gathering the right materials, and customizing to your liking, you can create a truly special pet accessory.
I hope this guide has inspired you to try making your own pet bed. If you do, I’d love to hear your thoughts! Please share your honest opinion and suggestions—I’d be happy to know how your project turns out and how your pet enjoys it.