
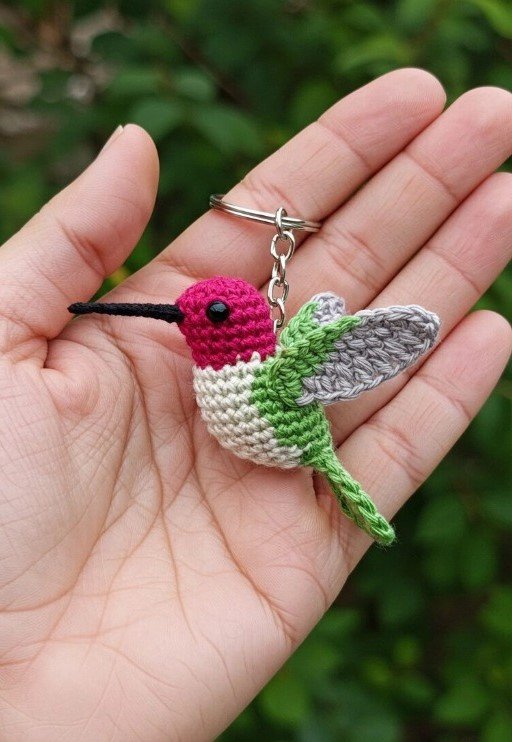
The tiny hummungbird crochet adorable amigurumi keychain guide – Crochet Pattern is a delightful project for anyone who loves handmade crafts, especially crochet enthusiasts. This little creation combines the joy of amigurumi with the practicality of a keychain, making it both cute and functional. Perfect for gifts, accessories, or simply adding a personal touch to your everyday items, this project is beginner-friendly yet charming enough for advanced crocheters to enjoy.
Amigurumi, the Japanese art of crocheting small stuffed toys, has grown into a worldwide trend. The idea of creating a tiny hummingbird amigurumi keychain adds a playful and meaningful touch, symbolizing joy, lightness, and energy. Many crafters enjoy making small projects like this because they don’t take too much time, yet they bring a great sense of accomplishment. By following this guide, you can learn how to craft an adorable piece step by step.
This crochet pattern not only guides you through the stitches but also inspires creativity. You can play with different colors, textures, and even embellishments like beads or embroidery to make your hummingbird unique. Whether you are looking for a quick handmade gift or something to brighten your own keys, bag, or backpack, this project is perfect. Now, let’s explore the steps and details in this complete tiny hummungbird crochet adorable amigurumi keychain guide – Crochet Pattern.
1. Materials and Preparation for the Hummingbird Keychain
Before you start creating your tiny hummungbird crochet adorable amigurumi keychain, gathering the right materials is essential. The most important item is yarn. Lightweight yarn, like cotton or acrylic, works best for small amigurumi projects. Choosing bright greens, blues, and pinks will give your hummingbird a realistic yet playful look.
You will also need a crochet hook suitable for your yarn. Generally, a size 2.0mm to 3.0mm hook is recommended for amigurumi, as it creates tight stitches that prevent stuffing from peeking through. A small amount of polyester stuffing will bring your hummingbird to life, giving it a plump and adorable appearance.
In addition, you should prepare a yarn needle for sewing the parts together, scissors for trimming, and stitch markers to keep track of your rounds. A keychain ring or lobster clasp will turn your finished bird into a functional accessory. These are small details, but they make a big difference.
Safety eyes or tiny beads are optional but highly recommended to give the hummingbird a lively and expressive face. If the keychain is intended for children under three, you may want to embroider the eyes instead for safety.
Having everything organized before starting ensures a smoother crafting process. Set up a comfortable space with good lighting, and keep your tools within reach. A tidy setup often leads to more enjoyable crochet sessions.
Lastly, remember that preparation also means having patience and creativity. Even if your stitches are not perfect at first, with practice, your tiny hummingbird crochet amigurumi will look beautiful. This project is as much about enjoying the process as it is about the final result.
2. Step-by-Step Crochet Instructions
The tiny hummungbird crochet adorable amigurumi keychain guide – Crochet Pattern begins with the body. Most amigurumi patterns are worked in continuous rounds, starting with a magic ring. Begin with a small circle of stitches, gradually increasing to form the round body of the bird.
Once the body is shaped, you will crochet the wings separately. Small, flat pieces created with simple stitches will give your hummingbird its charming character. Attach them carefully so they look balanced and natural.
The beak is another distinctive feature. For this, crochet a tiny cone shape using dark-colored yarn. Even though it’s a small detail, it adds so much personality to your hummingbird. Sew it firmly to the front of the body.
Next, create the tail feathers. These can be made with chains or small triangular pieces. Bright and contrasting colors work well here, giving your bird a playful style. Experiment with your yarn shades to make the feathers stand out.
After attaching all parts, stuff the body lightly but firmly. This step makes your hummingbird plump and squeezable, just like a true amigurumi should be. Ensure that no gaps are left where the stuffing can escape.
Finally, sew in the keychain ring or clasp securely. This transforms your hummingbird from a simple crochet toy into a portable accessory you can carry everywhere. Now, your amigurumi keychain is complete and ready to spread joy.
3. Creative Variations and Customization Ideas
One of the best parts of following the tiny hummungbird crochet adorable amigurumi keychain guide – Crochet Pattern is the freedom to customize. The basic pattern is simple, but your creativity can make each keychain unique.
You can try different color combinations. For example, a realistic green and blue hummingbird looks natural, while pastel shades create a dreamy version. Bold neon colors can make your keychain stand out even more.
Adding embellishments is another way to personalize. Tiny sequins or beads can mimic shimmering feathers. You could also embroider small flowers or hearts on the wings for an extra cute effect.
If you love experimenting, try using variegated yarn. This creates a natural gradient effect without changing colors often, making the bird appear magical and vibrant.
For those who want something extra special, consider making a set of hummingbirds in different colors. Attach them to zippers, bags, or even gift them as matching charms to friends. They make wonderful souvenirs or party favors.
Remember, crochet is not only about following a pattern but also about adding your personal touch. Every stitch you make carries your style and love, making your amigurumi keychain truly one of a kind.
4. Tips for Beginners and Finishing Touches
If you are new to crochet, the tiny hummungbird crochet adorable amigurumi keychain guide – Crochet Pattern might seem challenging at first. But don’t worry—amigurumi projects are an excellent way to practice and improve your skills.
Start slowly and focus on mastering the magic ring, single crochet, and invisible decrease stitches. These are the foundation of most amigurumi creations. With practice, your stitches will become more even and neat.
Use a stitch marker at the beginning of each round. This simple habit helps prevent mistakes and keeps your work symmetrical. It also makes counting stitches much easier.
When sewing the parts together, take your time. Position the wings and beak carefully before securing them. Sometimes, a small adjustment can completely change the character of your hummingbird.
Finishing touches, like adding embroidered details or choosing the right keychain hardware, can make your project look more professional. Don’t rush this part—it’s what gives your hummingbird personality.
Most importantly, enjoy the journey. Each hummingbird you make will look slightly different, and that’s the charm of handmade crafts. With time, you’ll build confidence and perhaps even create your own crochet designs.
FAQ About the tiny hummungbird crochet adorable amigurumi keychain guide – Crochet Pattern
Q1: Is this crochet pattern suitable for complete beginners?
Yes, the tiny hummingbird amigurumi keychain is beginner-friendly. As long as you know basic stitches like single crochet and increases, you can follow the pattern easily.
Q2: How long does it take to finish one keychain?
On average, it takes about two to three hours to complete one hummingbird. Beginners may take a bit longer, while experienced crocheters can finish faster.
Q3: What type of yarn works best for this project?
Lightweight cotton or acrylic yarn works best. These yarns hold shape well and give your hummingbird a neat look.
Q4: Can I make this keychain without safety eyes?
Absolutely. You can embroider the eyes using black yarn or thread, which is especially recommended for children’s items.
Q5: How do I attach the keychain securely?
Use a yarn needle to sew the metal keychain ring into the top of the hummingbird. Ensure it’s tightly fastened to avoid it coming loose with use.
Q6: Can I sell the finished keychains?
Yes, handmade amigurumi keychains are popular at craft fairs and online shops. Just be sure to credit the original pattern if required.
The tiny hummungbird crochet adorable amigurumi keychain guide – Crochet Pattern is more than just a set of instructions—it’s a fun and creative journey. From gathering materials to adding the final touches, every step allows you to express your creativity and bring joy into small, everyday objects.
Whether you are making this as a personal accessory, a thoughtful handmade gift, or even as items to sell, this project is versatile and rewarding. Each stitch contributes to something that is both functional and beautiful.
I hope this detailed guide has inspired you to pick up your crochet hook and try this project. If you do, I would love to hear your thoughts. Please share your sincere opinion and suggestions in the comments—I’m always happy to know how these tutorials help your crafting journey.