
The Chapstick Holder – Free Pattern – Quilt Pattern is a charming and practical sewing project that combines function and creativity. It’s perfect for keeping your chapstick, lip balm, or small cosmetic tubes secure and within easy reach, whether attached to your keys, handbag, or backpack. This small yet stylish accessory is not only quick to make but also a wonderful way to use up fabric scraps from previous quilting projects. With a little creativity, you can personalize each piece to match your style or create thoughtful handmade gifts for friends and family.
Making your own Chapstick Holder – Free Pattern – Quilt Pattern allows you to experiment with colors, prints, and textures. You can create a minimalist solid-color design for everyday use or choose bright, patterned fabrics for a fun, eye-catching look. Quilting the holder adds extra durability and texture, making it even more unique. Since the project is small, it’s a great opportunity to practice quilting techniques without committing to a large-scale project. Many sewing enthusiasts enjoy making several at once to keep on hand for gift-giving occasions.
In addition to the chapstick holder, this article will also introduce the Reversible fabric headband pattern – Quilt Pattern, another small-scale project that is practical and stylish. Both patterns are quick to sew, require minimal materials, and make excellent beginner-friendly quilting projects. By combining these two ideas, you can create a coordinated set that is perfect for personal use or as a gift bundle. Now, let’s dive into the steps and tips for creating these useful quilted accessories.
1. Choosing Fabrics and Materials
The first step in making a Chapstick Holder – Free Pattern – Quilt Pattern is selecting the right fabric. Quilting cotton is the most popular choice because it’s easy to work with, comes in endless patterns, and is durable enough for daily use. For a sturdier holder, you can also use canvas or denim, though you’ll need to account for the extra thickness when sewing.
When choosing fabrics, consider selecting two coordinating prints—one for the exterior and another for the lining. This creates a stylish contrast and makes the project feel more personalized. You can also choose fabrics that match the Reversible fabric headband pattern – Quilt Pattern for a coordinated accessory set. Using fabric remnants from previous quilting projects is an eco-friendly way to reduce waste while making something useful.
In addition to fabric, you’ll need interfacing or fusible fleece to give the holder structure and help it keep its shape. This is especially important for a small accessory like a chapstick holder because it will be handled frequently. A lightweight fusible interfacing is usually sufficient, but if you want a padded look, fusible fleece works beautifully.
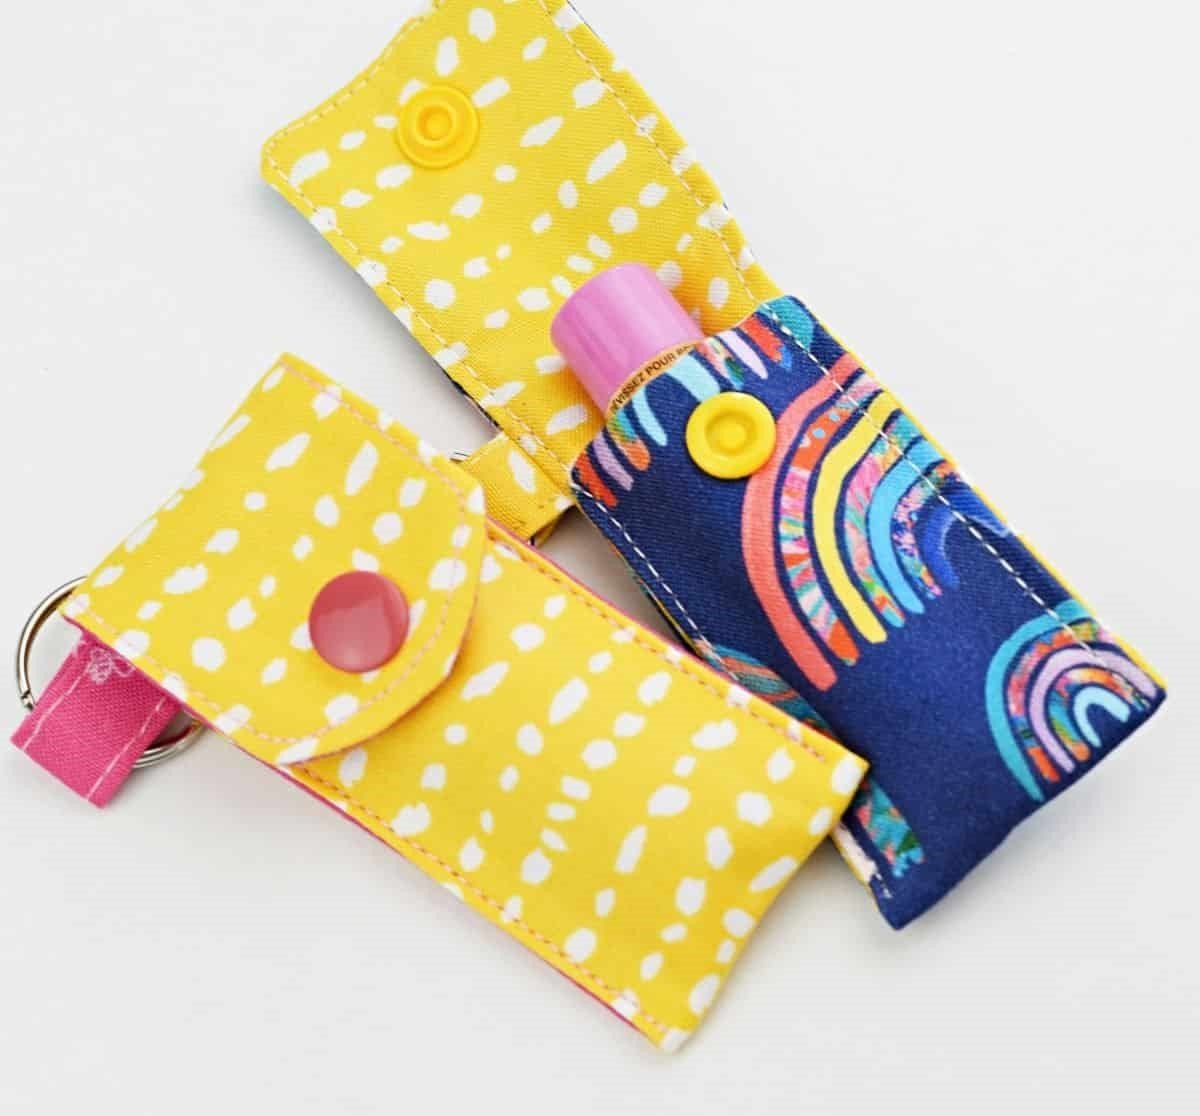
For the closure, you can choose between a snap button, Velcro, or even a small magnetic clasp. Snaps are the most common option as they are easy to install and hold securely. You will also need a key ring or swivel clasp so the holder can be attached to a bag or keys.
Finally, gather basic sewing tools like a rotary cutter, quilting ruler, cutting mat, and matching thread. With all your materials ready, you can start cutting your fabric pieces and moving on to the assembly process.
2. Cutting and Preparing the Pieces
For the Chapstick Holder – Free Pattern – Quilt Pattern, precise cutting is essential to ensure all parts fit together perfectly. Use your quilting ruler and rotary cutter for clean, straight edges. The typical size for a chapstick holder is small, so accurate measurements will make the sewing process much smoother.
You’ll need one exterior fabric piece, one lining fabric piece, and matching interfacing or fleece. Cut all three to the same dimensions to avoid bulk during sewing. If you want a quilted look, you can piece together small fabric scraps for the exterior, giving your holder a patchwork charm. This is a great way to add personality while using leftover quilting fabrics.
Before assembly, apply the interfacing or fusible fleece to the wrong side of your exterior fabric. This adds stability and ensures the holder maintains its shape after repeated use. If you are using a heavier fabric like canvas, you may choose to skip the interfacing altogether.
At this stage, you can also prepare the key ring tab. Cut a small strip of fabric, fold it lengthwise with the raw edges tucked inside, and stitch it closed. This will be attached later to hold the key ring securely in place.
If you want to coordinate your project with the Reversible fabric headband pattern – Quilt Pattern, cut your headband fabrics now as well. That way, you can complete both accessories together for a matching set.
By taking the time to prepare and cut everything accurately, you set yourself up for a smooth sewing process and a professional-looking finished product.
3. Sewing and Quilting the Chapstick Holder
With your pieces ready, it’s time to start sewing the Chapstick Holder – Free Pattern – Quilt Pattern. Begin by placing the exterior and lining fabrics right sides together, aligning all edges. Stitch around the sides and bottom, leaving the top open. This will later be turned right side out.
Once sewn, turn the piece right side out and press it flat. If you want to quilt the exterior, now is the perfect time. Simple straight-line quilting works beautifully for a small piece, but you can also experiment with decorative stitches or free-motion quilting to add personality.
Next, fold the fabric to create the holder shape. The bottom portion should be long enough to fit a standard chapstick tube, with a small flap at the top to close securely. Pin in place and sew along the sides to form the pocket. Make sure the stitching is strong, as this area will endure frequent handling.
Attach the key ring tab to one side of the holder before sewing the final topstitching. This ensures it’s securely held in place and won’t come loose over time. Install your chosen closure method—snaps are quick and easy, but magnetic clasps can add a touch of elegance.
For an added decorative touch, you can sew a small fabric label or applique to the front. This personalizes the holder and makes it a truly unique handmade accessory.
By the end of this step, you’ll have a fully functional quilted chapstick holder ready for everyday use.
4. Making the Reversible Fabric Headband
The Reversible fabric headband pattern – Quilt Pattern is a wonderful companion project to the chapstick holder. Like the holder, it’s small, quick to sew, and a great way to use up fabric scraps. The reversible design means you get two looks in one accessory, making it versatile for different outfits or occasions.
Start by cutting two strips of fabric in your chosen prints—one for each side of the headband. If you want added comfort, cut a piece of lightweight interfacing to go between the layers. This helps the headband maintain its shape without being too stiff.
Place the two fabric strips right sides together and stitch along the edges, leaving a small opening for turning. Once sewn, turn the headband right side out and press it flat. Topstitching around the edges not only closes the opening but also gives a polished, professional look.
You can add an elastic section at the back for a flexible fit. To do this, cut a small piece of elastic, insert it between the fabric ends, and sew securely in place. The elastic makes the headband comfortable to wear for long periods.
Because the headband is reversible, you can coordinate the fabrics with your chapstick holder for a matching set. This makes a thoughtful handmade gift set for birthdays, holidays, or special occasions.
This project is quick enough to complete in under an hour, making it an excellent last-minute sewing project that still delivers on style and practicality.
FAQ – Chapstick Holder – Free Pattern – Quilt Pattern
1. Is the Chapstick Holder a beginner-friendly project?
Yes, it’s a small, straightforward project suitable for beginners with basic sewing skills.
2. What type of fabric works best?
Quilting cotton is ideal, but canvas, denim, or other medium-weight fabrics also work well.
3. Do I need special tools to make the holder?
A standard sewing machine, rotary cutter, quilting ruler, and basic sewing notions are all you need.
4. Can I make the holder without quilting?
Yes, you can skip quilting, but adding it increases durability and style.
5. Is the reversible headband also beginner-friendly?
Absolutely. The Reversible fabric headband pattern – Quilt Pattern is quick, easy, and perfect for beginners.
6. How can I personalize these projects?
You can use unique fabrics, add embroidery, applique, or custom labels for a personal touch.
The Chapstick Holder – Free Pattern – Quilt Pattern is a fun, practical, and beginner-friendly sewing project that delivers big results in a small package. Paired with the Reversible fabric headband pattern – Quilt Pattern, it makes a stylish set that’s perfect for personal use or gifting.
From fabric selection to quilting and finishing touches, every step allows you to express creativity while producing useful, durable accessories. I hope this guide has inspired you to try these projects—please share your honest opinions and suggestions so we can continue inspiring fellow makers with more creative ideas.