
The summery pillow – Quilt Pattern is the perfect way to bring a fresh, vibrant touch to your home décor while enjoying the relaxing art of quilting. This project blends the warmth of handmade craftsmanship with the bright and cheerful tones of summer. Whether placed on a couch, bed, or patio chair, a quilted pillow cover can transform a simple space into a cozy, inviting spot. By using bold patterns and sunny colors, the summery pillow instantly adds personality and comfort to any room.
Working on a summery pillow – Quilt Pattern is a satisfying project for quilters of all skill levels. Beginners will appreciate its manageable size, while more experienced quilters can use it to experiment with intricate designs or advanced quilting techniques. The smaller format of a pillow cover also means less fabric, making it an affordable and low-commitment project that still offers beautiful results. It’s a wonderful way to explore creativity without the large time investment of a full-sized quilt.
In this article, we will explore everything you need to know about making a summery pillow – Quilt Pattern, from choosing fabrics and creating the quilted top, to assembling and finishing the pillow with professional-looking details. You’ll also discover tips to personalize your design so your pillow becomes a unique statement piece that reflects your style.
1. Choosing Fabrics and Colors for Your Summery Pillow
When planning your summery pillow – Quilt Pattern, fabric selection is key. Summer-inspired colors such as yellows, blues, corals, and fresh greens work beautifully to create a cheerful look. You can mix solid fabrics with floral or geometric prints to add texture and visual interest.
Consider using lightweight cotton fabrics, as they are comfortable, breathable, and easy to quilt. Quilting cotton holds its shape well and comes in endless patterns, giving you full creative freedom. For a more rustic summer vibe, you could incorporate linen or chambray fabrics into your design.
The batting you choose will also affect the pillow’s feel. A thin cotton batting will create a sleek, flat finish, while a puffier batting will give the pillow a soft, cozy appearance. This choice depends on whether you want a decorative pillow or one meant for lounging.
Don’t forget to select a coordinating fabric for the back of the pillow. You can keep it simple with a single solid color, or make it reversible by using a different quilt block pattern on each side.
Thread choice is another important detail. Opt for high-quality thread that complements your fabric colors. Using a slightly contrasting thread for quilting lines can add a fun decorative element.
By thoughtfully combining fabrics, colors, and textures, you’ll create a summery pillow that not only looks beautiful but also reflects the season’s light and joyful energy.
2. Creating the Quilted Pillow Top
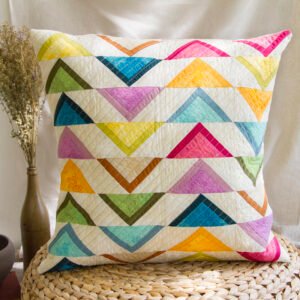
The heart of your summery pillow – Quilt Pattern is the quilted top. Start by cutting your chosen fabrics into the required shapes based on your design. Simple patchwork squares or half-square triangles are great for beginners, while experienced quilters might enjoy trying more complex patterns like pinwheels or flying geese.
Once the fabric pieces are cut, arrange them on a flat surface to decide on the final layout. This step allows you to visualize the overall balance of colors and patterns before you start sewing.
Sew the pieces together using a ¼-inch seam allowance for neat, even seams. Press each seam carefully, as this will help the pillow top lay flat and look professional.
After piecing the top, layer it with batting and a backing fabric. Baste the layers together with safety pins or temporary spray adhesive to prevent shifting during quilting.
The quilting itself can be as simple or elaborate as you like. Straight-line quilting gives a clean, modern look, while free-motion quilting adds intricate, artistic texture. Whichever style you choose, take your time to keep stitches even and consistent.
Once the quilting is complete, trim the edges so the pillow top is perfectly square, ensuring a smooth assembly later.
3. Assembling and Sewing the Pillow Cover
With your quilted top ready, it’s time to assemble the summery pillow – Quilt Pattern. The most common closure styles for pillow covers are envelope backs and zipper closures. Envelope backs are easier to sew and remove for washing, while zippers offer a sleek, tailored look.
For an envelope back, cut two pieces of fabric that overlap at the center. Hem the inner edges, then place them on the quilted top with right sides facing each other. Pin everything in place, making sure the pieces align perfectly.
If you prefer a zipper closure, sew the zipper to the two back pieces first, then attach this panel to the quilted top. Use a zipper foot on your sewing machine for a clean finish.
Sew around all sides with a ¼-inch seam allowance, reinforcing the corners for durability. Trim excess fabric from the corners to reduce bulk when turning the pillow cover right side out.
Turn the cover right side out and press the edges neatly. If using a zipper, test it to ensure it opens and closes smoothly. For an envelope back, check that the overlap fully covers the pillow insert.
This assembly process ensures your pillow cover is both attractive and functional, ready to brighten your space.
4. Adding Personal Touches and Styling Your Pillow
One of the best parts of making a summery pillow – Quilt Pattern is adding personal touches that make it truly your own. You can embellish the pillow with hand embroidery, appliqué shapes, or fabric-covered buttons for extra charm.
Consider adding piping or trim around the edges for a polished, decorative finish. This detail works especially well for summer-themed designs, such as nautical stripes or floral borders.
You can also play with quilting patterns to create different effects. For example, diagonal lines can give the pillow a modern feel, while curved quilting designs add softness and movement.
If you plan to make a set of pillows, vary the designs while keeping a consistent color palette. This creates visual harmony while still allowing each pillow to stand out.
Once complete, style your pillow in a space that will showcase its colors and craftsmanship. A porch swing, garden bench, or sunny reading nook is perfect for a summery quilted pillow.
These finishing touches will make your handmade pillow not only a decorative piece but also a cherished part of your home.
FAQ – Summery Pillow – Quilt Pattern
1. Is the summery pillow project suitable for beginners?
Yes, the summery pillow – Quilt Pattern is beginner-friendly, especially if you choose a simple patchwork design.
2. What size pillow insert should I use?
The most common sizes are 16×16 or 18×18 inches, but you can adjust your quilt pattern to fit any pillow insert.
3. Can I wash a quilted pillow cover?
Yes, most quilted covers can be machine washed on a gentle cycle, but always check fabric care instructions.
4. What batting should I use for a summer pillow?
Thin cotton batting is ideal for a lightweight, breathable finish suitable for warmer months.
5. How long does it take to make a quilted pillow?
Depending on the design complexity, it can take from a few hours to a weekend to complete.
6. Can I use leftover fabric scraps for this project?
Absolutely! This is a great way to use fabric scraps while creating a colorful and unique design
Making a summery pillow – Quilt Pattern is a joyful way to add seasonal charm to your home while practicing and improving your quilting skills. From selecting bright, fresh fabrics to piecing, quilting, and adding final touches, each step is an opportunity to infuse your personality into the design.
Whether for personal enjoyment or as a thoughtful handmade gift, this project is both practical and beautiful. I’d love to hear your honest feedback and suggestions—share your thoughts so we can keep inspiring each other in our creative quilting journeys.