
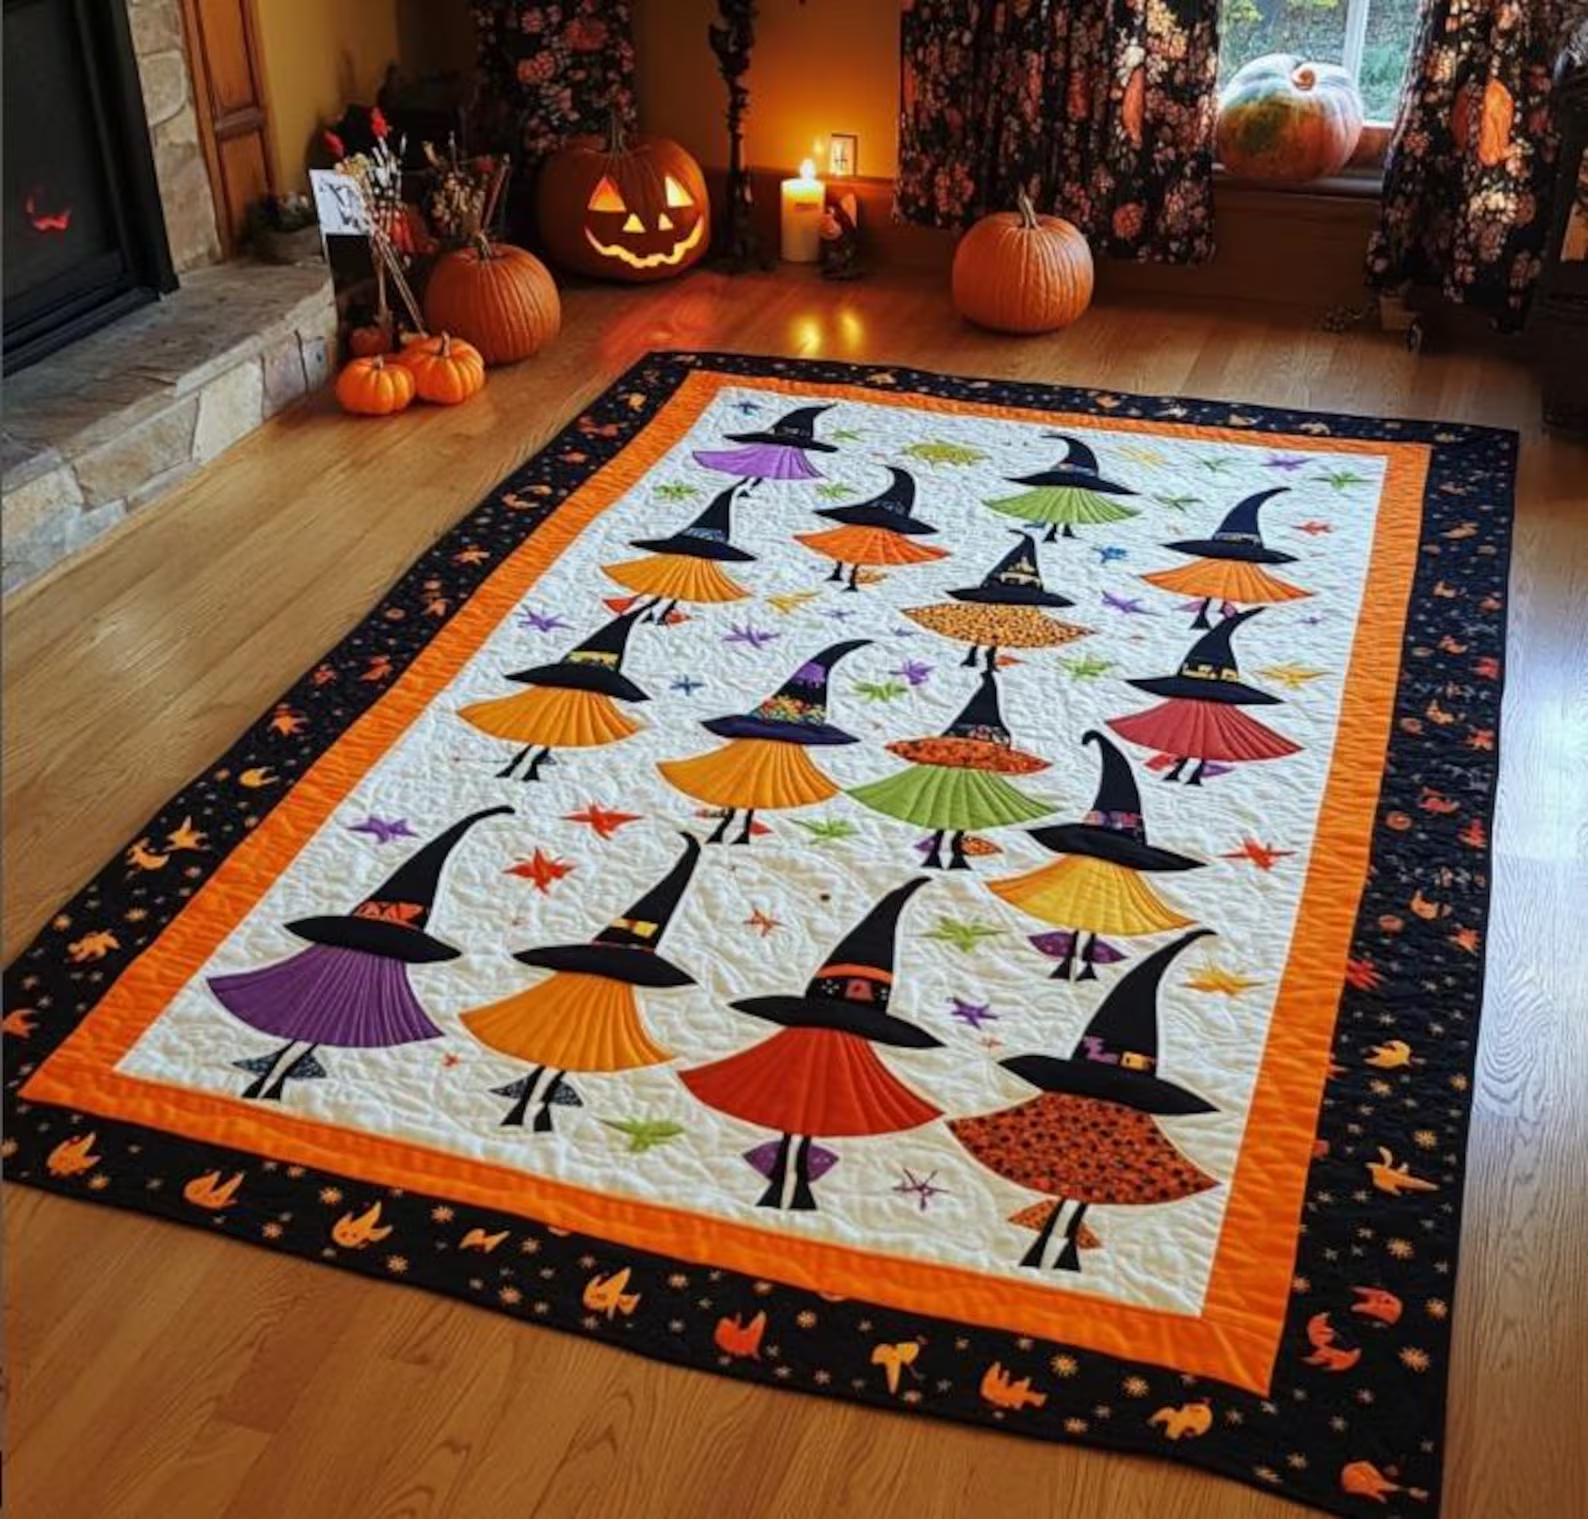
The Witch Parade Quilt Pattern – Quilt Pattern is a captivating and creative quilting design that brings a touch of magic, charm, and seasonal fun to your sewing projects. Perfect for autumn, Halloween, or for anyone who loves whimsical, themed quilts, this pattern allows you to tell a story through fabric. Each witch in the parade can be crafted in unique colors and styles, making your quilt a personal celebration of imagination. Whether you are quilting for your home or making a gift for a loved one, this design will instantly capture attention and bring a smile to anyone who sees it.
One of the most exciting aspects of working with the Witch Parade Quilt Pattern – Quilt Pattern is its versatility. While the concept focuses on a charming parade of witches, you can easily customize fabrics, backgrounds, and additional blocks to suit your taste. This project is an excellent opportunity to experiment with color palettes, from traditional Halloween oranges and blacks to more unconventional, vibrant schemes. Beginners and experienced quilters alike will find joy in piecing together each block, creating characters that seem to march right off the fabric.
The Witch Parade Quilt Pattern – Quilt Pattern also provides an ideal project for honing quilting skills. With its combination of applique, piecing, and possibly embroidery for details, it offers variety without being overly complicated. The pattern can be adapted to different quilt sizes, from wall hangings to full bed covers. In this guide, we’ll explore how to select fabrics, cut and piece blocks, assemble the quilt, and add special touches to make your witch parade truly enchanting.
1. Choosing Fabrics for the Witch Parade Quilt Pattern
Selecting the right fabrics is essential to bringing the Witch Parade Quilt Pattern – Quilt Pattern to life. Since each witch in the parade can have her own personality, you can have fun mixing prints, solids, and textures. Bright pops of color for hats, dresses, and accessories help each character stand out.
For the background, many quilters prefer a neutral tone that allows the witches to shine. Soft grays, smoky purples, or even midnight blues can create a dramatic backdrop without overwhelming the scene. You can also add subtle prints to mimic night skies or autumn landscapes.
Consider using quilting cotton for the main body of the quilt, as it’s easy to work with and widely available in a variety of colors. You might also incorporate felt or flannel for smaller details, such as hats or broom bristles, to add texture and depth.
When planning your color palette, think about the mood you want to convey. Traditional Halloween hues create a nostalgic feel, while pastel or jewel tones give the quilt a modern twist. Mixing light and dark fabrics will help give your witches dimension and movement.
If you enjoy themed quilting, you can even choose fabrics with tiny stars, bats, pumpkins, or magical symbols to enhance the narrative of your quilt. These details make the design more engaging and fun to explore.
Finally, gather coordinating fabrics for sashing, borders, and binding. These finishing touches frame your quilt beautifully and give it a polished look.
2. Cutting and Piecing the Witch Parade Blocks
Once you have your fabrics ready, it’s time to start cutting and piecing the blocks for your Witch Parade Quilt Pattern – Quilt Pattern. Precision is important in this step to ensure that all the pieces fit together neatly.
Begin by cutting the background pieces for each block, ensuring they are uniform in size. This consistency will make assembling the quilt much easier later on. A rotary cutter, quilting ruler, and cutting mat are essential tools for accuracy.
If your pattern uses applique for the witches, trace each shape onto fusible web and then iron it onto the wrong side of your chosen fabrics. Carefully cut out each piece, from hats and faces to dresses and broomsticks.
Arrange the witch pieces on the background block before fusing them permanently. This allows you to play with positioning and ensure the parade flows smoothly across your quilt. Once satisfied, fuse the shapes in place and stitch around the edges for durability.
Some quilters like to add embroidered details such as facial expressions, stars, or broom textures. These small embellishments make the characters more lively and unique.
After completing each witch block, trim them to the correct size and set them aside. When all blocks are ready, you can start arranging them in the order you want the parade to appear on the quilt top.
3. Assembling the Quilt Top
With your witch blocks ready, it’s time to assemble the Witch Parade Quilt Pattern – Quilt Pattern into a cohesive quilt top. This stage is where your parade truly takes shape.
Start by laying out the blocks on a large surface or design wall. This helps you visualize the final arrangement and make adjustments before sewing. You can arrange the witches in a straight line, staggered formation, or even create multiple rows for a larger quilt.
Add sashing strips between the blocks if you want extra separation or to give each witch her own “space” in the parade. Sashing can be a solid color or a subtle print that ties the blocks together.
Once the layout is finalized, sew the blocks and sashing strips together row by row. Press the seams carefully to keep everything flat and neat.
After joining the rows, add borders around the quilt top. Borders help frame the design and give it a finished appearance. You can use a single fabric for a clean look or multiple borders in coordinating prints for added impact.
If you want to enhance the magical theme, consider adding cornerstones in the borders—small squares of fabric featuring stars, moons, or other mystical motifs. These small elements bring extra charm to the design.
When the quilt top is complete, you’re ready for layering, quilting, and binding.
4. Quilting and Adding Finishing Touches
Quilting is where the Witch Parade Quilt Pattern – Quilt Pattern truly comes to life. The stitches add texture, depth, and durability to your creation.
You can choose a quilting design that complements the parade theme, such as swirling lines to suggest wind, stars, or clouds in the background. Free-motion quilting allows for creative shapes, while straight-line quilting gives a clean, modern finish.
Use a walking foot or free-motion foot depending on your chosen style. Take your time to ensure smooth, even stitches that enhance the overall design.
After quilting, trim away any excess batting and backing fabric. This prepares your quilt for binding, the final step that encloses the raw edges and frames your work beautifully.
Binding can be made from matching or contrasting fabric. A bold color might make the quilt pop, while a subtle tone lets the witch parade remain the star of the show.
Finally, add any extra details you desire. Decorative buttons, small fabric patches, or even hand-stitching around specific elements can give your quilt more personality. Once finished, your magical parade is ready to display or gift.
FAQ – Witch Parade Quilt Pattern – Quilt Pattern
1. Is the Witch Parade Quilt Pattern suitable for beginners?
Yes, with clear instructions and some basic quilting knowledge, even beginners can successfully make this pattern.
2. What size can I make this quilt?
The pattern can be adapted to various sizes, from small wall hangings to full-sized bed quilts.
3. Do I have to use applique for the witches?
Not necessarily. You can also use piecing techniques or a combination of both to achieve the look you want.
4. How can I make the witches more unique?
Try different fabrics, colors, and embellishments like embroidery or fabric paint to give each witch her own personality.
5. What kind of quilting design works best for this pattern?
Swirls, stars, and other whimsical motifs complement the magical theme beautifully.
6. Can I use non-Halloween colors?
Absolutely! You can choose any palette you like, making the quilt suitable for year-round display.
The Witch Parade Quilt Pattern – Quilt Pattern is a delightful project that combines creativity, skill, and storytelling. From choosing fabrics and piecing blocks to quilting and adding finishing touches, each step allows you to express your unique vision. This pattern is versatile enough to adapt to any color scheme or size, making it a timeless addition to your quilting repertoire.
I hope this guide has inspired you to create your own magical parade of witches. Please share your honest opinion and suggestions so we can continue celebrating and improving our quilting adventures together.