
The Folded star somerset tutorial – Quilt Pattern is a fascinating quilting technique that blends precision folding with creative design to create a stunning star pattern. This traditional style, sometimes called the Somerset Star, uses folded fabric pieces to form a textured and layered look that adds depth and dimension to your quilting projects. Whether you’re new to quilting or already an experienced maker, this method is a rewarding way to create eye-catching designs for pillows, wall hangings, table toppers, and more.
One of the most appealing aspects of the Folded star somerset tutorial – Quilt Pattern is that it requires minimal sewing while producing a professional, intricate result. The magic lies in the way the fabric is folded and layered, giving the illusion of complex piecing without the challenge of sewing tiny points together. This makes it accessible for beginners while still offering plenty of room for advanced quilters to experiment with color placement and fabric textures. The finished design is not only beautiful but also durable, thanks to the layering technique.
In this guide, we’ll explore each step of creating your own Folded star somerset tutorial – Quilt Pattern, from choosing fabrics and preparing materials to folding, layering, and finishing the project. You’ll learn helpful tips for precision, creative ways to customize the design, and techniques to ensure your star pattern turns out perfectly every time. By the end, you’ll be ready to bring this timeless quilting style into your own creative projects.
1. Preparing Fabrics and Materials for the Folded Star Somerset
The first step in the Folded star somerset tutorial – Quilt Pattern is gathering the right fabrics and tools. This project works best with high-quality quilting cotton because it holds folds well and offers crisp, clean lines. For a striking star effect, choose at least three different fabrics: one for the center, one for the star points, and one for the background.
Before cutting, wash and press your fabrics to remove any sizing and prevent shrinkage later. This will also make folding easier and neater. The fabric should be completely smooth, as wrinkles can cause uneven layers in your star.
Cut your fabrics into squares of equal size—common measurements range from 3 to 4 inches for smaller stars and 5 to 6 inches for larger designs. The number of squares you’ll need depends on how many layers of folds you want in your finished piece.
In addition to fabric, you’ll need a base square of sturdy cotton or muslin as your foundation. This is where all your folded pieces will be pinned and sewn. Having a solid base ensures the design remains stable throughout the process.
Other essential tools include sharp fabric scissors, straight pins, a rotary cutter and mat, a quilting ruler, and a hot iron for pressing each fold as you work. These tools help maintain precision and keep your design symmetrical.
By carefully preparing your materials in advance, you’ll make the folding process much smoother and more enjoyable, resulting in a cleaner, more professional final piece.
2. Folding and Layering the Star Points
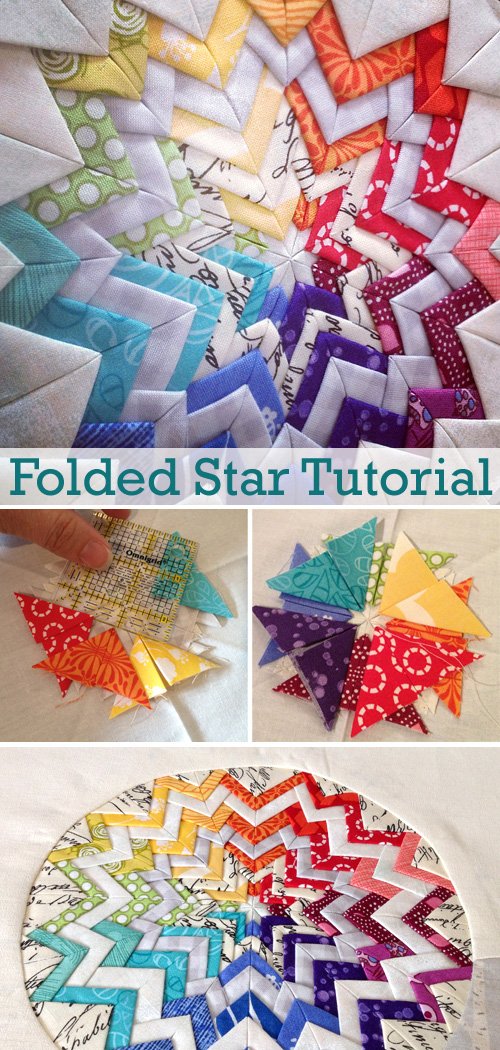
The folding stage is where the Folded star somerset tutorial – Quilt Pattern truly comes to life. Each fabric square will be folded into a triangle and then layered on your base to form the points of the star. This step requires patience, as precise folds create a sharper, more defined pattern.
To fold a fabric square, start by pressing it in half diagonally to form a triangle. Press again to ensure a crisp edge, then fold the two corners of the long side inward so they meet at the center point, forming a smaller triangle. Press once more to hold the folds in place.
As you prepare multiple folded pieces, keep them organized by color or fabric type so you can easily arrange them during layering. This will save time and help you maintain symmetry in your design.
Begin layering by placing your first set of folded triangles around the center point of your base fabric. Use pins to secure them in place. Ensure that each triangle overlaps slightly with the next to avoid gaps in the design.
After completing the first round of star points, add a second layer of folded triangles slightly outward from the center, making sure the tips are evenly spaced. Continue adding layers until you achieve the desired size and fullness of your star.
Throughout this process, check the alignment of your points regularly. Small adjustments as you go will prevent larger issues later, keeping your star neat and balanced.
3. Securing and Quilting the Folded Star
Once the folded star is fully layered, it’s time to secure it to the base fabric. In the Folded star somerset tutorial – Quilt Pattern, this is typically done by sewing along the edges of the folded pieces, working from the center outward. This ensures the folds remain crisp and stable over time.
Begin by stitching close to the inner edges of the first layer of triangles. Use a matching thread color to keep the stitches discreet, or choose a contrasting thread for a decorative touch. Sew slowly to maintain control and avoid shifting the layers.
Move outward, stitching each subsequent layer in the same manner. Be sure to keep the folds flat as you sew to preserve the dimensional look of the star. Using a walking foot on your sewing machine can help feed the layers evenly.
For added texture and durability, you can quilt additional lines radiating out from the star’s center. This not only reinforces the design but also enhances the overall visual impact.
If you prefer a hand-sewn finish, you can use small, neat stitches to tack down each folded piece. This can give the star a more traditional, handcrafted appearance.
After securing the star, trim any excess fabric from the edges of your base square, keeping your work neat and ready for finishing or framing.
By taking time to secure and quilt your folded star carefully, you’ll ensure that your design remains beautiful and intact for years to come.
4. Creative Uses and Variations
The Folded star somerset tutorial – Quilt Pattern offers endless opportunities for creative expression. While it’s commonly used for decorative quilt blocks, it can be adapted into many other projects.
One popular option is to create a folded star as the centerpiece of a pillow cover. The textured design makes a bold statement on home décor items and can be customized to match any color scheme.
You can also use the folded star technique to make festive table toppers or placemats, perfect for holiday gatherings. Choosing fabrics in seasonal colors can instantly transform the design into a themed piece.
Another variation is to experiment with fabric textures, such as combining cotton with satin or linen. The contrast in materials can add depth and visual interest to your star.
For a modern twist, try using gradient fabrics or ombre prints so that the star points subtly shift in color from the center outward. This creates a dynamic, eye-catching effect.
If you’re feeling ambitious, you can combine multiple folded stars into a larger quilt design. Arranging them in a grid or offset layout can result in a truly stunning quilt top.
Exploring different uses and variations ensures that this timeless quilting technique stays fresh and inspiring in all your sewing projects.
FAQ – Folded Star Somerset Tutorial – Quilt Pattern
1. Is the folded star somerset technique suitable for beginners?
Yes, it’s beginner-friendly because it involves simple folding and layering rather than complex piecing. Patience and attention to detail are key.
2. How many fabric squares do I need for one folded star?
The number depends on the size and number of layers you want, but typically 20–40 squares are needed for a full design.
3. Do I need a sewing machine for this project?
While a sewing machine speeds up the process, the star can also be sewn by hand for a more traditional look.
4. Can I wash items made with the folded star technique?
Yes, but it’s best to wash them gently to preserve the crisp folds and layered effect.
5. What size should my fabric squares be?
Common sizes range from 3 to 6 inches, but you can adjust based on your desired star size.
6. How do I keep the folds from shifting while I sew?
Pinning each piece securely and pressing the folds before sewing helps maintain alignment.
The Folded star somerset tutorial – Quilt Pattern is a beautiful quilting method that combines simplicity with striking visual results. From preparing your fabrics to folding, layering, securing, and experimenting with creative variations, this technique offers endless possibilities for personalizing your projects. Whether you use it for quilts, pillows, table toppers, or wall art, the folded star design is sure to impress.
I hope this guide inspires you to try this timeless technique—please share your honest opinions and suggestions so we can continue exploring new ways to bring quilting traditions to life.