
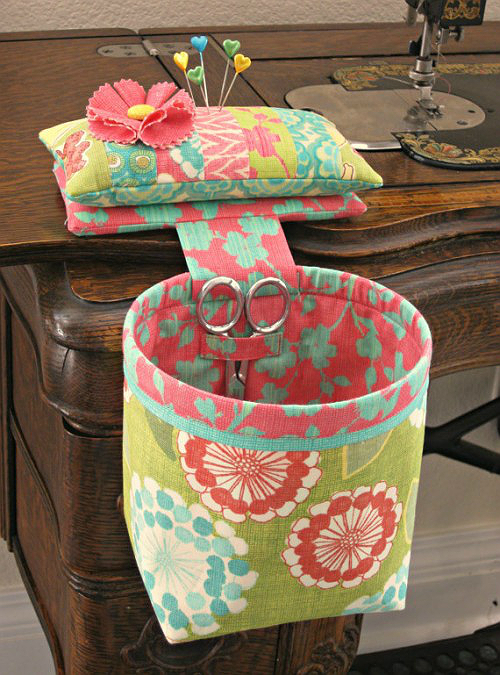
The Completed Thread Catchers – Quilt Pattern is a delightful and functional sewing project designed to keep your sewing space clean and organized. A thread catcher is a small fabric container that sits next to your sewing machine or work area, ready to catch stray threads, fabric scraps, and other small bits of debris. By completing your own thread catcher using a quilt pattern, you not only create a useful tool but also have the opportunity to showcase your quilting skills and creativity.
This project offers a perfect balance between practicality and artistry. The Completed Thread Catchers – Quilt Pattern allows you to experiment with different fabrics, patterns, and quilting techniques, making each piece unique. Whether you choose a simple design or something more elaborate, a handmade thread catcher brings personality to your sewing corner while making your work process more efficient.
For quilters and sewists alike, a Completed Thread Catchers – Quilt Pattern project can also serve as a wonderful gift idea. Many sewing enthusiasts appreciate handmade accessories that help keep their work area tidy, and a custom-made thread catcher is both thoughtful and functional. In this guide, you will learn how to choose the right fabrics, assemble the quilted pieces, sew your thread catcher, and add finishing touches that make your project truly stand out.
1. Selecting Fabrics and Materials for a Beautiful Thread Catcher
Choosing the right materials is the first step to making a high-quality Completed Thread Catchers – Quilt Pattern. The exterior fabric should be durable yet visually appealing. Quilting cotton is the most common choice, offering both strength and a wide variety of prints and colors to match your style.
You can create a vibrant look by mixing and matching complementary colors or patterns. Alternatively, a monochromatic scheme with subtle texture can give your thread catcher a modern, minimalist feel. Choosing a fabric that complements your sewing room décor will make the piece blend seamlessly into your space.
In addition to fabric, interfacing or fusible fleece is essential to give your thread catcher structure and stability. Without proper reinforcement, the sides may collapse, making the container less functional. Lightweight batting can also be used to give the quilted panels a soft yet sturdy feel.
The lining fabric should be smooth and easy to clean. Since the inside of a thread catcher will collect loose threads and scraps, a fabric that doesn’t fray easily and can be wiped clean is ideal.
Other supplies you’ll need include matching thread, a rotary cutter, quilting ruler, and sewing clips or pins to hold your layers in place during assembly. Having all materials prepared before you begin ensures a smoother sewing process.
Lastly, don’t forget to choose a quilting design that complements your fabric choices. Straight-line quilting can create a modern look, while free-motion designs can add intricate detail and personality.
2. Cutting and Quilting the Fabric Pieces
The construction of a Completed Thread Catchers – Quilt Pattern starts with accurate cutting. Begin by cutting your chosen fabrics into the required shapes for the outer panels, base, and lining. The dimensions may vary depending on your desired finished size, but precision is key to ensuring a neat, professional-looking result.
Once the pieces are cut, layer the outer fabric with batting and backing fabric, then baste them together. This sandwiching step keeps all layers stable during the quilting process.
Quilting the panels is where creativity truly comes into play. You might choose simple diagonal lines for a clean, geometric look, or experiment with curves, swirls, or free-motion quilting for a more decorative finish. The quilting stitches not only enhance the visual appeal but also strengthen the structure of the thread catcher.
After quilting, trim each piece to the final size. Clean edges make assembly much easier and prevent alignment issues later on.
If you’re making multiple thread catchers, cutting and quilting all the panels at once can save time and ensure consistency in size and shape.
This stage is also the perfect opportunity to add embellishments like appliqué, embroidery, or decorative stitching. These small details can elevate a simple project into something truly special.
3. Assembling the Thread Catcher
With your quilted panels ready, it’s time to assemble the Completed Thread Catchers – Quilt Pattern. Start by sewing the sides together, forming the container’s body. A quarter-inch seam allowance is standard in quilting, and maintaining consistency will help ensure clean, even corners.
Once the sides are joined, attach the base panel. This step can be a bit tricky, so use plenty of pins or clips to hold the fabric in place while you sew. Go slowly around the corners to avoid puckering.
After the exterior is complete, repeat the process for the lining fabric. Remember to leave an opening in the lining so you can turn the thread catcher right side out later.
Next, place the lining inside the outer fabric with right sides together. Sew around the top edge to connect them. Turn the piece right side out through the opening in the lining, then close the opening with a slip stitch or a quick topstitch.
Press the top edge carefully, and consider adding a row of topstitching to give the opening a crisp, finished appearance. This also helps the thread catcher keep its shape during use.
For extra functionality, some sewists like to add a small weighted pincushion attached to the side of the thread catcher. This not only keeps it from tipping over but also provides a convenient spot to hold pins and needles.
4. Adding Finishing Touches and Personalization
The finishing stage of the Completed Thread Catchers – Quilt Pattern is where you can get truly creative. Small details and personal touches make your project unique and reflect your style.
You can embellish the exterior with fabric-covered buttons, ribbons, or lace trim for a decorative touch. Adding a label with your name or logo can make your thread catcher feel like a professionally made product.
Experimenting with different quilting patterns can also change the entire feel of the piece. For example, crosshatch quilting gives a traditional look, while bold geometric shapes feel more modern.
Another idea is to make themed thread catchers for different occasions or seasons. A holiday-themed version can add a festive touch to your sewing space and make a great handmade gift.
Consider adding small internal pockets inside the lining to hold small sewing tools like seam rippers or fabric markers. This extra functionality can make your thread catcher even more useful.
Lastly, take the time to press your finished project well. A crisp, well-pressed thread catcher not only looks beautiful but also stands up better during use, keeping your sewing area neat and organized.
FAQ – Completed Thread Catchers – Quilt Pattern
1. What is the main purpose of a thread catcher?
A thread catcher is designed to collect loose threads, fabric trimmings, and small scraps while you sew, keeping your workspace tidy.
2. Can beginners make a Completed Thread Catchers – Quilt Pattern?
Yes, this is an excellent beginner project as it uses basic sewing and quilting techniques.
3. What type of fabric is best for the exterior?
Quilting cotton is ideal, but you can also use canvas or denim for extra durability.
4. Do I need batting or interfacing?
Yes, batting or interfacing gives the thread catcher structure and helps it maintain its shape.
5. How can I personalize my thread catcher?
You can use custom fabrics, decorative quilting, appliqué, embroidery, or trim to make your thread catcher unique.
6. Is it possible to make the thread catcher collapsible?
Yes, by using lighter interfacing and foldable construction methods, you can make a version that folds flat for storage.
Creating a Completed Thread Catchers – Quilt Pattern is a rewarding way to combine quilting artistry with practical sewing. From selecting fabrics and quilting the panels to assembling the container and adding personal touches, each step offers opportunities for creativity and skill-building. This simple yet functional project can enhance your sewing space, make a thoughtful gift, or even be produced in multiples for craft fairs.
I hope this guide has inspired you to try making your own thread catcher—please share your honest opinions and suggestions so we can continue exchanging ideas and improving together.