
The Fish-Shaped Drawstring Bag – Quilt Pattern is a delightful and creative project for quilters of all levels. Whether you’re a beginner looking for a fun introduction to quilting or an experienced crafter eager to explore new designs, this fish-inspired bag is a perfect blend of form and function. With its playful shape and quilted texture, it’s a practical item that doubles as an adorable handmade gift.
What makes the Fish-Shaped Drawstring Bag – Quilt Pattern truly special is its combination of quilting techniques with bag-making functionality. You’ll be able to showcase your favorite fabrics, practice your patchwork skills, and create a cute drawstring pouch all in one. It’s ideal for storing small items like accessories, sewing tools, or children’s treasures, making it both decorative and useful.
In this article, we’ll guide you through everything you need to know about this pattern: how to prepare your materials, tips for assembling the quilted fish shape, ideas for fabric selection, and how to finish the bag with a polished drawstring closure. You’ll also find a comprehensive FAQ section to help answer the most common questions, and we’ll wrap it up with a summary and an invitation to share your feedback.
1. Preparing Your Materials for the Fish-Shaped Drawstring Bag – Quilt Pattern
Before diving into sewing your Fish-Shaped Drawstring Bag – Quilt Pattern, it’s important to gather all the necessary supplies. This step sets the foundation for a smooth and enjoyable crafting experience. Because this is a quilted project, you’ll need both quilting materials and some basic bag-making notions.
Start by selecting your fabric. This pattern shines when you use bright, contrasting prints for the body and fins. Cotton quilting fabric is recommended for its structure and ease of sewing. You’ll also need coordinating solid fabric for lining and backing.
Next, gather your batting or fusible fleece. This adds the soft, padded texture typical in quilting projects. It also gives structure to the bag, helping it keep its unique fish shape. Choose a lightweight batting for ease of stitching.
You’ll also need basic sewing tools: rotary cutter, ruler, mat, scissors, pins, and your sewing machine. A walking foot is helpful for quilting layers evenly. For the drawstring, you can use cotton cord, ribbon, or even fabric ties.
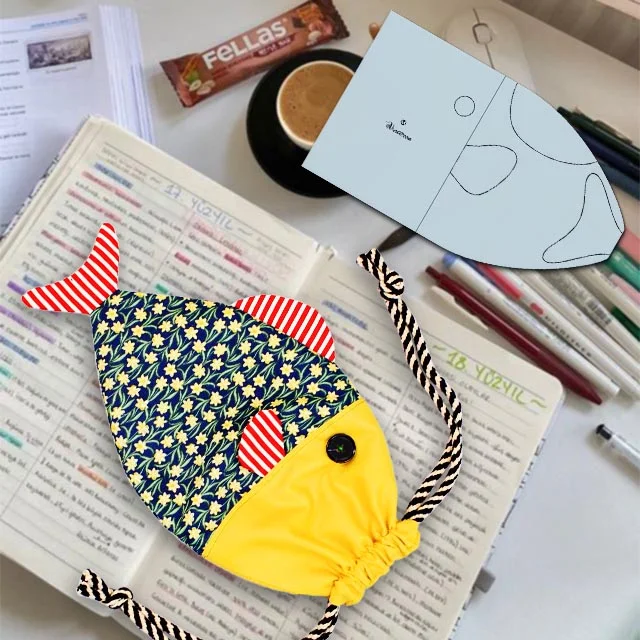
It’s helpful to have a printed template or draw your own fish shape as a guide. This shape will serve as your cutting pattern for both the outer and lining layers. Trace and cut it carefully, ensuring symmetry for the best visual result.
Lastly, gather your quilting thread and drawstring components. Match your thread to your fabric, or use a contrasting color for a decorative touch. If you’d like to add embellishments like buttons for eyes or applique for details, prepare those in advance.
2. Assembling the Quilted Fish Body
Creating the quilted base for your Fish-Shaped Drawstring Bag – Quilt Pattern is one of the most enjoyable parts of the process. This is where your creativity can really shine as you arrange and stitch your fabric pieces into a cohesive and playful fish design.
Start by layering your quilt sandwich. Place your backing fabric right side down, your batting in the middle, and your patchwork fabric or fish-shaped top on top. If you’re using a solid piece of fabric rather than patchwork, now is a good time to quilt decorative lines or patterns.
Secure the layers with safety pins or basting spray. This will keep everything in place as you sew. Use your walking foot to quilt the layers together with straight lines, wavy lines, or even free-motion quilting if you’re comfortable with that technique.
Once the quilting is complete, cut the fish shape using your template. Be sure to cut the same shape from your lining fabric. Trim any excess batting for a clean edge.
Now it’s time to add details like fins and a tail. These can be quilted separately and attached to the outer layer with topstitching. Play with different fabric combinations for contrast and visual interest.
If you’d like to add a face to your fish, you can sew on a button or felt eye. Embroider a smile or use fabric markers to personalize your bag even further.
With the body quilted and embellished, you’re ready to move on to assembling the bag. Be sure to double-check your alignment before stitching the sides together.
3. Sewing and Shaping the Drawstring Opening
One of the key features of the Fish-Shaped Drawstring Bag – Quilt Pattern is its practical and charming closure. The drawstring makes it easy to open and close the bag while keeping the contents secure. This part of the process brings the bag to life and gives it that finished, polished look.
Begin by preparing the casing for the drawstring. Cut two strips of fabric long enough to fit across the opening of your fish shape. These strips should be about 1 to 1.5 inches wide, depending on the thickness of your cord or ribbon.
Fold each strip in half lengthwise and press. Then fold in the raw edges and press again. Pin the casing strips in place on the outer fabric, near the top of the fish’s body, and sew them down on both edges to form channels for the drawstring.
Next, place the outer fish body and the lining right sides together. Sew around the edges, leaving the top (where the drawstring goes) open. Be sure to leave a small gap in the lining so you can turn the bag right side out later.
Clip curves and corners for a smooth finish when turned. Carefully turn the bag right side out through the gap. Push out the corners gently and press the seams for a clean look.
Sew the gap in the lining closed with a small hand stitch or a close edge stitch on your machine. Then tuck the lining into the outer bag, aligning the top edges neatly.
Thread your drawstring cord through the casing using a safety pin or bodkin. You can use one long piece or two shorter ones, depending on the desired look. Knot the ends to prevent fraying.
When you pull the drawstring tight, the top gathers beautifully, creating the mouth of your quilted fish. It’s a clever design element that’s both functional and fun.
4. Creative Fabric Ideas for a Unique Fish Bag
One of the best parts of making a Fish-Shaped Drawstring Bag – Quilt Pattern is choosing fabrics that reflect your personal style or the personality of the recipient. From whimsical prints to elegant textures, the fabric you select will determine the overall vibe of your finished bag.
Bright, tropical prints can evoke the feeling of an underwater paradise. Think colorful scales, bold stripes, and vibrant blues and greens. These fabrics are especially fun for kids or as summer-themed gifts.
For a more subtle, elegant version, try using tonal fabrics or batiks in ocean-inspired shades. Add metallic thread quilting for a shimmery, fish-like effect. This elevates the simple pattern into something truly artful.
Mix and match scraps from your fabric stash to create a patchwork look. This is a great way to use up leftover fabric and incorporate lots of visual interest into your project.
If you’re making a gift, consider using fabric that reflects the recipient’s interests. For example, floral prints for a garden lover, or novelty prints for a child who loves sea creatures.
Using linen or denim can give your fish-shaped bag a rustic, earthy look. Pair it with leather or cotton drawstrings for a trendy, modern twist.
Don’t forget the inside! Coordinating or contrasting linings can add a fun surprise every time the bag is opened. Lining your bag with soft cotton also makes it durable and easy to wash.
FAQ – Fish-Shaped Drawstring Bag – Quilt Pattern
Q1: Is this pattern suitable for beginners?
Yes! The Fish-Shaped Drawstring Bag – Quilt Pattern is beginner-friendly and a great introduction to basic quilting and bag-making techniques.
Q2: What size is the finished bag?
The final size depends on your template, but most fish-shaped bags are about 10 to 12 inches wide and 6 to 8 inches tall, perfect for small items.
Q3: Can I sew this bag by hand instead of using a machine?
Yes, though it will take more time. Hand-sewing is entirely possible if you use sturdy stitches and double-threading for durability.
Q4: What kind of drawstring works best?
Cotton cord, twill tape, satin ribbon, or fabric ties all work well. Choose one that matches your design and is easy to pull.
Q5: Can I wash the bag?
If all your materials are washable, yes. Use a gentle cycle or hand wash, and let it air dry to preserve the shape and quilting.
Q6: Can I make a larger version of this bag?
Absolutely. Just scale up your template proportionally and adjust the drawstring casing and batting to match the new size.
The Fish-Shaped Drawstring Bag – Quilt Pattern is a wonderful way to blend creativity, functionality, and the art of quilting into one joyful project. With its charming shape, custom fabric choices, and practical drawstring feature, it’s sure to bring a smile to anyone’s face—whether you make it for yourself or as a gift.
We’ve walked through material prep, sewing techniques, quilting the fish body, and adding personality through fabric choices. This project is a celebration of fabric and fun, and we hope you’re inspired to make your own unique version.
If you enjoyed this tutorial or have tips to share, please leave your honest opinion in the comments. We’d love to hear your suggestions and see what kind of fishy creations you make!