
If you’ve been searching for a heartwarming and adorable quilting idea, the Puppy Quilt Block – Quilt Pattern might just steal your heart. Whether you’re a beginner or an experienced quilter, creating a quilt featuring playful puppy blocks adds charm, personality, and a cozy touch to any space. From nursery decor to heartfelt gifts, these blocks are loved by dog lovers and quilt enthusiasts alike.
The Puppy Quilt Block – Quilt Pattern combines traditional patchwork techniques with a whimsical twist. Each block showcases a puppy’s friendly face, floppy ears, and sweet expression—making every stitch a joy. These designs allow room for creativity with fabric choices, colors, and embellishments. Whether you prefer modern prints or classic plaids, each pup becomes a unique character in your quilt.
Throughout this article, you’ll find helpful tips and techniques to make the most of your Puppy Quilt Block – Quilt Pattern journey. We’ll explore fabric selection, piecing strategies, layout inspiration, and finishing touches that elevate your quilt from simple to spectacular. Let’s get started on crafting something both heartwarming and handmade.
1. Choosing Fabrics for Your Puppy Quilt Block – Quilt Pattern
The foundation of a successful quilt lies in the fabric. For your Puppy Quilt Block – Quilt Pattern, selecting the right textiles can make each puppy pop with personality.
Start by choosing a consistent background fabric. Neutral tones like white, cream, gray, or soft blue create a soothing canvas. This lets your puppy design shine without overwhelming the eye. If you prefer something playful, opt for pastel polka dots or subtle textured prints.
Next, choose fabrics for the puppy’s body, ears, and face. Go for medium to dark tones that contrast well with your background. You can use solids, tiny prints, or even tone-on-tone designs to give the block dimension without being too busy.
For the ears and eyes, consider adding a touch of novelty fabric with tiny paw prints, bones, or spots. These small details bring character and joy to the puppy blocks.
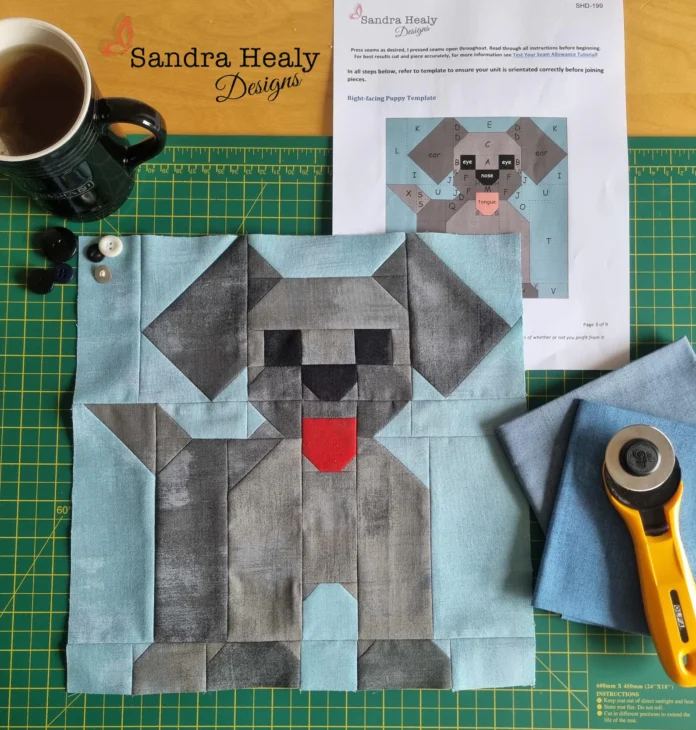
Don’t forget the nose and eye details. Use dark fabrics like black or navy to add definition and clarity to the puppy’s face. Embroidery floss or buttons can also enhance facial features if you want a mixed-media approach.
Quilters often enjoy using scraps from previous projects. The Puppy Quilt Block – Quilt Pattern is a great opportunity to give those fabric pieces a new life while creating something adorable.
Take a few moments to lay out your fabric choices before cutting. Arrange them side by side to ensure they complement each other. This extra planning step helps you visualize the finished quilt and avoid any color clashes.
2. Piecing and Assembly Techniques
Once your fabrics are chosen, it’s time to bring your Puppy Quilt Block – Quilt Pattern to life through careful piecing. Accuracy is key when working with small and detailed blocks.
Begin by cutting your fabric pieces according to the pattern measurements. Use a rotary cutter, ruler, and self-healing mat to keep your lines straight and your sizes precise.
Start assembling your puppy block by piecing together the facial features. Usually, the ears, cheeks, and nose are pieced separately and then joined to the main face block. Follow a step-by-step sequence to maintain proper alignment.
Press each seam as you go. This keeps your block flat and helps with accuracy in the final layout. You can press seams open or to the side depending on your preference, but consistency is important.
Use pins or clips when matching seams. This avoids any slipping during stitching and ensures that all your puppies look tidy and uniform.
If your Puppy Quilt Block – Quilt Pattern includes curves or appliqué, consider using fusible web or freezer paper methods to make the process smoother. Appliqué allows for even more expressive puppy designs and creative variations.
Once your blocks are complete, square them up to the correct size. Trimming your blocks ensures consistency when piecing the full quilt top and avoids distortion in the final product.
3. Layout Inspiration for Your Puppy Quilt
Now that you’ve created your adorable Puppy Quilt Block – Quilt Pattern, it’s time to decide how to arrange them in a full quilt. There are many creative layouts that can showcase your hard work.
A classic layout is a simple grid. Place each puppy block in neat rows and columns for a clean, balanced look. This layout works well for baby quilts, wall hangings, or lap throws.
For a playful approach, stagger your blocks diagonally. This dynamic design gives the illusion of puppies peeking across the quilt, adding energy and movement to the overall piece.
Consider alternating your Puppy Quilt Block – Quilt Pattern with plain or star blocks. This technique creates visual breaks while highlighting the puppy design. You can use coordinating fabrics for these filler blocks to keep the color palette consistent.
Another charming idea is to frame each puppy block with a fabric border. This mimics a picture frame and makes each puppy look like a portrait. It’s a great technique for showcasing special fabrics or fussy-cut details.
Sashing and cornerstones can be used to separate blocks and add structure. This method is particularly helpful when blocks vary slightly in size or if you want to control the flow of color across your quilt.
Finally, think about your quilt’s purpose. For wall quilts, you might want a smaller, centered design. For a bed quilt, aim for balance across the quilt top so that each puppy block gets its moment to shine.
4. Finishing Your Puppy Quilt Block Project
After arranging and piecing your quilt top, the final steps bring your Puppy Quilt Block – Quilt Pattern to completion. It’s time to quilt, bind, and display your creation proudly.
Choose your quilt batting based on how you intend to use the quilt. For soft, cuddly throws or baby quilts, go with lightweight cotton or bamboo batting. For more structured wall hangings, polyester batting offers durability.
When it comes to quilting designs, echo quilting around the puppy shapes is a popular choice. It emphasizes the design and adds texture without overshadowing the pattern. Free-motion quilting, stippling, or simple grid quilting also work beautifully.
Select a backing fabric that complements your quilt top. Soft flannel or coordinating cottons make excellent choices. Make sure the backing is a few inches larger than the top to allow for shifting during quilting.
Baste the quilt sandwich carefully using pins, spray adhesive, or thread basting. This step prevents bunching or puckering when you quilt the layers together.
Once quilting is complete, trim the edges and prepare your binding. A contrasting or patterned binding adds a delightful frame to your Puppy Quilt Block – Quilt Pattern. Hand-stitching the binding gives a neat, polished finish.
Don’t forget to add a quilt label! Include your name, the date, and any special notes. This final detail personalizes your work and turns it into a treasured keepsake.
Frequently Asked Questions (FAQ)
What size should a Puppy Quilt Block be?
Most common sizes are 10″ to 12″ square, but you can adjust the pattern size to fit your quilt project. Some patterns offer multiple sizes for flexibility.
Can I use fusible appliqué for the puppy features?
Yes! Fusible appliqué is a great method for adding facial details and ears. It’s beginner-friendly and gives clean edges with minimal sewing.
Is this quilt block beginner-friendly?
Absolutely. While some small pieces require precision, most Puppy Quilt Block – Quilt Pattern designs are suitable for confident beginners with basic sewing skills.
What kind of fabrics work best for this pattern?
Cotton fabrics are ideal. Use a mix of solids and small prints for contrast and visual interest. Avoid bulky fabrics that may distort the block.
Can I turn a single puppy block into a pillow or wall hanging?
Yes! One finished block can become a lovely cushion, wall hanging, or even a tote bag embellishment. It’s a versatile motif.
How do I wash a finished puppy quilt?
Use a gentle cycle with mild detergent and cold water. Air-dry or tumble on low. Always pre-wash your fabrics to avoid shrinking or color bleeding.
Creating a quilt using the Puppy Quilt Block – Quilt Pattern is more than just a sewing project—it’s a way to infuse joy and personality into your handmade creations. From choosing the perfect fabrics to stitching each puppy’s smile, every step offers a rewarding experience filled with creativity and warmth.
We’ve explored essential fabric tips, piecing techniques, layout suggestions, and finishing touches to help guide you through your quilting journey. Whether you’re making a gift, decorating a nursery, or simply indulging in your love for puppies and quilting, this pattern will leave you with something truly special.
If you’ve enjoyed this guide or tried out the Puppy Quilt Block – Quilt Pattern, we’d love to hear from you! Share your honest opinion and feel free to leave suggestions for future tutorials. Happy quilting!