
If you’re looking to add a whimsical touch to your Halloween sewing projects, this Scrappy Witch’s Hat Tutorial – Quilt Pattern is exactly what you need. Whether you’re a seasoned quilter or just starting out, this charming pattern offers a creative way to use up your favorite fabric scraps while celebrating spooky season in style. The beauty of a “scrappy” quilt block is in the freedom it gives you—there are no wrong color combinations, only magical possibilities.
This Scrappy Witch’s Hat Tutorial – Quilt Pattern is perfect for adding to a wall hanging, table runner, or even turning into a mini quilt. It’s a quick make, ideal for a weekend project, and can easily be customized to suit your color preferences or seasonal palette. Plus, it’s beginner-friendly while still being enjoyable for advanced quilters.
Throughout this guide, you’ll learn how to create a fun witch hat block using scrap fabric, basic patchwork techniques, and some quilting magic. Let’s dive into this festive project and bring a little enchantment to your sewing table!
1. Gathering Materials for the Scrappy Witch’s Hat Quilt Pattern
Before beginning the Scrappy Witch’s Hat Tutorial – Quilt Pattern, make sure you have all the essential tools and materials. Preparing in advance sets the tone for a smooth and enjoyable quilting experience.
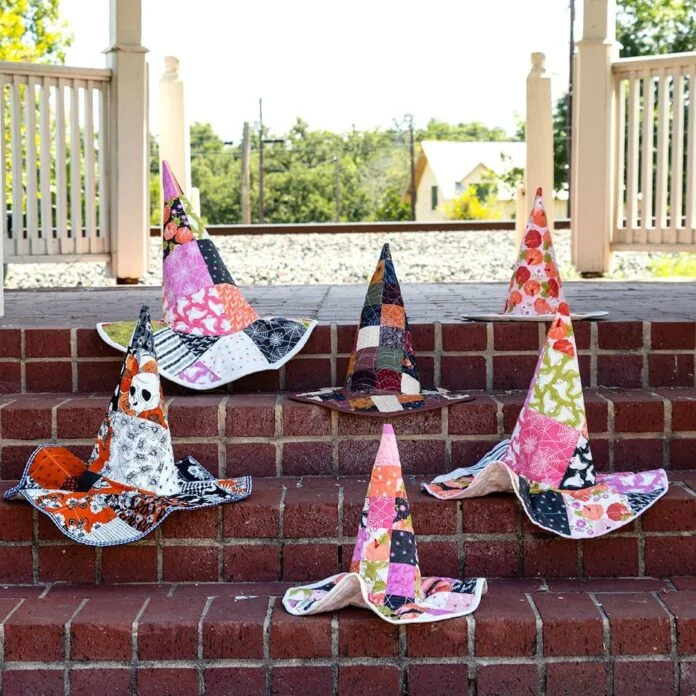
Start by collecting a variety of fabric scraps. The witch’s hat block is the perfect project for those leftover pieces that are too precious to throw away but not large enough for bigger projects. Look for Halloween-themed prints or go wild with colors like purple, green, black, and orange.
You’ll also need basic quilting supplies: a rotary cutter, cutting mat, quilting ruler, thread, and a sewing machine. Make sure your machine is clean and oiled so you don’t run into stitching issues during the process.
For the background of the block, choose a contrasting solid or subtle print that makes the Scrappy Witch’s Hat Quilt Pattern pop. Light grays, creams, or even a spooky black-and-white print can work beautifully.
Consider using lightweight fusible interfacing if you’re working with very lightweight fabric scraps. It’ll help stabilize your pieces and make your block crisp and flat.
Lastly, press your fabrics before you begin. Wrinkle-free fabric ensures accurate cutting and piecing, which is especially important when using scraps of various sizes and textures.
2. Cutting and Assembling the Witch’s Hat Pieces
With your materials ready, it’s time to begin cutting the fabric for your Scrappy Witch’s Hat Quilt Pattern. The key to scrappy designs is embracing the irregularities while still maintaining a coherent layout.
Begin by cutting rectangles and squares from your scrap fabrics. Try to maintain similar widths (e.g., 2″ or 2.5″) for consistency, but allow length variation to enhance the scrappy feel. Aim for enough pieces to stack and build the cone of the hat.
Lay out your pieces in a triangle shape to form the witch’s hat. Start wide at the bottom and gradually narrow the strip lengths as you go upward. This layering gives the visual illusion of a tall, tapered hat.
Once you’re satisfied with the layout, sew the pieces together row by row, pressing the seams to one side as you go. Nesting the seams will help your patchwork lie flat and keep your block tidy.
Next, cut the brim of the hat. This can be a bold solid strip or another fun print. Align the brim horizontally under your triangle and sew it in place.
Trim the sides of the cone block so you end up with a clean triangle on top and the brim perfectly aligned at the base. This block should now resemble a festive witch’s hat!
Finally, add background pieces around your hat to square up the block. These borders help give structure and let you enlarge or adjust the block’s size as needed.
3. Stitching the Block and Adding Finishing Touches
Now that the Scrappy Witch’s Hat Tutorial – Quilt Pattern has taken shape, it’s time to stitch everything together securely and prep your block for quilting.
Join all your pieces using a consistent 1/4″ seam allowance. This is a standard quilting seam and will help maintain the block’s proportions during final assembly.
Give the block a thorough press, focusing on the seams. Use a little steam or a pressing spray to set the seams and flatten bulky areas. This makes your witch’s hat look polished and professionally done.
If you want to enhance the scrappy charm, consider topstitching along the brim or outline of the hat with a contrasting thread. Decorative stitches can add a handmade feel that’s both fun and functional.
Add embellishments like buttons, tiny bows, or even stitched stars if you’re turning this block into a wall hanging or decorative pillow. Just ensure these additions are securely attached if the quilt will be used or washed frequently.
To finish the quilt block into a mini project, sandwich it with batting and backing, then quilt as desired. Straight-line quilting or free-motion swirls both look lovely with this design.
Finally, bind the edges or turn the block into a pillow cover, placemat, or panel. This step completes your project and makes the block usable in multiple creative ways.
4. Creative Ways to Use Your Scrappy Witch’s Hat Block
After completing your Scrappy Witch’s Hat Tutorial – Quilt Pattern, you may wonder how best to display or incorporate your block. The options are endless, and your creativity is the only limit!
Turn your block into a mini wall quilt for Halloween. Add a hanging sleeve on the back and display it near your entryway or in a kid’s room for seasonal flair.
Make a set of matching blocks and assemble them into a festive table runner. Alternate the witch’s hats with pumpkin or star blocks for a fun and varied Halloween look.
If you’re making a full Halloween quilt, use the witch’s hat blocks as feature elements mixed in with patchwork filler blocks, spiders, bats, or candy motifs. It adds storytelling and personality to your quilt.
Transform your block into a quilted pillow cover. Use envelope backing or a zipper closure so you can change it out with the seasons. Add some orange piping or pom-poms for extra charm.
Create a spooky trick-or-treat tote bag. Use the block as the focal panel, and add handles and a lining. Kids will love the playful design and the scrappy aesthetic.
Gift your block as part of a quilt swap or block exchange. Personalized scrappy quilt blocks are always appreciated, especially during the holiday season when handmade crafts mean so much.
FAQ: Scrappy Witch’s Hat Quilt Pattern
Q: What size is the finished Scrappy Witch’s Hat quilt block?
A: The finished block typically measures around 12” x 12”, but this can vary depending on your layout and border choices.
Q: Can I use pre-cuts like charm packs or jelly rolls for this pattern?
A: Yes! Pre-cuts like 2.5″ strips (jelly rolls) are perfect for this project and make cutting even easier. They also provide beautiful fabric variety.
Q: Is this pattern suitable for beginners?
A: Absolutely. The Scrappy Witch’s Hat Tutorial – Quilt Pattern is designed to be beginner-friendly, with simple shapes and straight-line piecing.
Q: What kind of fabric works best for a scrappy witch hat block?
A: Cotton quilting fabric is ideal. You can use Halloween-themed prints, batiks, or even low-volume scraps to make the design pop.
Q: How do I keep my scrappy blocks from looking too messy or chaotic?
A: Stick to a limited color palette or theme. Using consistent background fabric and strip widths also helps the block look cohesive.
Q: Can I scale the block to make it larger or smaller?
A: Yes, you can adjust the size by changing the width of your strips and the size of your background squares or borders. The design is very flexible.
The Scrappy Witch’s Hat Tutorial – Quilt Pattern is a delightful project that brings together creativity, color, and a little bit of Halloween mischief. Whether you use it for a mini quilt, pillow, bag, or table runner, this scrappy block is bound to become a seasonal favorite in your handmade collection.
We’ve explored how to gather your materials, piece together your witch’s hat, sew the block with precision, and even brainstormed some creative ways to use it. The best part? You likely already have the fabric needed in your scrap bin!
If you enjoyed this tutorial, I’d love to hear your thoughts. Leave a comment with your honest opinion or suggestions on how you’d personalize your own Scrappy Witch’s Hat Quilt Pattern. Happy quilting and have a magical time crafting your spooky masterpiece!