
The Magical Moons Wall Art Quilt Pattern is more than just a beautiful quilting design — it’s a mystical experience that transforms any space with creativity and intention. Whether you’re an experienced quilter or just beginning your journey, this pattern invites you to explore celestial beauty through fabric, stitches, and imagination.
Creating a quilt based on the Magical Moons Wall Art Quilt Pattern means crafting a piece that tells a story. Each curve of the moon, each patch of fabric, and each chosen color reflects not only artistic skill but personal emotion and meaning. It’s an enchanting way to express your love for the stars, the phases of the moon, and the magic they represent.
In this article, you’ll learn all about how to create your own wall quilt with the Magical Moons Wall Art Quilt Pattern. We’ll walk through ideas for fabric selection, layout suggestions, sewing tips, and finishing touches. Let your creativity take flight and let the moonlight guide your hands as we dive into this one-of-a-kind celestial quilt project.
1. Choosing Fabrics for Your Magical Moons Wall Art Quilt Pattern
Selecting the right fabrics is key to bringing the Magical Moons Wall Art Quilt Pattern to life. The moon, after all, shines brightest when surrounded by contrast and subtle shadows. Choose fabrics that reflect the mystery of the night sky — think deep blues, rich purples, silvery grays, and soft whites.
When using batik or hand-dyed fabric, you can give your quilt an ethereal feel. These materials often feature organic patterns that mimic the craters and textures of the moon. They also blend beautifully, adding depth and dimension to each block of your Magical Moons Wall Art Quilt Pattern.
For a cohesive look, select a single color palette and vary the shades within it. You can go bold with metallic prints or keep it soft with muted tones. This flexibility is what makes the Magical Moons Wall Art Quilt Pattern so adaptable to your personal style and décor preferences.
Don’t forget your background fabric — this is what will frame the moons. Consider darker tones like charcoal or navy to help the moons truly glow. A subtle print that resembles stars or clouds can further enhance the celestial theme of your wall art.
Also think about texture. Adding fabrics like velvet, flannel, or linen can give different tactile experiences to the quilt, creating visual and physical interest in the finished piece.
Finally, remember that quilting is an art form. Don’t feel constrained by traditional color schemes. The Magical Moons Wall Art Quilt Pattern invites you to dream and explore — follow your intuition when choosing what feels magical to you.
2. Designing the Layout of Your Magical Moons Wall Art Quilt
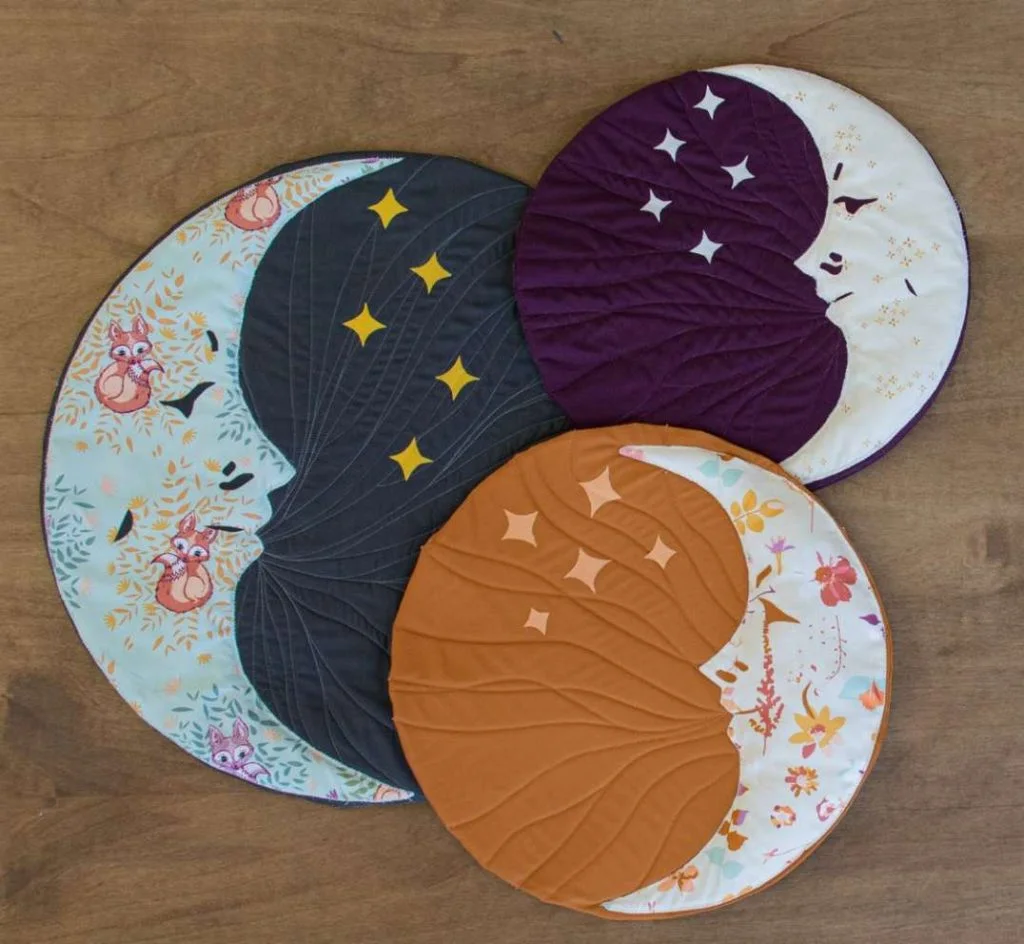
With your fabrics selected, it’s time to plan your layout. The Magical Moons Wall Art Quilt Pattern typically features the moon in various phases — full, crescent, half — arranged in a visually harmonious sequence. You can follow a linear progression or get creative with a spiral, pyramid, or scattered layout.
Start by laying out your moon shapes on a design board or floor space. Move them around until the composition feels balanced. Think of this as your moon dance — a play between symmetry and whimsy that defines the overall feeling of the quilt.
Try alternating the size of the moons to add movement and flow. For instance, start with a large full moon at the center and taper outwards to smaller crescent shapes. This draws the eye and adds a dynamic visual rhythm to your Magical Moons Wall Art Quilt Pattern.
Spacing is equally important. Too close, and the quilt may feel crowded. Too far apart, and the moons might lose their unity. Test different distances until the balance feels just right. Use chalk or masking tape to mark your placements before you begin stitching.
Some quilters choose to add stars, planets, or constellations using appliqué or embroidery techniques. These elements can enhance the narrative quality of your Magical Moons Wall Art Quilt Pattern, making it a truly personalized piece.
Don’t forget to consider the final size of your wall hanging. Whether small and minimalist or large and dramatic, the layout should match the space where it will hang. Measure carefully and take your wall color into account when making final layout decisions.
Ultimately, the goal is to create a design that speaks to you. The Magical Moons Wall Art Quilt Pattern is meant to be as fluid and enchanting as the night sky itself — there are no limits to what you can create.
3. Sewing and Assembling Your Magical Moons Wall Art Quilt Pattern
Now comes the exciting part — bringing your layout to life with needle and thread. The Magical Moons Wall Art Quilt Pattern can be created using either appliqué or piecing techniques, depending on your preferred style and skill level.
If you choose appliqué, begin by tracing your moon shapes onto fusible web and ironing them onto your fabric. Cut them out carefully, peel off the backing, and position them on your background. Fuse them into place and secure them with a satin stitch, zigzag, or decorative border stitch.
Piecing is a bit more advanced but offers a seamless look. Use curved templates and precision stitching to build each moon shape. This method gives a clean, tailored finish to your Magical Moons Wall Art Quilt Pattern, though it requires more patience and skill.
Be sure to press your seams regularly as you sew. A well-pressed block not only looks better but also ensures accuracy and alignment throughout the quilt.
Use coordinating thread colors for each moon to keep the stitching discreet. Alternatively, metallic or contrasting threads can add a shimmering, magical quality that catches the light — perfect for enhancing the celestial theme.
Once all blocks are complete, join them using your chosen layout. Add sashing or borders if desired, then sandwich your quilt top with batting and backing. Pin or baste everything in place to prevent shifting during quilting.
Now it’s time to quilt! Simple stitch-in-the-ditch techniques work well, or you can go bolder with free-motion designs like swirling galaxies, lunar textures, or constellations to elevate the Magical Moons Wall Art Quilt Pattern.
4. Finishing and Displaying Your Magical Moons Wall Art Quilt
Finishing touches make all the difference. After quilting, trim any excess batting and square up the edges of your Magical Moons Wall Art Quilt Pattern for a professional appearance. Then choose a binding that complements your fabrics without distracting from the moons.
For wall art, you’ll want to add a hanging sleeve to the back. This allows you to display your piece securely and beautifully on any wall. Simply sew a fabric tube across the top back of the quilt and slide in a rod or dowel.
Consider signing your quilt with a custom label or even stitching your name and date into a corner. This adds a personal, artistic touch that turns your wall quilt into a timeless keepsake.
When displaying the quilt, choose a spot with soft lighting. Natural daylight or warm LED lights will help highlight the colors and textures of your Magical Moons Wall Art Quilt Pattern, showcasing your craftsmanship.
Dust your quilt gently from time to time to maintain its beauty. Avoid direct sunlight, which can fade the fabrics over time. If needed, lightly steam it while hanging to remove any creases from storage or shipping.
Your finished quilt isn’t just decoration — it’s a symbol of your creativity, patience, and inspiration. Let it hang where it can spark wonder in your everyday life, reminding you of the beauty of the moon and the joy of quilting.
Magical Moons Wall Art Quilt Pattern
What is the best fabric to use for the Magical Moons Wall Art Quilt Pattern?
High-quality cotton is ideal for this project. Batiks, metallic prints, or hand-dyed fabrics also work wonderfully to give a moonlit effect.
Is the Magical Moons Wall Art Quilt Pattern suitable for beginners?
Yes! While curved piecing can be tricky, beginners can use the appliqué method for easier assembly and still get beautiful results.
Can I customize the moon shapes and sizes?
Absolutely. The Magical Moons Wall Art Quilt Pattern is highly flexible, allowing for variation in size, phase, and placement of each moon.
What size should my finished quilt be?
That depends on your wall space. Many quilters make their wall quilts between 24″ x 36″ and 36″ x 48″, but you can go smaller or larger as desired.
How do I hang the quilt on a wall?
Sew a hanging sleeve onto the back of the quilt and use a wooden dowel or curtain rod to hang it evenly and securely.
Can I add other celestial elements to the quilt design?
Yes! You can add stars, planets, or constellations with embroidery or additional appliqué to enhance the magical theme of your quilt.
The Magical Moons Wall Art Quilt Pattern offers a beautiful and meaningful way to explore creativity through fabric. From choosing fabrics and designing your layout to assembling and finishing your quilt, this pattern gives you the freedom to express your inner artist. Whether you follow the moon’s natural phases or create a cosmic dreamscape of your own, your wall quilt will surely be a cherished masterpiece.
If you’ve enjoyed this tutorial, please consider sharing your thoughts in the comments. I’d love to hear your experiences, questions, and suggestions for future quilting projects. Let’s continue creating beautiful things under the light of the moon!