
If you’re looking for the perfect Easy Glasses Case for Beginner Quilt Pattern, you’re in the right place! Whether you’re just starting your quilting journey or simply want a quick and rewarding project, this guide will walk you through creating a charming quilted glasses case that’s both functional and stylish. With simple techniques and easy-to-follow instructions, this project is ideal for practicing basic quilting skills while producing something beautiful and practical.
This Easy Glasses Case for Beginner Quilt Pattern doesn’t require complicated tools or advanced sewing knowledge. It’s a delightful choice for those who love to create handmade gifts or want to add a personal touch to their daily essentials. Plus, it uses only small amounts of fabric, which makes it perfect for using up those leftover scraps from previous quilting projects.
Throughout this article, we’ll break down everything you need to know: from fabric selection to quilting methods, assembly, and finishing touches. We’ll guide you with helpful tips and explanations using humanized language to ensure even absolute beginners feel confident from start to finish. Let’s get started with this enjoyable and beginner-friendly project!
1. Choosing Fabrics and Materials
One of the joys of working with an Easy Glasses Case for Beginner Quilt Pattern is how flexible it can be in terms of materials. You don’t need much to get started, and the best part is you can often use scraps from your fabric stash.
Choose two to three coordinating cotton fabrics—one for the outer layer, one for the lining, and one optional accent. Since this is a small project, bold prints or solids can both work beautifully. Look for soft cotton that is easy to handle and forgiving when sewing.
You’ll also need batting to give the case its padded, protective feel. Lightweight cotton or polyester batting is ideal. Avoid heavy or stiff materials that might make turning the project inside out more difficult.
Don’t forget some basic tools: a rotary cutter or fabric scissors, a quilting ruler, pins or clips, thread to match your fabric, and a sewing machine. You can hand sew if you wish, but machine stitching will speed things up and offer more durability.
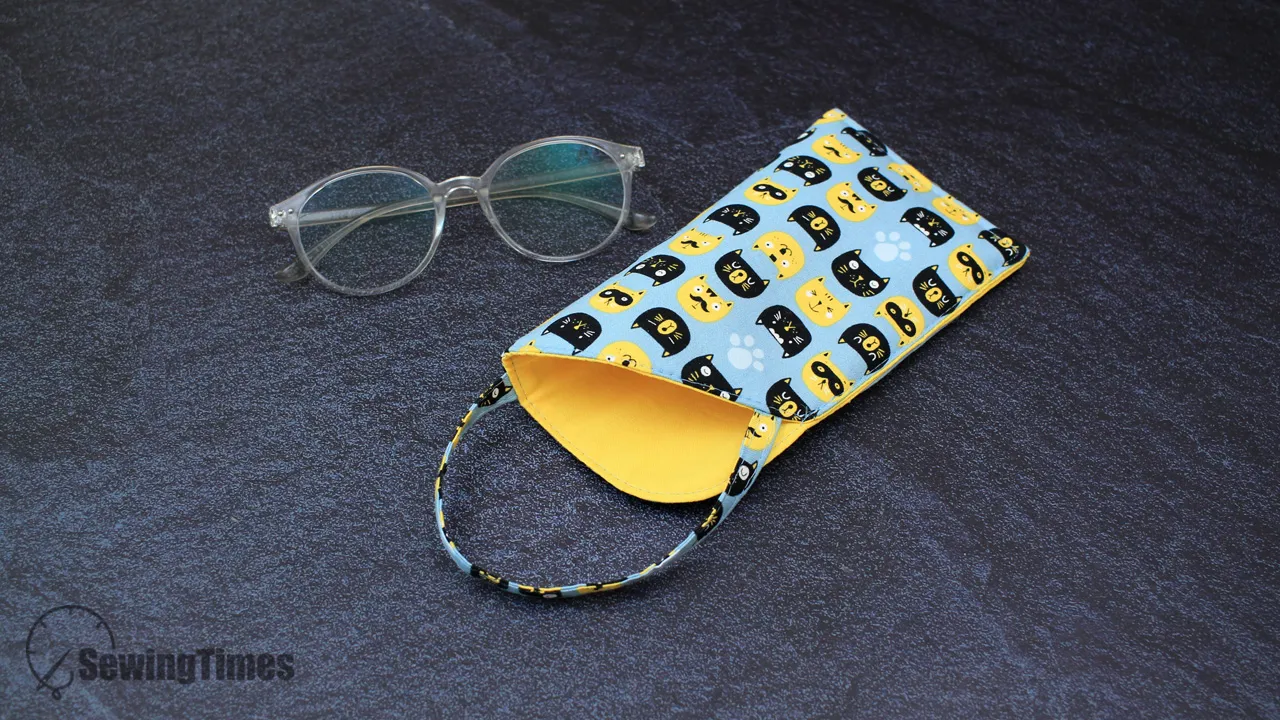
Optional items like a snap button, Velcro, or a magnetic clasp can be used to secure your glasses case. If you’re going for a super simple look, you can also leave the top open for a slip-in style. Either way, this Easy Glasses Case for Beginner Quilt Pattern allows for customization based on your preferences.
Lastly, prepare your iron. Pressing your fabric and seams is essential in quilting, even for small projects. A crisp press makes sewing smoother and ensures your final piece looks clean and professional.
2. Cutting and Preparing the Quilt Layers
With your materials ready, it’s time to move into preparation. Cutting your fabric correctly is a vital step in creating a successful Easy Glasses Case for Beginner Quilt Pattern.
Start by cutting your fabric and batting into rectangles. A good size to begin with is 8 inches by 5 inches. You’ll need two fabric rectangles (outer and lining) and one piece of batting for each side—so a total of four fabric pieces and two batting pieces.
Once cut, layer each fabric piece with batting. Place the outer fabric right side up, lay the batting on the wrong side, and press gently to hold them together. You can also use a few pins or quilting spray adhesive to keep them from shifting while sewing.
To add quilting to your case, mark diagonal lines across the fabric with a fabric-safe marking pen or chalk. These lines will act as guides to quilt simple patterns. For beginners, straight lines are a great choice—they’re easy to sew and look clean.
Now, sew along the marked lines using a straight stitch. This step gives the glasses case its quilted texture and adds structure. Repeat the process for both outer panels. Once quilted, trim any frayed edges or loose threads.
If you want to add a decorative touch, now is the time to sew on a fabric strip or lace across the top edge of the outer panels. This is completely optional but adds a lovely finish. Small additions like this help personalize your Easy Glasses Case for Beginner Quilt Pattern.
Remember to press everything again before assembly. Pressed pieces are easier to work with and result in more accurate seams. With all your parts ready and quilted, you’re now set to move on to assembly.
3. Assembling the Glasses Case
Assembling your Easy Glasses Case for Beginner Quilt Pattern is a satisfying process that brings all your pieces together. This is the moment when your project starts to really look like a case!
Begin by placing the two quilted outer panels right sides together. Align the edges and pin or clip around the sides and bottom, leaving the top open. Sew along the edges using a ¼-inch seam allowance. Backstitch at the beginning and end to secure.
Do the same for the lining pieces: place right sides together, sew the sides and bottom, but leave a 2-inch gap in the bottom seam. This gap is essential—it’s how you’ll turn the project right side out later on.
Now, turn the outer case right side out and tuck it inside the lining so that the right sides are touching. Align the top edges and pin them together carefully. Make sure the seams match for a cleaner finish.
Sew all the way around the top edge. This connects the lining and the outer case together. Use a slow and steady pace, especially around corners, to keep the line smooth.
Next, pull the case through the gap you left in the lining. Push everything out gently, including corners, and then sew the opening in the lining closed by hand or with a small machine stitch.
Tuck the lining into the outer case, give it a good press, and topstitch around the upper edge. This adds durability and gives a polished look. Your Easy Glasses Case for Beginner Quilt Pattern is almost complete!
4. Finishing Touches and Personalization
Now that your case is fully assembled, it’s time to add those special finishing touches that make your Easy Glasses Case for Beginner Quilt Pattern unique and functional.
If you want your case to close securely, you can add a button with an elastic loop, a magnetic snap, or Velcro. Sew the closure in place carefully, making sure everything is centered and secure.
Want to personalize it even more? Add an embroidered name, an applique shape like a heart or star, or even a small patch. These elements turn your project into a perfect handmade gift.
You can also explore using different quilt blocks on the front, even simple ones like log cabin or rail fence. While slightly more advanced, these can still work for beginners and add extra flair to your project.
If you’re making multiple cases, consider creating a batch using different fabrics for variety. These make great stocking stuffers, birthday presents, or items to sell at craft fairs.
Another fun idea is to add a key ring loop to one side so you can attach your glasses case to your bag. This small addition increases the practicality of your Easy Glasses Case for Beginner Quilt Pattern.
Don’t forget to admire your finished work. Creating something useful and beautiful with your own hands is rewarding, and you’ve just completed a full quilting project from start to finish. Congratulations!
FAQ – Easy Glasses Case for Beginner Quilt Pattern
Q: Can I hand sew this project instead of using a sewing machine?
A: Yes, absolutely. While a machine makes the process faster, hand stitching is possible. Just use small, consistent stitches to ensure strength and durability.
Q: What type of batting is best for a quilted glasses case?
A: Lightweight cotton or polyester batting is best. It offers softness and protection without being too bulky, which is perfect for this small project.
Q: How do I make sure my seams are straight?
A: Use a quilting ruler and fabric marker to guide your stitching lines. Pressing your fabric well and working slowly also helps with accuracy.
Q: Can I wash my glasses case?
A: Yes, if all your materials are washable. Use cold water and gentle detergent. Air dry for best results to maintain its shape.
Q: What are good dimensions for glasses of different sizes?
A: For most standard glasses, 8″ x 5″ fabric rectangles work well. For larger sunglasses, you might want to increase the width to 6″.
Q: Is this project suitable for children or teens learning to sew?
A: Definitely. This Easy Glasses Case for Beginner Quilt Pattern is a great introductory project for young sewists under supervision, thanks to its simplicity and short completion time.
Creating an Easy Glasses Case for Beginner Quilt Pattern is a fun and fulfilling sewing experience. You’ve learned how to select materials, cut and quilt your fabric, assemble your project, and add finishing touches that make your case truly yours. Whether you’re sewing for yourself, a friend, or just for practice, this pattern is an excellent introduction to the world of quilting.
We hope this tutorial gave you the confidence to start your sewing journey and the inspiration to keep creating. If you followed along and made your own case, we’d love to hear about your experience. Please leave a sincere comment below and feel free to share suggestions or questions to help us improve our tutorials. Happy quilting