
If you’re looking to master a new and beautiful stitch technique, learning how to crochet the tulip stitch: a complete step-by-step guide crochet pattern is the perfect place to start. This decorative stitch is ideal for creating vibrant, floral-inspired textures in your crochet work. Whether you’re designing blankets, scarves, dishcloths, or even garments, the tulip stitch brings elegance and a pop of color to every project.
The tulip stitch is visually appealing and surprisingly easy once you understand the basic steps. It creates the illusion of blooming tulips nestled in rows, making your fabric come to life. Using simple combinations of double crochet, chain spaces, and cluster stitches, this pattern results in a lacy, openwork texture that feels light and airy.
This detailed tutorial will guide you through how to crochet the tulip stitch: a complete step-by-step guide crochet pattern from beginning to end. Whether you’re a beginner eager to try something new or an advanced crocheter looking to refresh your skills, this guide provides all the tips, techniques, and encouragement you need to succeed.
1. Understanding the Tulip Stitch Structure
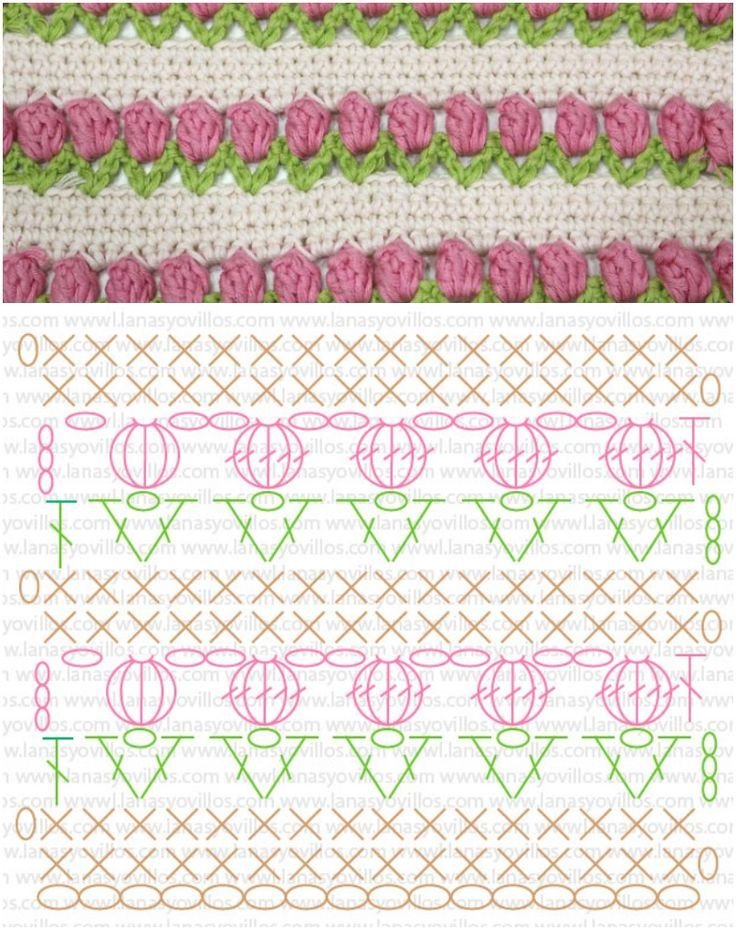
To begin how to crochet the tulip stitch: a complete step-by-step guide, it’s essential to understand how the stitch is formed. The tulip stitch is created by pairing double crochets and chain stitches in such a way that it forms clusters resembling flower petals.
This stitch requires working in multiples of four plus three. That means your starting chain must be divisible by four, and then you add three more chains. This ensures your pattern lines up evenly and maintains the flower shape throughout your work.
The base row typically begins with a series of double crochets to form a strong foundation. Once this row is established, the tulip petals begin to bloom in the next rows using carefully placed stitch combinations.
You’ll be creating chain spaces where future tulips will be planted. These act like small flower beds in your pattern, and you’ll later work tulip shapes into those spaces using stitches like treble crochet or puff stitch for added dimension.
It’s important to keep a consistent tension while working the stitch to ensure the flowers look uniform. Loose or tight stitches can make the petals look uneven or distort the openwork effect.
Once you’ve practiced a few rows, the pattern becomes rhythmic and enjoyable. Many crocheters find working this stitch relaxing and rewarding as the tulips begin to “grow” row after row.
2. Materials and Tools You’ll Need
Before diving into how to crochet the tulip stitch: a complete step-by-step guide crochet pattern, make sure you have the right materials on hand. The stitch looks best with yarn that highlights texture and stitch definition.
Choose a soft, smooth yarn in a worsted or DK weight. These yarns are versatile and show off the tulip design clearly. For a more colorful result, use multiple yarn shades: green for stems and a bright color for the flowers.
A 4.0 mm to 5.5 mm crochet hook works well with most medium-weight yarns. Check your yarn label for recommendations, but adjust based on your natural tension. A smaller hook gives a tighter fabric, while a larger one creates more drape.
Don’t forget to have a pair of sharp scissors, a tapestry needle for weaving in ends, and stitch markers if you need help keeping track of your rows or clusters.
If you’re working from a pattern, print it out or keep it accessible. You might also want to practice the stitch using scrap yarn before starting your actual project.
Consider using cotton yarn if you’re making items like dishcloths or bags, and acrylic or wool for garments or blankets. The tulip stitch works beautifully in all kinds of fibers as long as the texture remains visible.
Having your materials ready before you start allows for an uninterrupted flow and more enjoyable crocheting experience.
3. Step-by-Step Instructions for the Tulip Stitch
Now we’ll explore the actual steps for how to crochet the tulip stitch: a complete step-by-step guide crochet pattern. This stitch involves repeating rows that build on each other to create the flower-like design.
Start by chaining a multiple of 4 plus 3. For example, chain 27 (24 + 3). This will give you a good sample swatch to practice the stitch.
Row 1: Work 1 double crochet into the 4th chain from your hook. Continue making double crochets across the row. You should end with a double crochet in each chain, forming a strong base row.
Row 2: Chain 3 (counts as first double crochet), skip the next stitch, and work 1 double crochet, chain 2, and 1 double crochet all into the next stitch. This forms your first “V” shape, where the tulip will go later. Skip two stitches and repeat this V-stitch sequence across the row.
Row 3: This is where the tulip begins to bloom. Chain 3, then work 3 double crochets into the chain-2 space of each V-stitch below. These three double crochets form the petals of your tulip. Skip the next V and repeat across.
Row 4: To add more tulips, chain 3, and work a V-stitch in the center stitch of each tulip from the previous row. This builds new spaces for more flowers in the following rows.
Repeat rows 3 and 4 to continue the pattern. The tulips will stack and alternate, creating a lush, floral fabric.
Don’t forget to weave in ends securely and block your finished piece if needed. This will enhance the stitch pattern and give your project a professional finish.
4. Project Ideas Using the Tulip Stitch
Now that you’ve mastered how to crochet the tulip stitch: a complete step-by-step guide crochet pattern, it’s time to put your new skills into action. This versatile stitch can be used in countless creative ways.
One of the most popular uses for the tulip stitch is in lightweight baby blankets or throws. The floral texture makes the blanket look playful and elegant, ideal for nurseries or as a handmade gift.
You can also create stunning shawls and scarves using gradient yarns or spring-themed colors. The open spaces in the stitch give the fabric breathability, making it perfect for warmer months.
Home decor items like pillow covers, table runners, or valances benefit from the tulip stitch as well. It adds charm and a cottage-inspired feel to any room, especially when paired with natural fibers.
Smaller projects like dishcloths, pot holders, or mug cozies also look adorable in the tulip stitch. These are great practice pieces if you’re still getting used to the pattern.
For those who enjoy wearables, tulip stitch cardigans or summer tops are a unique way to incorporate the design into fashion. Use lightweight yarns like cotton or bamboo blends for a breezy fit.
Lastly, if you’re into crafting gifts or selling handmade items, bags made with the tulip stitch are a great option. Lined or unlined, these bags hold their shape well and catch the eye with their lovely floral pattern.
How to Crochet the Tulip Stitch
Q1: Is the tulip stitch hard for beginners to learn?
A: Not at all! While it may look complex, how to crochet the tulip stitch: a complete step-by-step guide is approachable with basic crochet skills like double crochet and chain stitches.
Q2: What type of yarn works best for the tulip stitch?
A: Soft, smooth yarns in worsted or DK weight work beautifully. Choose cotton for crisp stitch definition or acrylic for a softer finish.
Q3: Can I use the tulip stitch for garments?
A: Absolutely. The tulip stitch is excellent for summer tops, light sweaters, or shawls. Just be sure to swatch and adjust your gauge.
Q4: How do I keep the flowers aligned in my project?
A: Maintaining a consistent stitch count and tension is key. Use stitch markers and double-check your math when chaining and skipping stitches.
Q5: Does this stitch use a lot of yarn?
A: Not necessarily. It’s fairly lightweight and open, so it may actually use less yarn than denser patterns like popcorn or bobble stitches.
Q6: Can I combine the tulip stitch with other crochet stitches?
A: Yes! You can blend it with rows of single or half-double crochet for texture changes or to frame your tulips in a different way.
Learning how to crochet the tulip stitch: a complete step-by-step guide crochet pattern opens the door to an array of beautiful, handmade creations. With its graceful appearance and adaptable nature, the tulip stitch is both practical and decorative. Whether you’re crocheting for personal joy, gifting, or selling, this stitch adds a special floral touch that everyone will admire.
We hope this comprehensive guide gave you the clarity and confidence to start your tulip stitch journey. Now it’s your turn to get creative—pick your favorite yarn, grab your hook, and enjoy the relaxing process of stitching row by row. We’d love to hear from you! Please leave a sincere comment with your thoughts, questions, or suggestions for future tutorials. Your feedback helps build a warm and welcoming community for crochet lovers around the world.