
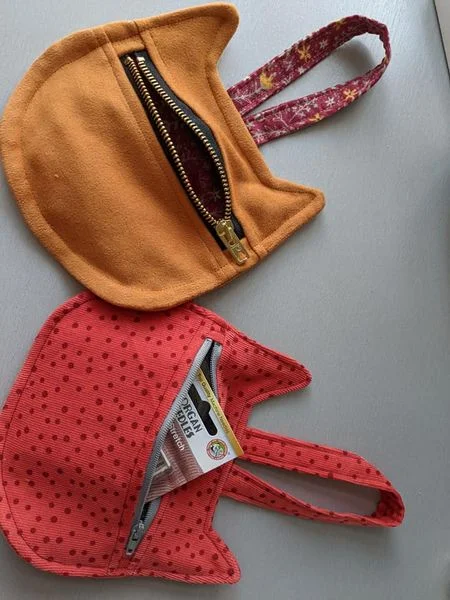
If you’re looking for a free sewing pattern for kitty bag, you’re in for a treat! This delightful project blends creativity, practicality, and charm—perfect for cat lovers, sewing beginners, and quilting enthusiasts alike. Not only is it adorable, but this quilt pattern is also surprisingly easy to follow and incredibly rewarding to complete.
The appeal of a free sewing pattern for kitty bag lies in its versatility. Whether you’re gifting it to a fellow feline fanatic, using it as a quirky purse, or turning it into a child’s favorite tote, the design is flexible and fully customizable. With some basic fabric scraps, batting, and simple tools, you can create a handmade bag that reflects your personal style.
Throughout this tutorial, we’ll guide you through every step of the process, using the quilt pattern structure to help reinforce the bag’s shape while offering that cozy, padded look. So, grab your sewing machine, gather your fabric, and let’s dive into the world of stitching up your own unique kitty bag!
1. Choosing Materials for Your Kitty Bag
When starting any project that uses a free sewing pattern for kitty bag, the fabric selection is one of the most exciting parts. It sets the tone and personality of your final piece.
You can use quilting cotton for both the outer and inner layers of your kitty bag. It’s lightweight yet durable enough to hold up to everyday use. Choose playful prints with cats, paws, or neutral solids to highlight the quilted design.
The batting or interfacing plays an essential role in giving the quilt pattern that cushioned, structured feel. Use a medium-weight fusible batting to make the bag feel plush without being bulky.
You’ll also need basic tools such as scissors or a rotary cutter, pins, clips, a sewing machine, and coordinating thread. Don’t forget fabric marking pens—they’ll help you trace and align the quilt pieces accurately.
Optional details such as buttons for the eyes, a snap closure, or a zipper pocket can give your kitty bag both function and flair. Feel free to get creative with embellishments like bows or embroidery.
Lining fabric is important too. Choose something smooth and easy to clean on the inside—this will make your free sewing pattern for kitty bag not only pretty but practical.
2. Cutting and Quilting the Fabric Pieces
The first step in this quilt pattern involves cutting your fabric based on a simple kitty silhouette. Think rounded ears, a rounded body, and space for a cute face.
Trace the main kitty shape onto the fabric and batting layers using a fabric marker. Cut carefully along the outlines, ensuring all layers align. For beginners, a paper template can help keep shapes consistent.
Now it’s time to quilt! Sandwich the batting between the outer and inner fabric layers. Use quilting pins or clips to hold the layers together. You can do straight-line quilting or even echo quilting around the shape of the cat.
Choose a quilting design that suits your fabric. For example, diagonal lines give a modern touch, while free-motion swirls or paw print designs enhance the feline charm.
After quilting, trim the edges to make sure everything is neat. The quilt pattern really begins to take shape here, and you’ll notice how the texture adds depth to the bag.
If you’d like, you can sew a small face on one side of the kitty. Use appliqué, embroidery, or safety eyes to give it personality. The more expressive the face, the more your kitty bag will stand out.
3. Assembling the Kitty Bag Body
Now that you’ve quilted the outer panels, it’s time to sew the free sewing pattern for kitty bag into a functioning shape. Lay the quilted pieces right sides together and pin around the edge.
Sew around the perimeter, leaving the top of the head open. Use a 1/4” seam allowance for clean, strong seams. Clip around the curves to allow smoother turning.
Turn the kitty shape right side out and press gently. You should now see the adorable outline of your cat bag. The quilted texture gives it that distinct handmade appeal.
Next, prepare the lining using the same kitty shape. Sew the lining pieces together, leaving a small opening at the bottom for turning later.
Insert the lining into the outer kitty shell, right sides together, and align the edges. Sew around the top edge (the opening of the bag). This will create a clean finish when turned.
Once stitched, turn the entire bag right side out through the opening in the lining. Sew the lining closed with an invisible ladder stitch or a topstitch, and press the top of the bag flat.
4. Adding Straps and Finishing Touches
A kitty bag isn’t complete without a way to carry it! You can make matching quilted handles or use premade straps—both work well with this free sewing pattern for kitty bag.
To make quilted handles, cut long strips of fabric and batting, quilt them, and sew them into sturdy tubes. Attach each end to the top corners of your bag using reinforced stitching.
Adjust the strap length based on how you plan to use the kitty bag. A short handle works well as a purse, while a long adjustable strap turns it into a crossbody bag.
Secure the straps with a box-and-cross stitch for added durability. You don’t want them coming loose when carrying your essentials.
If you prefer zippers, install one across the bag’s top edge before joining the lining. Alternatively, magnetic snaps offer an easy closure and maintain the handmade look.
Add charm with decorative elements like tassels, small bells, embroidered names, or iron-on patches. These details personalize your quilt pattern and turn your kitty bag into a one-of-a-kind treasure.
Lastly, give everything a good final press, and your kitty bag is ready to show off!
FAQ: Common Questions About the Free Sewing Pattern for Kitty Bag – Quilt Pattern
Q1: Is this kitty bag suitable for beginner sewists?
Yes! The free sewing pattern for kitty bag is perfect for beginners. It involves basic quilting and sewing techniques that are easy to learn and practice.
Q2: Can I resize the kitty bag?
Absolutely. The pattern is easily scalable. Just enlarge or reduce the printed template before cutting your fabric. A larger size works well for a tote, while a smaller one makes a great coin pouch.
Q3: What kind of batting is best for this quilt pattern?
A medium-weight fusible batting provides structure and softness. It’s ideal for small projects like this where you want a plush but manageable finish.
Q4: Can I use other fabrics besides quilting cotton?
Yes, but quilting cotton is the easiest to work with. If you’re more experienced, you can try canvas, denim, or even felt for a different texture.
Q5: How do I make the bag washable?
Choose machine-washable materials and pre-wash your fabric before sewing. Reinforce seams and use washable interfacing for durability.
Q6: Is it okay to sell the bags made with this pattern?
As long as the free sewing pattern for kitty bag is not copyrighted for personal use only, you may sell items made from it. Always double-check the pattern’s terms of use.
Creating a free sewing pattern for kitty bag using a quilt pattern approach is a fun, relaxing, and creative project that anyone can enjoy. From selecting adorable fabrics to quilting unique details and assembling the final piece, each step brings you closer to a handmade accessory filled with personality and charm.
We hope this tutorial has inspired you to try making your very own kitty bag. If you followed along, we’d love to hear your thoughts! Please leave your honest feedback and suggestions below so we can keep creating helpful, beginner-friendly tutorials for the sewing community.