
The Blockheads 5 – Group 2 | Block 7: Star Bloom quilt pattern is a delightful design that blends traditional block-making techniques with modern quilting aesthetics. For quilting enthusiasts, this block represents both a creative challenge and a rewarding opportunity to add a radiant star to your sampler quilt collection. Whether you’re a seasoned quilter or a beginner eager to try a fresh block, the Star Bloom design in Blockheads 5 – Group 2 is perfect for bringing texture and depth to your quilt project.
This specific block—Block 7: Star Bloom—has quickly become a favorite among the Blockheads 5 community. Its dynamic points and blooming star effect create a captivating visual that works beautifully with a variety of fabrics and color schemes. It serves as a versatile centerpiece or a stunning filler block, making it a must-have in your quilt pattern collection.
In this article, we’ll walk you through everything you need to know about the Blockheads 5 – Group 2 | Block 7: Star Bloom quilt pattern. From selecting your fabrics and preparing your tools to stitching the block and troubleshooting common issues, you’ll find a comprehensive guide to support your creative journey. Let’s dive into the structure, techniques, and beauty of the Star Bloom block.
1. Understanding the Structure of the Star Bloom Block
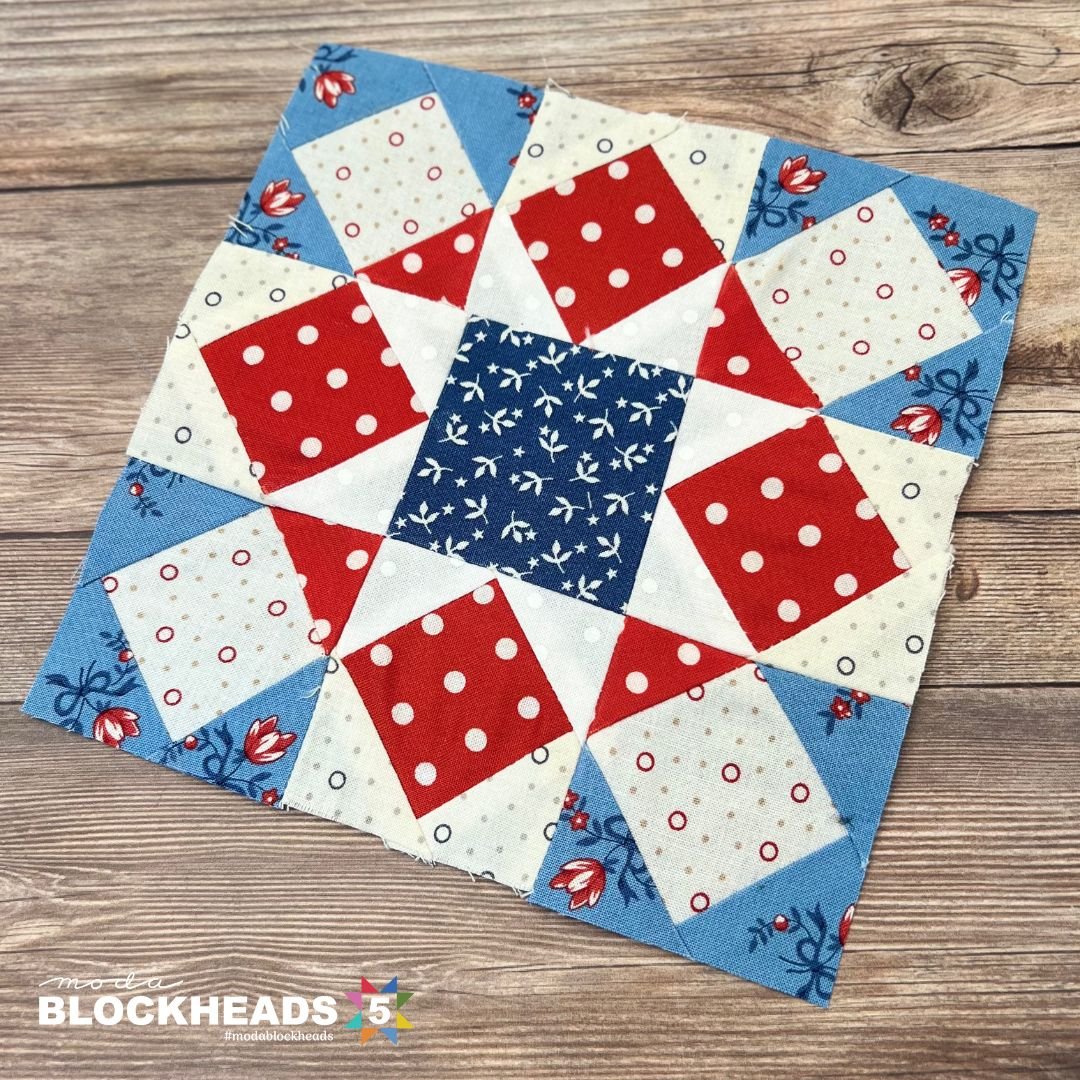
The structure of the Blockheads 5 – Group 2 | Block 7: Star Bloom block is what makes it stand out among other quilting blocks. At its core, it features a blooming star that radiates outward, giving the illusion of depth and movement.
This block typically uses half-square triangles (HSTs), flying geese, and square-in-a-square units. These classic quilting components come together in a symmetrical arrangement to form the blooming star motif.
One of the great aspects of this block is that it’s suitable for both scrappy quilts and color-coordinated compositions. It allows quilters to experiment with contrasting tones, subtle shades, or even bold prints to highlight the star’s petals.
When laying out the Star Bloom, pay close attention to directional prints and fabric placement. A small change in fabric positioning can dramatically shift the block’s visual impact.
Precision is key when assembling the star points and outer petals. Carefully trimming and pressing your units as you go will help maintain the block’s shape and overall alignment.
Even though the Blockheads 5 – Group 2 | Block 7: Star Bloom block looks complex, breaking it into manageable units simplifies the process and ensures a professional-looking finish.
2. Fabric Selection and Color Planning
Choosing the right fabrics for your Blockheads 5 – Group 2 | Block 7: Star Bloom quilt pattern is one of the most exciting parts of the process. This block shines with color contrast and thoughtful coordination.
To emphasize the “blooming” effect, consider using a gradient or ombré selection of fabrics. A deep center with lighter outer petals creates a blossoming visual that draws the eye outward.
If you prefer a scrappy look, dig into your stash and choose a variety of fabrics that still offer a good contrast between the star and background. This block offers a great opportunity to use up beautiful leftover pieces.
Solid fabrics or tone-on-tone prints help highlight the block’s structure, especially the sharp star points and angular units. High contrast between the background and star fabric is essential to make the pattern pop.
When planning for an entire quilt, consider repeating the Star Bloom block in different colorways to create a field of blooming stars across your quilt top.
Remember to pre-wash your fabrics if they’re likely to shrink or bleed, especially if you’re mixing bold reds, navies, or blacks with lighter tones.
3. Step-by-Step Piecing Instructions
The beauty of the Blockheads 5 – Group 2 | Block 7: Star Bloom quilt pattern lies in its precise construction. Begin by cutting all your fabrics according to the pattern’s measurements. Accurate cutting leads to smoother piecing later on.
Start with the half-square triangles. These are foundational units in the star and require clean 45-degree seams. Use a consistent seam allowance and press carefully to avoid distortion.
Next, assemble your flying geese units. Use the stitch-and-flip method for added accuracy. Press seams open or to the side based on your personal preference and how the units nest together.
The square-in-a-square unit forms the block’s center and sets the tone for the overall look. Pay close attention to aligning the corners and maintaining a true square.
After assembling all the units, lay them out in the final block arrangement before sewing rows together. This ensures that all your directional fabrics and points align correctly.
Join the rows using a consistent 1/4” seam allowance. Press the completed block flat and square it up if needed before incorporating it into your larger quilt layout.
4. Troubleshooting and Finishing Tips
Even experienced quilters may face challenges when working with the Blockheads 5 – Group 2 | Block 7: Star Bloom quilt pattern. The key is knowing how to troubleshoot and adjust as needed.
If your points aren’t aligning, double-check your seam allowance. A slightly wide or narrow seam can throw off the entire layout. Use a seam guide if necessary.
Uneven edges on your flying geese or square-in-a-square units? Be sure you’re trimming to the exact unfinished size after pressing. Accuracy at each stage prevents larger issues later.
Warped or stretched fabric can be caused by over-pressing or using steam. Try finger pressing or dry pressing with a warm—not hot—iron to maintain stability.
If your block size is slightly off, square up the final block carefully. Small deviations can be adjusted when sashing or joining blocks together.
To finish your block, consider stay-stitching around the edges with a scant seam to prevent fraying or distortion before assembling your full quilt top.
Finally, celebrate your finished Star Bloom block by sharing it with your quilting community or incorporating it into a pillow, wall hanging, or sampler quilt.
FAQ: Blockheads 5 – Group 2 | Block 7: Star Bloom Quilt Pattern
Q: What size is the finished Star Bloom block?
A: The standard size for Blockheads 5 – Group 2 | Block 7: Star Bloom is 9” or 12” finished, depending on the designer’s instructions. Always double-check the official pattern for exact dimensions.
Q: Can beginners try the Star Bloom block?
A: Yes! While it includes intermediate techniques like flying geese and HSTs, the block is very achievable with careful cutting and piecing. Take your time and practice individual units first if needed.
Q: What fabric types are best for this block?
A: Quilting cottons work best. They provide the structure needed for precise piecing and pressing. Avoid stretchy or loosely woven fabrics for this project.
Q: How many fabrics do I need for this block?
A: Typically, you’ll need at least three contrasting fabrics: one for the star, one for the background, and one accent or petal fabric. You can use more for a scrappy look.
Q: Can this block be used in an entire quilt?
A: Absolutely. Repeating the Star Bloom block across a quilt top with varying fabrics can create a stunning overall design. It’s also perfect for sampler quilts or as a focal block.
Q: How can I avoid losing my points when sewing blocks together?
A: Use a scant 1/4” seam and press carefully. When joining blocks, always pin precisely at the points and seams to preserve sharp edges.
The Blockheads 5 – Group 2 | Block 7: Star Bloom quilt pattern is a captivating and rewarding block that adds brilliance to any quilt project. With its dynamic design, classic construction techniques, and endless fabric possibilities, it offers something for quilters of all skill levels.
We’ve explored the structure of the Star Bloom block, fabric planning, step-by-step piecing, and common troubleshooting tips—all designed to help you succeed in your quilting journey. This block isn’t just another patchwork—it’s a blooming star waiting to shine in your handmade creation.
If this guide helped you understand the Blockheads 5 – Group 2 | Block 7: Star Bloom quilt pattern better, please share your thoughts! Your feedback and suggestions help keep our quilting community growing and inspired.